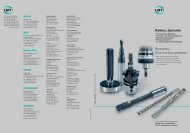
Kompetenzen und Referenzen der LMT LMT's competences and ...
Kompetenzen und Referenzen der LMT LMT's competences and ...
Kompetenzen und Referenzen der LMT LMT's competences and ...

Sie wollen auch ein ePaper? Erhöhen Sie die Reichweite Ihrer Titel.
YUMPU macht aus Druck-PDFs automatisch weboptimierte ePaper, die Google liebt.
148<br />
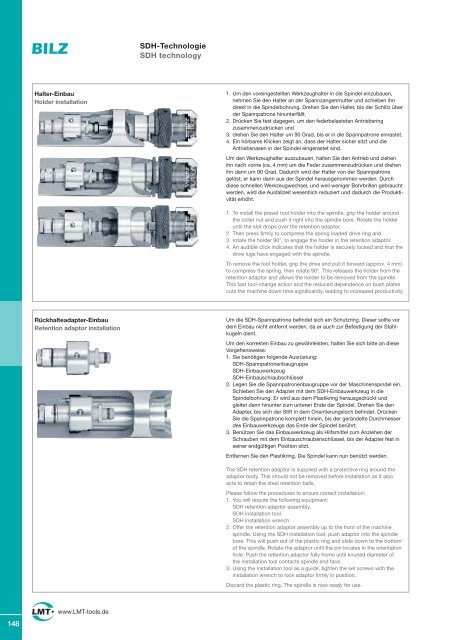
Halter-Einbau<br />
Hol<strong>der</strong> installation<br />
Rückhalteadapter-Einbau<br />
Retention adaptor installation<br />
www.<strong>LMT</strong>-tools.de<br />
SDH-Technologie<br />
SDH technology<br />
1. Um den voreingestellten Werkzeughalter in die Spindel einzubauen,<br />
nehmen Sie den Halter an <strong>der</strong> Spannzangenmutter <strong>und</strong> schieben ihn<br />
direkt in die Spindelbohrung. Drehen Sie den Halter, bis <strong>der</strong> Schlitz über<br />
<strong>der</strong> Spannpatrone hinunterfällt.<br />
2. Drücken Sie fest dagegen, um den fe<strong>der</strong>belasteten Antriebsring<br />
zusammenzudrücken <strong>und</strong><br />
3. drehen Sie den Halter um 90 Grad, bis er in die Spannpatrone einrastet.<br />
4. Ein hörbares Klicken zeigt an, dass <strong>der</strong> Halter sicher sitzt <strong>und</strong> die<br />
Antriebsnasen in <strong>der</strong> Spindel eingerastet sind.<br />
Um den Werkzeughalter auszubauen, halten Sie den Antrieb <strong>und</strong> ziehen<br />
ihn nach vorne (ca. 4 mm) um die Fe<strong>der</strong> zusammenzudrücken <strong>und</strong> drehen<br />
ihn dann um 90 Grad. Dadurch wird <strong>der</strong> Halter von <strong>der</strong> Spannpatrone<br />
gelöst; er kann dann aus <strong>der</strong> Spindel herausgenommen werden. Durch<br />
diese schnellen Werkzeugwechsel, <strong>und</strong> weil weniger Bohrbrillen gebraucht<br />
werden, wird die Ausfallzeit wesentlich reduziert <strong>und</strong> dadurch die Produktivität<br />
erhöht.<br />
1. To install the preset tool hol<strong>der</strong> into the spindle, grip the hol<strong>der</strong> aro<strong>und</strong><br />
the collet nut <strong>and</strong> push it right into the spindle bore. Rotate the hol<strong>der</strong><br />
until the slot drops over the retention adaptor.<br />
2. Then press firmly to compress the spring loaded drive ring <strong>and</strong><br />
3. rotate the hol<strong>der</strong> 90°, to engage the hol<strong>der</strong> in the retention adaptor.<br />
4. An audible click indicates that the hol<strong>der</strong> is securely locked <strong>and</strong> that the<br />
drive lugs have engaged with the spindle.<br />
To remove the tool hol<strong>der</strong>, grip the drive <strong>and</strong> pull it forward (approx. 4 mm)<br />
to compress the spring, then rotate 90°. This releases the hol<strong>der</strong> from the<br />
retention adaptor <strong>and</strong> allows the hol<strong>der</strong> to be removed from the spindle.<br />
This fast tool-change action <strong>and</strong> the reduced dependence on bush plates<br />
cuts the machine down time significantly, leading to increased productivity.<br />
Um die SDH-Spannpatrone befindet sich ein Schutzring. Dieser sollte vor<br />
dem Einbau nicht entfernt werden, da er auch zur Befestigung <strong>der</strong> Stahlkugeln<br />
dient.<br />
Um den korrekten Einbau zu gewährleisten, halten Sie sich bitte an diese<br />
Vorgehensweise:<br />
1. Sie benötigen folgende Ausrüstung:<br />
SDH-Spannpatronenbaugruppe<br />
SDH-Einbauwerkzeug<br />
SDH-Einbauschraubschlüssel<br />
2. Legen Sie die Spannpatronenbaugruppe vor <strong>der</strong> Maschinenspindel ein.<br />
Schieben Sie den Adapter mit dem SDH-Einbauwerkzeug in die<br />
Spindelbohrung. Er wird aus dem Plastikring herausgedrückt <strong>und</strong><br />
gleitet dann hinunter zum unteren Ende <strong>der</strong> Spindel. Drehen Sie den<br />
Adapter, bis sich <strong>der</strong> Stift in dem Orientierungsloch befindet. Drücken<br />
Sie die Spannpatrone komplett hinein, bis <strong>der</strong> gerändelte Durchmesser<br />
des Einbauwerkzeugs das Ende <strong>der</strong> Spindel berührt.<br />
3. Benützen Sie das Einbauwerkzeug als Hilfsmittel zum Anziehen <strong>der</strong><br />
Schrauben mit dem Einbauschraubenschlüssel, bis <strong>der</strong> Adapter fest in<br />
seiner endgültigen Position sitzt.<br />
Entfernen Sie den Plastikring. Die Spindel kann nun benützt werden.<br />
The SDH retention adaptor is supplied with a protective ring aro<strong>und</strong> the<br />
adaptor body. This should not be removed before installation as it also<br />
acts to retain the steel retention balls.<br />
Please follow the procedures to ensure correct installation:<br />
1. You will require the following equipment:<br />
SDH retention adaptor assembly.<br />
SDH installation tool<br />
SDH installation wrench<br />
2. Offer the retention adaptor assembly up to the front of the machine<br />
spindle. Using the SDH installation tool, push adaptor into the spindle<br />
bore. This will push out of the plastic ring <strong>and</strong> slide down to the bottom<br />
of the spindle. Rotate the adaptor until the pin locates in the orientation<br />
hole. Push the retention adaptor fully home until knurled diameter of<br />
the installation tool contacts spindle end face.<br />
3. Using the installation tool as a guide, tighten the set screws with the<br />
installation wrench to lock adaptor firmly in position.<br />
Discard the plastic ring. The spindle is now ready for use.