VideoMate DVB-T300/T200 PCI Tuner Card Start Up Guide
VideoMate DVB-T300/T200 PCI Tuner Card Start Up Guide
VideoMate DVB-T300/T200 PCI Tuner Card Start Up Guide

You also want an ePaper? Increase the reach of your titles
YUMPU automatically turns print PDFs into web optimized ePapers that Google loves.
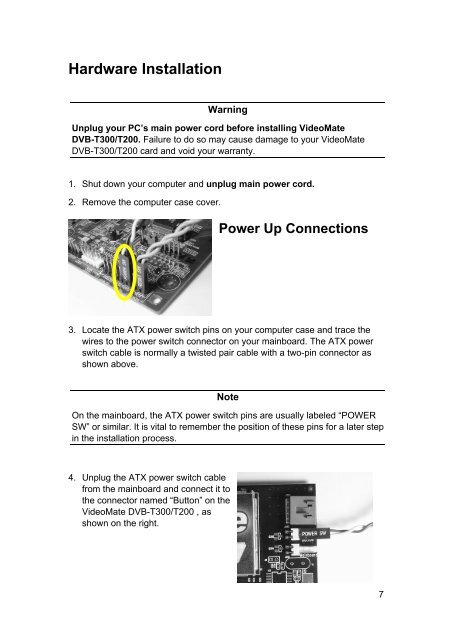
Hardware Installation<br />
Warning<br />
Unplug your PC’s main power cord before installing <strong>VideoMate</strong><br />
<strong>DVB</strong>-<strong>T300</strong>/<strong>T200</strong>. Failure to do so may cause damage to your <strong>VideoMate</strong><br />
<strong>DVB</strong>-<strong>T300</strong>/<strong>T200</strong> card and void your warranty.<br />
1. Shut down your computer and unplug main power cord.<br />
2. Remove the computer case cover.<br />
Power <strong>Up</strong> Connections<br />
3. Locate the ATX power switch pins on your computer case and trace the<br />
wires to the power switch connector on your mainboard. The ATX power<br />
switch cable is normally a twisted pair cable with a two-pin connector as<br />
shown above.<br />
Note<br />
On the mainboard, the ATX power switch pins are usually labeled “POWER<br />
SW” or similar. It is vital to remember the position of these pins for a later step<br />
in the installation process.<br />
4. Unplug the ATX power switch cable<br />
from the mainboard and connect it to<br />
the connector named “Button” on the<br />
<strong>VideoMate</strong> <strong>DVB</strong>-<strong>T300</strong>/<strong>T200</strong> , as<br />
shown on the right.<br />
7