StringPin Pinsetter Service Manual - Brunswick
StringPin Pinsetter Service Manual - Brunswick
StringPin Pinsetter Service Manual - Brunswick

You also want an ePaper? Increase the reach of your titles
YUMPU automatically turns print PDFs into web optimized ePapers that Google loves.
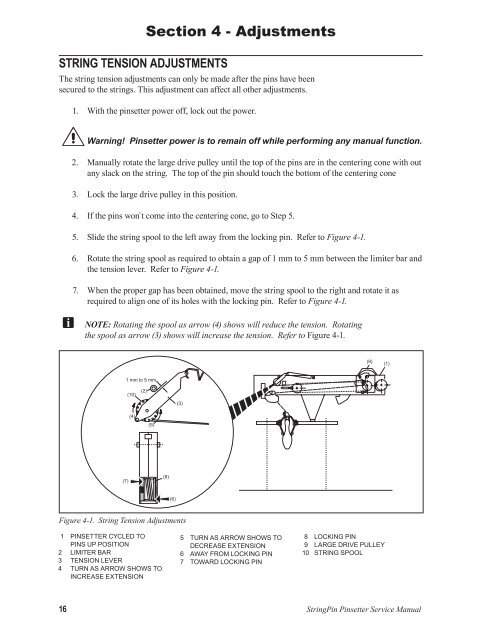
STring TenSion adjUSTMenTS<br />
Section 4 - Adjustments<br />
The string tension adjustments can only be made after the pins have been<br />
secured to the strings. This adjustment can affect all other adjustments.<br />
1. With the pinsetter power off, lock out the power.<br />
Warning! <strong>Pinsetter</strong> power is to remain off while performing any manual function.<br />
2. <strong>Manual</strong>ly rotate the large drive pulley until the top of the pins are in the centering cone with out<br />
any slack on the string. The top of the pin should touch the bottom of the centering cone<br />
3. Lock the large drive pulley in this position.<br />
4. If the pins won`t come into the centering cone, go to Step 5.<br />
5. Slide the string spool to the left away from the locking pin. Refer to Figure 4-1.<br />
6. Rotate the string spool as required to obtain a gap of 1 mm to 5 mm between the limiter bar and<br />
the tension lever. Refer to Figure 4-1.<br />
7. When the proper gap has been obtained, move the string spool to the right and rotate it as<br />
required to align one of its holes with the locking pin. Refer to Figure 4-1.<br />
NOTE: Rotating the spool as arrow (4) shows will reduce the tension. Rotating<br />
the spool as arrow (3) shows will increase the tension. Refer to Figure 4-1.<br />
Figure 4-1. String Tension Adjustments<br />
1 PINSETTER CYCLED TO<br />
PINS UP POSITION<br />
2 LIMITER BAR<br />
3 TENSION LEVER<br />
4 TURN AS ARROw SHOwS TO<br />
INCREASE EXTENSION<br />
5 TURN AS ARROw SHOwS TO<br />
DECREASE EXTENSION<br />
6 AwAY FROM LOCKING PIN<br />
7 TOwARD LOCKING PIN<br />
8 LOCKING PIN<br />
9 LARGE DRIVE PULLEY<br />
10 STRING SPOOL<br />
16 <strong>StringPin</strong> <strong>Pinsetter</strong> <strong>Service</strong> <strong>Manual</strong>