StringPin Pinsetter Service Manual - Brunswick
StringPin Pinsetter Service Manual - Brunswick
StringPin Pinsetter Service Manual - Brunswick

You also want an ePaper? Increase the reach of your titles
YUMPU automatically turns print PDFs into web optimized ePapers that Google loves.
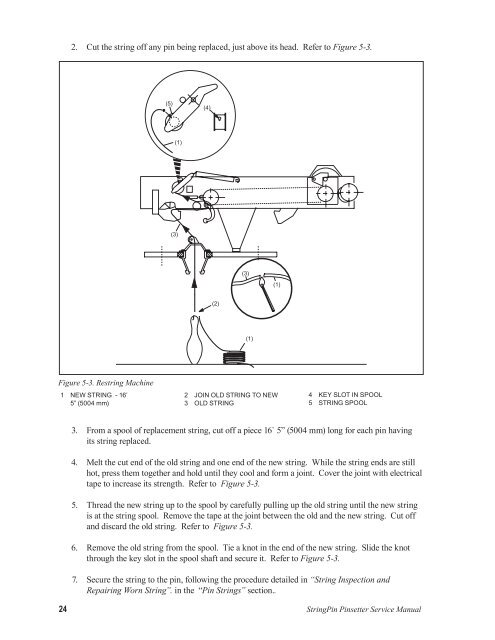
2. Cut the string off any pin being replaced, just above its head. Refer to Figure 5-3.<br />
Figure 5-3. Restring Machine<br />
1 NEw STRING - 16’<br />
5” (5004 mm)<br />
2 JOIN OLD STRING TO NEw<br />
3 OLD STRING<br />
4 KEY SLOT IN SPOOL<br />
5 STRING SPOOL<br />
3. From a spool of replacement string, cut off a piece 16` 5” (5004 mm) long for each pin having<br />
its string replaced.<br />
4. Melt the cut end of the old string and one end of the new string. While the string ends are still<br />
hot, press them together and hold until they cool and form a joint. Cover the joint with electrical<br />
tape to increase its strength. Refer to Figure 5-3.<br />
5. Thread the new string up to the spool by carefully pulling up the old string until the new string<br />
is at the string spool. Remove the tape at the joint between the old and the new string. Cut off<br />
and discard the old string. Refer to Figure 5-3.<br />
6. Remove the old string from the spool. Tie a knot in the end of the new string. Slide the knot<br />
through the key slot in the spool shaft and secure it. Refer to Figure 5-3.<br />
7. Secure the string to the pin, following the procedure detailed in “String Inspection and<br />
Repairing Worn String”. in the “Pin Strings” section..<br />
24 <strong>StringPin</strong> <strong>Pinsetter</strong> <strong>Service</strong> <strong>Manual</strong>