CDV34 Gas Fireplace - Continental Fireplaces
CDV34 Gas Fireplace - Continental Fireplaces
CDV34 Gas Fireplace - Continental Fireplaces

You also want an ePaper? Increase the reach of your titles
YUMPU automatically turns print PDFs into web optimized ePapers that Google loves.
20<br />
MOBILE HOME INSTALLATION<br />
W415-0345 / L / 03.05.09<br />
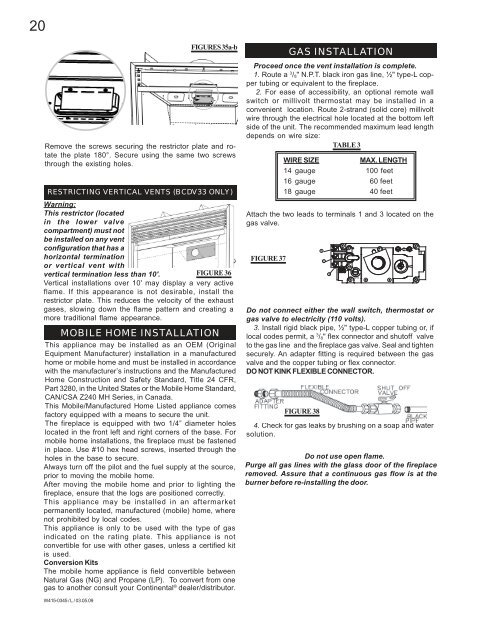
FIGURES 35a-b<br />
Remove the screws securing the restrictor plate and rotate<br />
the plate 180°. Secure using the same two screws<br />
through the existing holes.<br />
RESTRICTING VERTICAL VENTS (BCDV33 ONLY)<br />
Warning:<br />
This restrictor (located<br />
in the lower valve<br />
compartment) must not<br />
be installed on any vent<br />
configuration that has a<br />
horizontal termination<br />
or vertical vent with<br />
vertical termination less than 10'. FIGURE 36<br />
Vertical installations over 10' may display a very active<br />
flame. If this appearance is not desirable, install the<br />
restrictor plate. This reduces the velocity of the exhaust<br />
gases, slowing down the flame pattern and creating a<br />
more traditional flame appearance.<br />
This appliance may be installed as an OEM (Original<br />
Equipment Manufacturer) installation in a manufactured<br />
home or mobile home and must be installed in accordance<br />
with the manufacturer’s instructions and the Manufactured<br />
Home Construction and Safety Standard, Title 24 CFR,<br />
Part 3280, in the United States or the Mobile Home Standard,<br />
CAN/CSA Z240 MH Series, in Canada.<br />
This Mobile/Manufactured Home Listed appliance comes<br />
factory equipped with a means to secure the unit.<br />
The fireplace is equipped with two 1/4” diameter holes<br />
located in the front left and right corners of the base. For<br />
mobile home installations, the fireplace must be fastened<br />
in place. Use #10 hex head screws, inserted through the<br />
holes in the base to secure.<br />
Always turn off the pilot and the fuel supply at the source,<br />
prior to moving the mobile home.<br />
After moving the mobile home and prior to lighting the<br />
fireplace, ensure that the logs are positioned correctly.<br />
This appliance may be installed in an aftermarket<br />
permanently located, manufactured (mobile) home, where<br />
not prohibited by local codes.<br />
This appliance is only to be used with the type of gas<br />
indicated on the rating plate. This appliance is not<br />
convertible for use with other gases, unless a certified kit<br />
is used.<br />
Conversion Kits<br />
The mobile home appliance is field convertible between<br />
Natural <strong>Gas</strong> (NG) and Propane (LP). To convert from one<br />
gas to another consult your <strong>Continental</strong> ® dealer/distributor.<br />
GAS INSTALLATION<br />
Proceed once the vent installation is complete.<br />
1. Route a 3 /8" N.P.T. black iron gas line, ½" type-L copper<br />
tubing or equivalent to the fireplace.<br />
2. For ease of accessibility, an optional remote wall<br />
switch or millivolt thermostat may be installed in a<br />
convenient location. Route 2-strand (solid core) millivolt<br />
wire through the electrical hole located at the bottom left<br />
side of the unit. The recommended maximum lead length<br />
depends on wire size:<br />
TABLE 3<br />
WIRE SIZE MAX. LENGTH<br />
14 gauge 100 feet<br />
16 gauge 60 feet<br />
18 gauge 40 feet<br />
Attach the two leads to terminals 1 and 3 located on the<br />
gas valve.<br />
FIGURE 37<br />
Do not connect either the wall switch, thermostat or<br />
gas valve to electricity (110 volts).<br />
3. Install rigid black pipe, ½" type-L copper tubing or, if<br />
local codes permit, a 3 /8" flex connector and shutoff valve<br />
to the gas line and the fireplace gas valve. Seal and tighten<br />
securely. An adapter fitting is required between the gas<br />
valve and the copper tubing or flex connector.<br />
DO NOT KINK FLEXIBLE CONNECTOR.<br />
FIGURE 38<br />
1<br />
2<br />
3<br />
4. Check for gas leaks by brushing on a soap and water<br />
solution.<br />
Do not use open flame.<br />
Purge all gas lines with the glass door of the fireplace<br />
removed. Assure that a continuous gas flow is at the<br />
burner before re-installing the door.<br />
LOT<br />
PI<br />
LO<br />
H<br />
I<br />
N<br />
O<br />
T<br />
L O<br />
P I<br />
O<br />
FF