CDV34 Gas Fireplace - Continental Fireplaces
CDV34 Gas Fireplace - Continental Fireplaces
CDV34 Gas Fireplace - Continental Fireplaces

You also want an ePaper? Increase the reach of your titles
YUMPU automatically turns print PDFs into web optimized ePapers that Google loves.
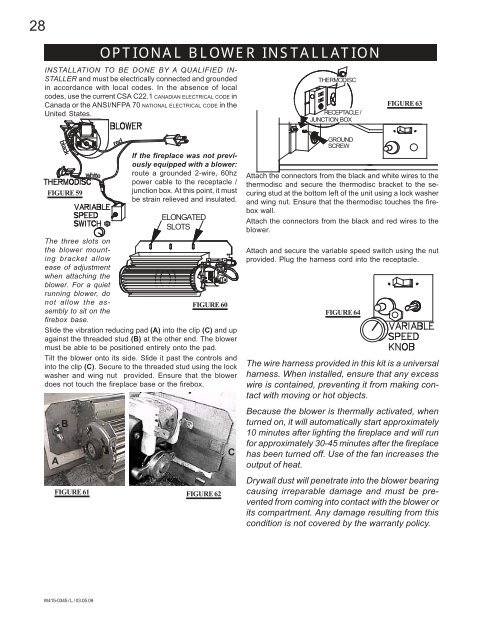
28<br />
INSTALLATION TO BE DONE BY A QUALIFIED IN-<br />
STALLER and must be electrically connected and grounded<br />
in accordance with local codes. In the absence of local<br />
codes, use the current CSA C22.1 CANADIAN ELECTRICAL CODE in<br />
Canada or the ANSI/NFPA 70 NATIONAL ELECTRICAL CODE in the<br />
United States.<br />
black<br />
FIGURE 59<br />
white<br />
W415-0345 / L / 03.05.09<br />
red<br />
If the fireplace was not previously<br />
equipped with a blower:<br />
route a grounded 2-wire, 60hz<br />
power cable to the receptacle /<br />
junction box. At this point, it must<br />
be strain relieved and insulated.<br />
The three slots on<br />
the blower mounting<br />
bracket allow<br />
ease of adjustment<br />
when attaching the<br />
blower. For a quiet<br />
running blower, do<br />
not allow the as-<br />
FIGURE 60<br />
sembly to sit on the<br />
firebox base.<br />
Slide the vibration reducing pad (A) into the clip (C) and up<br />
against the threaded stud (B) at the other end. The blower<br />
must be able to be positioned entirely onto the pad.<br />
Tilt the blower onto its side. Slide it past the controls and<br />
into the clip (C). Secure to the threaded stud using the lock<br />
washer and wing nut provided. Ensure that the blower<br />
does not touch the fireplace base or the firebox.<br />
A<br />
B<br />
FIGURE 61<br />
OPTIONAL BLOWER INSTALLATION<br />
ELONGATED<br />
SLOTS<br />
FIGURE 62<br />
C<br />
THERMODISC<br />
RECEPTACLE /<br />
JUNCTION BOX<br />
GROUND<br />
SCREW<br />
Attach the connectors from the black and white wires to the<br />
thermodisc and secure the thermodisc bracket to the securing<br />
stud at the bottom left of the unit using a lock washer<br />
and wing nut. Ensure that the thermodisc touches the firebox<br />
wall.<br />
Attach the connectors from the black and red wires to the<br />
blower.<br />
Attach and secure the variable speed switch using the nut<br />
provided. Plug the harness cord into the receptacle.<br />
FIGURE 64<br />
FIGURE 63<br />
The wire harness provided in this kit is a universal<br />
harness. When installed, ensure that any excess<br />
wire is contained, preventing it from making contact<br />
with moving or hot objects.<br />
Because the blower is thermally activated, when<br />
turned on, it will automatically start approximately<br />
10 minutes after lighting the fireplace and will run<br />
for approximately 30-45 minutes after the fireplace<br />
has been turned off. Use of the fan increases the<br />
output of heat.<br />
Drywall dust will penetrate into the blower bearing<br />
causing irreparable damage and must be prevented<br />
from coming into contact with the blower or<br />
its compartment. Any damage resulting from this<br />
condition is not covered by the warranty policy.