- Page 3 and 4: Contents 1. Welcome ...............
- Page 5: 8. Painting, Drawing and Text .....
- Page 8 and 9: 2 Welcome
- Page 10 and 11: 4 Welcome New features • 64-bit O
- Page 12 and 13: 6 Welcome Installation Minimum: •
- Page 14 and 15: 8 Getting Started
- Page 16 and 17: 10 Getting Started Use the Choose W
- Page 18 and 19: 12 Getting Started 4. (Optional) Se
- Page 20 and 21: 14 Getting Started To open any imag
- Page 22 and 23: 16 Getting Started To save your cur
- Page 24 and 25: 18 Layers, Masks, and Blending
- Page 26 and 27: 20 Layers, Masks, and Blending Kind
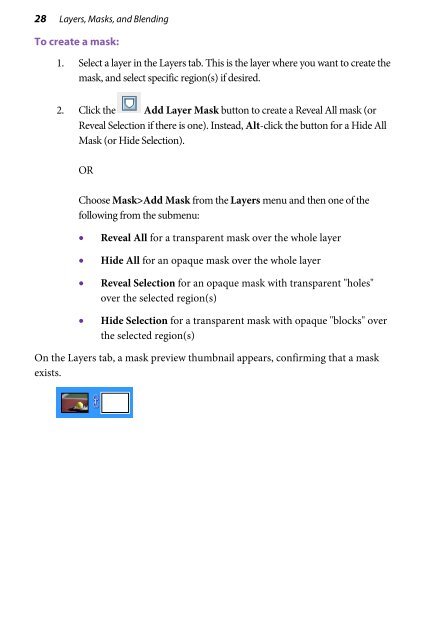
- Page 28 and 29: 22 Layers, Masks, and Blending Sele
- Page 30 and 31: 24 Layers, Masks, and Blending To c
- Page 32 and 33: 26 Layers, Masks, and Blending To s
- Page 36 and 37: 30 Layers, Masks, and Blending It's
- Page 38 and 39: 32 Layers, Masks, and Blending
- Page 40 and 41: 34 Making Image Adjustments
- Page 42 and 43: 36 Making Image Adjustments Overvie
- Page 44 and 45: 38 Making Image Adjustments Instead
- Page 46 and 47: 40 Making Image Adjustments The fol
- Page 48 and 49: 42 Making Image Adjustments To save
- Page 50 and 51: 44 Making Image Adjustments To uncl
- Page 52 and 53: 46 Making Image Adjustments Using P
- Page 54 and 55: 48 Making Image Adjustments Adjustm
- Page 56 and 57: 50 Making Image Adjustments To appl
- Page 58 and 59: 52 Making Image Adjustments To appl
- Page 60 and 61: 54 Making Image Adjustments To edit
- Page 62 and 63: 56 Applying Image Effects
- Page 64 and 65: 58 Applying Image Effects Using fil
- Page 66 and 67: 60 Applying Image Effects Managing
- Page 68 and 69: 62 Applying Image Effects To create
- Page 70 and 71: 64 Applying Image Effects Using the
- Page 72 and 73: 66 Applying Image Effects Use the U
- Page 74 and 75: 68 Applying Image Effects Applying
- Page 76 and 77: 70 Applying Image Effects Applying
- Page 78 and 79: 72 Applying Image Effects To apply
- Page 80 and 81: 74 Applying Image Effects Merging b
- Page 82 and 83: 76 Applying Image Effects To select
- Page 84 and 85:
78 Applying Image Effects 10. From
- Page 86 and 87:
80 Manipulating Images
- Page 88 and 89:
82 Manipulating Images To cancel th
- Page 90 and 91:
84 Manipulating Images For any sele
- Page 92 and 93:
86 Manipulating Images To select a
- Page 94 and 95:
88 Manipulating Images To store a s
- Page 96 and 97:
90 Manipulating Images Making the s
- Page 98 and 99:
92 Manipulating Images The Modify i
- Page 100 and 101:
94 Manipulating Images Manipulating
- Page 102 and 103:
96 Manipulating Images Cut/Copy/Del
- Page 104 and 105:
98 Manipulating Images Changing ima
- Page 106 and 107:
100 Manipulating Images Changing ca
- Page 108 and 109:
102 Manipulating Images Straighteni
- Page 110 and 111:
104 Manipulating Images Cropping an
- Page 112 and 113:
106 Manipulating Images To crop to
- Page 114 and 115:
108 Manipulating Images Destructive
- Page 116 and 117:
110 Manipulating Images Deforming T
- Page 118 and 119:
112 Manipulating Images To hide the
- Page 120 and 121:
114 Manipulating Images Selecting a
- Page 122 and 123:
116 Manipulating Images
- Page 124 and 125:
118 Colour and Greyscale
- Page 126 and 127:
120 Colour and Greyscale If you no
- Page 128 and 129:
122 Colour and Greyscale To define
- Page 130 and 131:
124 Colour and Greyscale Storing co
- Page 132 and 133:
126 Painting, Drawing, and Text
- Page 134 and 135:
128 Painting, Drawing, and Text If
- Page 136 and 137:
130 Painting, Drawing, and Text To
- Page 138 and 139:
132 Painting, Drawing, and Text To
- Page 140 and 141:
134 Painting, Drawing, and Text Usi
- Page 142 and 143:
136 Painting, Drawing, and Text To
- Page 144 and 145:
138 Painting, Drawing, and Text App
- Page 146 and 147:
140 Painting, Drawing, and Text To
- Page 148 and 149:
142 Painting, Drawing, and Text Dra
- Page 150 and 151:
144 Painting, Drawing, and Text Cre
- Page 152 and 153:
146 Painting, Drawing, and Text To
- Page 154 and 155:
148 Painting, Drawing, and Text To
- Page 156 and 157:
150 Painting, Drawing, and Text Cre
- Page 158 and 159:
152 Painting, Drawing, and Text To
- Page 160 and 161:
154 Print, Export, and Share
- Page 162 and 163:
156 Print, Export, and Share • Pr
- Page 164 and 165:
158 Print, Export, and Share 6. (Op
- Page 166 and 167:
160 Print, Export, and Share Sizing
- Page 168 and 169:
162 Print, Export, and Share Croppi
- Page 170 and 171:
164 Print, Export, and Share Export
- Page 172 and 173:
166 Print, Export, and Share To adj
- Page 174 and 175:
168 Print, Export, and Share You ma
- Page 176 and 177:
170 Print, Export, and Share Resamp
- Page 178 and 179:
172 Additional Information
- Page 180 and 181:
174 Additional Information North Am
- Page 182 and 183:
176 Additional Information
- Page 184 and 185:
178 Index
- Page 186 and 187:
180 Index Deform Tool, 110 deformin
- Page 188 and 189:
182 Index Print Studio, 155 printin