Windows PowerShell 3.0 Step by Step - Cdn.oreilly.com - O'Reilly
Windows PowerShell 3.0 Step by Step - Cdn.oreilly.com - O'Reilly
Windows PowerShell 3.0 Step by Step - Cdn.oreilly.com - O'Reilly
Create successful ePaper yourself
Turn your PDF publications into a flip-book with our unique Google optimized e-Paper software.
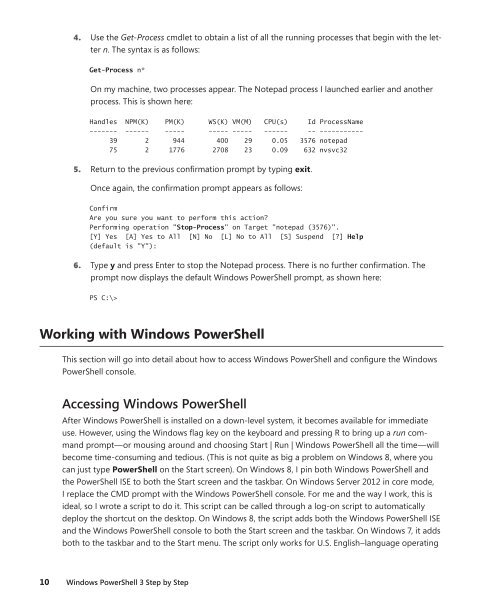
4. Use the Get-Process cmdlet to obtain a list of all the running processes that begin with the letter<br />
n. The syntax is as follows:<br />
Get-Process n*<br />
On my machine, two processes appear. The Notepad process I launched earlier and another<br />
process. This is shown here:<br />
Handles NPM(K) PM(K) WS(K) VM(M) CPU(s) Id ProcessName<br />
------- ------ ----- ----- ----- ------ -- -----------<br />
39 2 944 400 29 0.05 3576 notepad<br />
75 2 1776 2708 23 0.09 632 nvsvc32<br />
5. Return to the previous confirmation prompt <strong>by</strong> typing exit.<br />
Once again, the confirmation prompt appears as follows:<br />
Confirm<br />
Are you sure you want to perform this action?<br />
Performing operation "Stop-Process" on Target "notepad (3576)".<br />
[Y] Yes [A] Yes to All [N] No [L] No to All [S] Suspend [?] Help<br />
(default is "Y"):<br />
6. Type y and press Enter to stop the Notepad process. There is no further confirmation. The<br />
prompt now displays the default <strong>Windows</strong> <strong>PowerShell</strong> prompt, as shown here:<br />
PS C:\><br />
Working with <strong>Windows</strong> <strong>PowerShell</strong><br />
This section will go into detail about how to access <strong>Windows</strong> <strong>PowerShell</strong> and configure the <strong>Windows</strong><br />
<strong>PowerShell</strong> console.<br />
accessing <strong>Windows</strong> <strong>PowerShell</strong><br />
After <strong>Windows</strong> <strong>PowerShell</strong> is installed on a down-level system, it be<strong>com</strong>es available for immediate<br />
use. However, using the <strong>Windows</strong> flag key on the keyboard and pressing R to bring up a run <strong>com</strong>mand<br />
prompt—or mousing around and choosing Start | Run | <strong>Windows</strong> <strong>PowerShell</strong> all the time—will<br />
be<strong>com</strong>e time-consuming and tedious. (This is not quite as big a problem on <strong>Windows</strong> 8, where you<br />
can just type <strong>PowerShell</strong> on the Start screen). On <strong>Windows</strong> 8, I pin both <strong>Windows</strong> <strong>PowerShell</strong> and<br />
the <strong>PowerShell</strong> ISE to both the Start screen and the taskbar. On <strong>Windows</strong> Server 2012 in core mode,<br />
I replace the CMD prompt with the <strong>Windows</strong> <strong>PowerShell</strong> console. For me and the way I work, this is<br />
ideal, so I wrote a script to do it. This script can be called through a log-on script to automatically<br />
deploy the shortcut on the desktop. On <strong>Windows</strong> 8, the script adds both the <strong>Windows</strong> <strong>PowerShell</strong> ISE<br />
and the <strong>Windows</strong> <strong>PowerShell</strong> console to both the Start screen and the taskbar. On <strong>Windows</strong> 7, it adds<br />
both to the taskbar and to the Start menu. The script only works for U.S. English–language operating<br />
10 <strong>Windows</strong> <strong>PowerShell</strong> 3 <strong>Step</strong> <strong>by</strong> <strong>Step</strong>


