
Create successful ePaper yourself
Turn your PDF publications into a flip-book with our unique Google optimized e-Paper software.
FI<br />
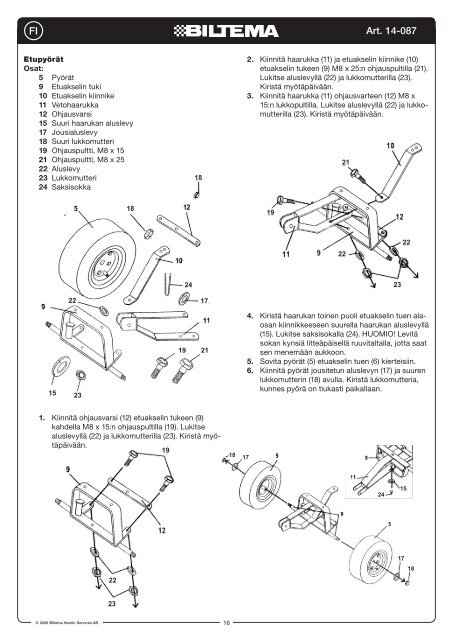
etupyörät<br />
Osat:<br />
5 Pyörät<br />
9 Etuakselin tuki<br />
10 Etuakselin kiinnike<br />
Right Axle 11 Vetohaarukka<br />
d 8) onto the 12 Ohjausvarsi<br />
d poles on the 15 Rear Suuri haarukan aluslevy<br />
6). 17 Jousialuslevy<br />
18 Suuri lukkomutteri<br />
t 5) onto the 19 extended Ohjauspultti, threaded M8 ends x 15of<br />
the Rear Axle<br />
21 Ohjauspultti, M8 x 25<br />
22 Aluslevy<br />
st with Wheel<br />
23<br />
Spring<br />
Lukkomutteri<br />
Washer(Part 17) and Large lock<br />
ten large lock 24 Nut Saksisokka clockwise until <strong>wheel</strong>s are secure.<br />
L ASSEMBLY:<br />
upport<br />
t Axle Brace<br />
k Connector<br />
Washer<br />
g Washer<br />
ut<br />
ering Bolt<br />
ering Bolt<br />
22<br />
15 23<br />
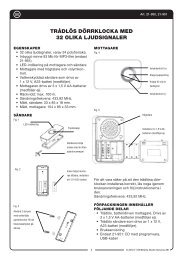
1. Kiinnitä ohjausvarsi (12) etuakselin tukeen (9)<br />
kahdella M8 x 15:n ohjauspultilla (19). Lukitse<br />
aluslevyllä 3 (22) ja lukkomutterilla (23). Kiristä myötäpäivään.<br />
19<br />
© 2009 <strong>Biltema</strong> Nordic Services AB<br />
22<br />
23<br />
18<br />
17<br />
18<br />
18<br />
22<br />
23<br />
1. Attach the Steering 17 17 Link<br />
Connector(Part 12) to the<br />
Front Axle Support(Part 9) by<br />
threading two M8 x 15 Bolts<br />
(Part 19) through the top of the<br />
Link connector (Part 12) and<br />
into the Axle Support(Part 9).<br />
Secure at the bottom with<br />
Washer(Part 22) and then<br />
Lock Nut(Part 23). Tighten<br />
clockwise until secure.<br />
16<br />
21<br />
19<br />
1. Attach the Steering Link<br />
Connector(Part 12) to the<br />
Front Axle Support(Part Art. 14-087 9) by<br />
threading two M8 x 15 Bolts<br />
(Part 19) through the top of the<br />
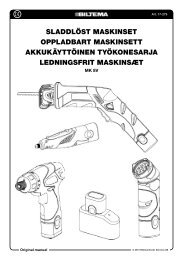
2. Kiinnitä haarukka Link (11) connector ja etuakselin (Part kiinnike 12) and (10)<br />
etuakselin tukeen into (9) the M8 Axle x 25:n Support(Part ohjauspultilla 9). (21).<br />
Lukitse aluslevyllä Secure (22) ja at lukkomutterilla the bottom with (23).<br />
Kiristä myötäpäivään. Washer(Part 22) and then<br />
3. Kiinnitä haarukka Lock (11) ohjausvarteen Nut(Part 23). Tighten (12) M8 x<br />
15:n lukkopultilla. clockwise Lukitse aluslevyllä until secure. (22) ja lukkomutterilla<br />
(23). Kiristä myötäpäivään.<br />
2. Join the Yoke(Part 11)<br />
and the Center Front<br />
19<br />
Axle Brace(Part 10) to<br />
the Front Axle<br />
Support(Part 9) by<br />
22<br />
first threading one M8<br />
22<br />
x 25 Bolt(Part 21)<br />
through the hole in the<br />
Center 24Front<br />
Axle<br />
23<br />
Brace(Part 10), then<br />
into the second 17 hole<br />
in the Yoke(Part 11) and through the hole in the bottom of the Front Axle Support(Part<br />
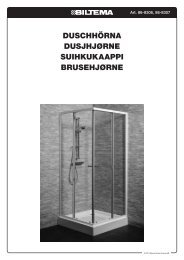
4. Kiristä haarukan toinen puoli etuakselin tuen ala-<br />
9). From the bottom, insert Washer(Part 22) and secure with Lock Nut(Part 23).<br />
osan kiinnikkeeseen suurella haarukan aluslevyllä<br />
Tighten clockwise until secure.<br />
(15). Lukitse saksisokalla (24). HUOMIO! Levitä<br />
3. Secure the Yoke (Part 11) to the sokan Steering kynsiä Link litteäpäisellä Connector(Part ruuvitaltalla, 12) by threading jotta saat one<br />
M8 x 19 15 Bolt(Part 21 19) through sen the first menemään hole in the aukkoon. Yoke(Part 11) then into the Link<br />
Connector(Part 12). Secure 5. With Sovita Washer(Part pyörät (5) 22) etuakselin and Lock tuen Nut(Part (6) kierteisiin. 23).<br />
Tighten clockwise until secure. 6. Kiinnitä pyörät jousitetun aluslevyn (17) ja suuren<br />
lukkomutterin (18) avulla. Kiristä lukkomutteria,<br />
4. Attach the top of the Yoke(Part kunnes 11) to the pyörä appendage on tiukasti located paikallaan. on the under side(top) of<br />
the Front Axle Support(Part 9) by first inserting Large Yoke Washer(Part 15) and then<br />
inserting Cotter Pin(Part 24) into the hole in the middle of the appendage.<br />
NOTE: Use a flat Head Screwdriver to separate<br />
4.CONTINUED..and bend the the end end of of the the Cotter Pin Pin outwards to to lock it it into into place.<br />
18 18<br />
4<br />
5. 5. Slide Wheels(Part 5) 5) onto the extended<br />
threaded ends of of the Front Axle Support<br />
(Part 9). 9).<br />
6. 6. Secure Wheels first with<br />
Wheel Spring Washer(Part 17), and large lock Nut<br />
(Part 18). Tighten Large Lock Nut clockwise until <strong>wheel</strong>s are secure.<br />
BED ASSEMBLY:<br />
21<br />
24 24<br />
15 15<br />
17 17<br />
18 18