
You also want an ePaper? Increase the reach of your titles
YUMPU automatically turns print PDFs into web optimized ePapers that Google loves.
DK<br />
© 2009 <strong>Biltema</strong> Nordic Services AB<br />
24<br />
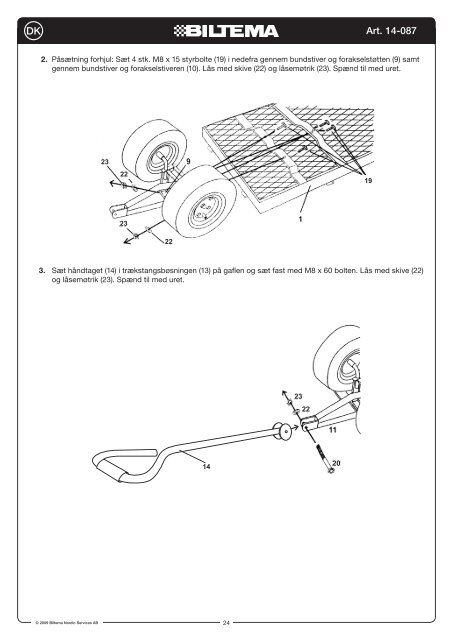
Art. 14-087<br />
2. Påsætning forhjul: Sæt 4 stk. M8 x 15 styrbolte (19) i nedefra gennem bundstiver og forakselstøtten (9) samt<br />
gennem bundstiver og forakselstiveren (10). Lås med skive (22) og låsemøtrik (23). Spænd til med uret.<br />
23<br />
23<br />
22<br />
22<br />
23<br />
22<br />
2. Join the 23 Front Wheel Assembly to the Bed(Part 1) by inserting four more M8 x<br />
15 Steering Bolts(Parts 19) first from under the bar through the holes in the<br />
22<br />
metal support bars then into the holes in both the Front Axle Support(Part 9)<br />
and the Center Front Axle Brace(Part 10). Insert Washers(Part 22) onto the<br />
2. Join the Front Wheel Assembly to the Bed(Part 1) by inserting four more M8 x<br />
3. Sæt håndtaget Bolts (14) then i trækstangsbøsningen secure with Lock Nuts(Part (13) på 23). gaflen og sæt fast med M8 x 60 bolten. Lås med skive (22)<br />
og låsemøtrik (23). 15 Steering Spænd Bolts(Parts til med uret. 19) first from under the bar through the holes in the<br />
3. Attach metal the support Handle bars Coupler(Part then into the 13) holes to the in end both of the the Front Pull Handle(Part Axle Support(Part 14) by 9) simply<br />
inserting and the the Center end of Front the Pull Axle Handle(Part Brace(Part 10). 14) into Insert the Washers(Part pole hole of the 22) Coupler(Part onto the 13).<br />
Be Bolts sure then to align secure holes with on Lock the inside Nuts(Part of the 23). Pull Handle(Part 14) and the outside of the<br />
Coupler(Part 13). Join to the end of the Yoke (Part 11) by aligning holes<br />
and 3. Attach then inserting the Handle M8 Coupler(Part x 60 Pull Handle 13) to Bolt(Part the end 20) of the into Pull first Handle(Part the 14) by simply<br />
Yoke, inserting the Coupler(Part the end of the 13), Pull then Handle(Part out the other 14) side into of the thepole<br />
hole of the Coupler(Part 13).<br />
Yoke. Be Secure sure to align with Washer(Part holes on the 22) inside and of Lock the Pull Handle(Part 14) and the outside of the<br />
Nut(Part Coupler(Part 23). 13). Join to the end of the Yoke (Part 11) by aligning holes<br />
and then inserting M8 x 60 Pull Handle Bolt(Part 20) into first the<br />
Yoke, the Coupler(Part 13), then out the other side of the<br />
Yoke. Secure with Washer(Part 22) and Lock<br />
23<br />
Nut(Part 23).<br />
14<br />
14<br />
7<br />
7<br />
22<br />
23<br />
22<br />
20<br />
20<br />
19<br />
19