
Create successful ePaper yourself
Turn your PDF publications into a flip-book with our unique Google optimized e-Paper software.
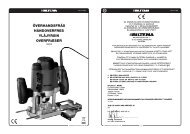
SE<br />
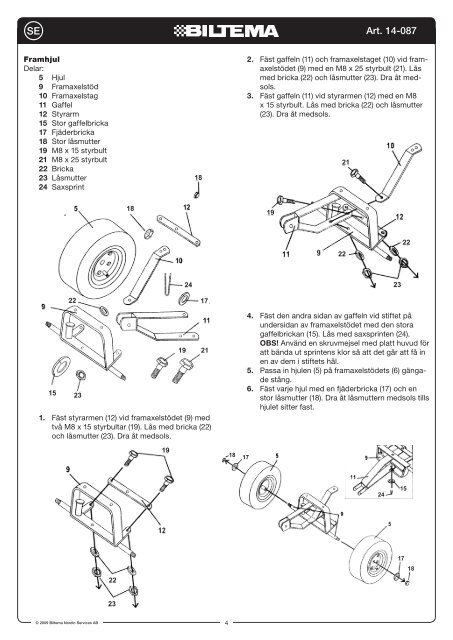
Framhjul<br />
Delar:<br />
5 Hjul<br />
9 Framaxelstöd<br />
10 Framaxelstag<br />
Right Axle 11 Gaffel<br />
d 8) onto the 12 Styrarm<br />
d poles on the 15 Rear Stor gaffelbricka<br />
6). 17 Fjäderbricka<br />
18 Stor låsmutter<br />
t 5) onto the 19 extended M8 x 15 threaded styrbult ends of the Rear Axle<br />
21 M8 x 25 styrbult<br />
22 Bricka<br />
st with Wheel<br />
23<br />
Spring<br />
Låsmutter<br />
Washer(Part 17) and Large lock<br />
ten large lock 24 Nut Saxsprint clockwise until <strong>wheel</strong>s are secure.<br />
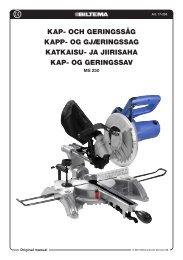
L ASSEMBLY:<br />
upport<br />
t Axle Brace<br />
k Connector<br />
Washer<br />
g Washer<br />
ut<br />
ering Bolt<br />
ering Bolt<br />
22<br />
24<br />
23<br />
Brace(Part 10), then<br />
into the second 17 hole<br />
in the Yoke(Part 11) and through the hole in the bottom of the Front Axle Support(Part<br />
4. Fäst den andra sidan av gaffeln vid stiftet på<br />
9). From the bottom, insert Washer(Part 22) and secure with Lock Nut(Part 23).<br />
undersidan av framaxelstödet med den stora<br />
Tighten clockwise until secure.<br />
gaffelbrickan (15). Lås med saxsprinten (24).<br />
3. Secure the Yoke (Part 11) to the OBS! Steering Använd Link en Connector(Part skruvmejsel med 12) by platt threading huvud one för<br />
M8 x 19 15 Bolt(Part 21 19) through att the bända first hole ut in sprintens the Yoke(Part klor så 11) att then det into går the att Link få in<br />
Connector(Part 12). Secure With en Washer(Part av dem i stiftets 22) and hål. Lock Nut(Part 23).<br />
Tighten clockwise until secure. 5. Passa in hjulen (5) på framaxelstödets (6) gängade<br />
stång.<br />
4. Attach the top of the Yoke(Part 6. Fäst 11) to varje the hjul appendage med en located fjäderbricka on the (17) under och side(top) en of<br />
15 23<br />
the Front Axle Support(Part 9) stor by first låsmutter inserting (18). Large Dra Yoke åt låsmuttern Washer(Part medsols 15) and tills then<br />
inserting Cotter Pin(Part 24) into hjulet the sitter hole in fast. the middle of the appendage.<br />
1. Fäst styrarmen (12) vid framaxelstödet NOTE: (9) Use med a flat Head Screwdriver to separate<br />
4.CONTINUED..and bend the the end end of of the the Cotter Pin Pin outwards to to lock it it into into place.<br />
två M8 x 15 styrbultar (19). Lås med bricka (22)<br />
och låsmutter (23). Dra åt medsols.<br />
3<br />
© 2009 <strong>Biltema</strong> Nordic Services AB<br />
22<br />
23<br />
18<br />
19<br />
17<br />
18<br />
18<br />
2. Join the Yoke(Part 11)<br />
and the Center Front<br />
Axle Brace(Part 10) to<br />
the Front Axle<br />
Support(Part 9) by<br />
first threading one M8<br />
x 25 Bolt(Part 21)<br />
through the hole in the<br />
Center Front Axle<br />
22<br />
23<br />
18 18<br />
1. Attach the Steering 17 17 Link<br />
Connector(Part 12) to the<br />
Front Axle Support(Part 9) by<br />
threading two M8 x 15 Bolts<br />
(Part 19) through the top of the<br />
Link connector (Part 12) and<br />
into the Axle Support(Part 9).<br />
Secure at the bottom with<br />
Washer(Part 22) and then<br />
Lock Nut(Part 23). Tighten<br />
clockwise until secure.<br />
5. 5. Slide Wheels(Part 5) 5) onto the extended<br />
threaded ends of of the Front Axle Support<br />
(Part 9). 9).<br />
6. 6. Secure Wheels first with<br />
Wheel Spring Washer(Part 17), and large lock Nut<br />
(Part 18). Tighten Large Lock Nut clockwise until <strong>wheel</strong>s are secure.<br />
BED ASSEMBLY:<br />
4<br />
21<br />
19<br />
1. Attach the Steering Link<br />
Connector(Part 12) to the<br />
Front Axle Support(Part Art. 14-087 9) by<br />
threading two M8 x 15 Bolts<br />
(Part 19) through the top of the<br />
2. Fäst gaffeln (11) och Link framaxelstaget connector (Part (10) 12) and vid framaxelstödet<br />
(9) med into en the M8 Axle x 25 Support(Part styrbult (21). 9). Lås<br />
med bricka (22) och Secure låsmutter at the bottom (23). Dra with åt medsols.<br />
Washer(Part 22) and then<br />
3. Fäst gaffeln (11) vid Lock styrarmen Nut(Part 23). (12) med Tighten en M8<br />
x 15 styrbult. Lås clockwise med bricka until (22) secure. och låsmutter<br />
(23). Dra åt medsols.<br />
19<br />
4<br />
21<br />
22<br />
24<br />
24<br />
22<br />
15 15<br />
17 17<br />
18 18