
Create successful ePaper yourself
Turn your PDF publications into a flip-book with our unique Google optimized e-Paper software.
SE<br />
© 2009 <strong>Biltema</strong> Nordic Services AB<br />
6<br />
Art. 14-087<br />
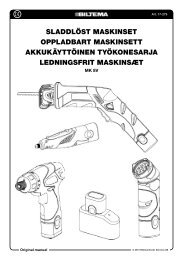
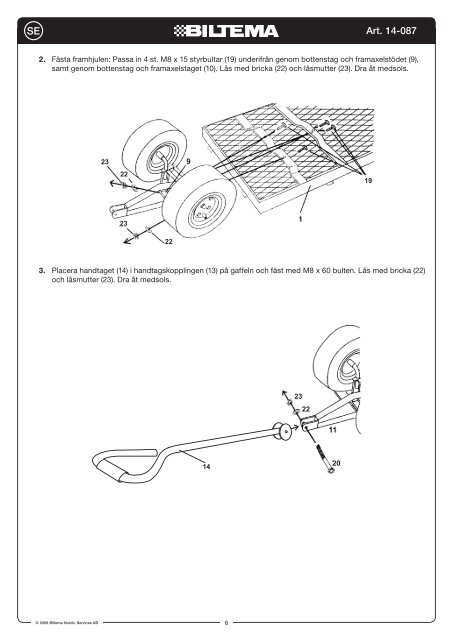
2. Fästa framhjulen: Passa in 4 st. M8 x 15 styrbultar (19) underifrån genom bottenstag och framaxelstödet (9),<br />
samt genom bottenstag och framaxelstaget (10). Lås med bricka (22) och låsmutter (23). Dra åt medsols.<br />
23<br />
23<br />
22<br />
22<br />
23<br />
22<br />
2. Join the 23 Front Wheel Assembly to the Bed(Part 1) by inserting four more M8 x<br />
15 Steering Bolts(Parts 19) first from under the bar through the holes in the<br />
22<br />
metal support bars then into the holes in both the Front Axle Support(Part 9)<br />
and the Center Front Axle Brace(Part 10). Insert Washers(Part 22) onto the<br />
2. Join the Front Wheel Assembly to the Bed(Part 1) by inserting four more M8 x<br />
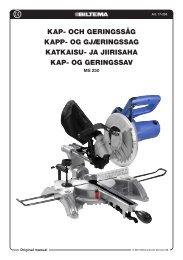
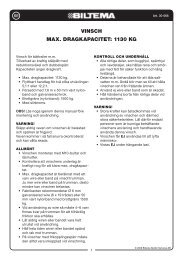
3. Placera handtaget Bolts then (14) secure i handtagskopplingen with Lock Nuts(Part (13) 23). på gaffeln och fäst med M8 x 60 bulten. Lås med bricka (22)<br />
och låsmutter (23). 15 Steering Dra åt medsols. Bolts(Parts 19) first from under the bar through the holes in the<br />
3. Attach metal the support Handle bars Coupler(Part then into the 13) holes to the in end both of the the Front Pull Handle(Part Axle Support(Part 14) by 9) simply<br />
inserting and the the Center end of Front the Pull Axle Handle(Part Brace(Part 10). 14) into Insert the Washers(Part pole hole of the 22) Coupler(Part onto the 13).<br />
Be Bolts sure then to align secure holes with on Lock the inside Nuts(Part of the 23). Pull Handle(Part 14) and the outside of the<br />
Coupler(Part 13). Join to the end of the Yoke (Part 11) by aligning holes<br />
and 3. Attach then inserting the Handle M8 Coupler(Part x 60 Pull Handle 13) to Bolt(Part the end 20) of the into Pull first Handle(Part the 14) by simply<br />
Yoke, inserting the Coupler(Part the end of the 13), Pull then Handle(Part out the other 14) side into of the thepole<br />
hole of the Coupler(Part 13).<br />
Yoke. Be Secure sure to align with Washer(Part holes on the 22) inside and of Lock the Pull Handle(Part 14) and the outside of the<br />
Nut(Part Coupler(Part 23). 13). Join to the end of the Yoke (Part 11) by aligning holes<br />
and then inserting M8 x 60 Pull Handle Bolt(Part 20) into first the<br />
Yoke, the Coupler(Part 13), then out the other side of the<br />
Yoke. Secure with Washer(Part 22) and Lock<br />
23<br />
Nut(Part 23).<br />
14<br />
14<br />
7<br />
7<br />
22<br />
23<br />
22<br />
20<br />
20<br />
19<br />
19