PT-F100U
PT-F100U
PT-F100U

Create successful ePaper yourself
Turn your PDF publications into a flip-book with our unique Google optimized e-Paper software.
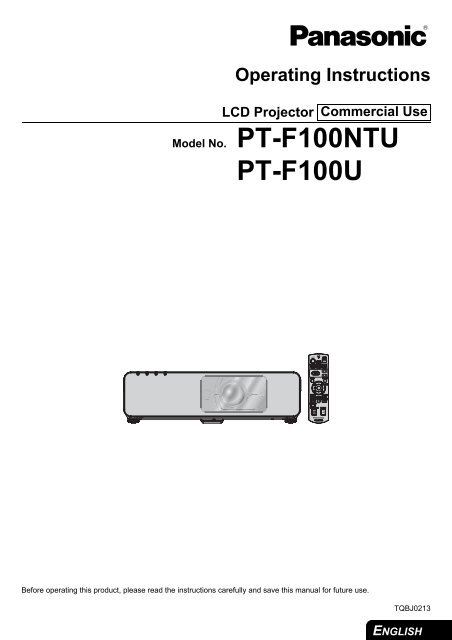
Operating Instructions<br />
LCD Projector<br />
Model No. <strong>PT</strong>-F100NTU<br />
<strong>PT</strong>-<strong>F100U</strong><br />
Before operating this product, please read the instructions carefully and save this manual for future use.<br />
Commercial Use<br />
TQBJ0213<br />
ENGLISH
Important<br />
Information<br />
Important Safety Notice<br />
Dear Panasonic Customer:<br />
This instruction booklet provides all the necessary operating information that you might require. We hope it will help<br />
you to get the most out of your new product, and that you will be pleased with your Panasonic LCD projector. The<br />
serial number of your product may be found on its bottom. You should note it in the space provided below and retain<br />
this booklet in case service is required.<br />
ENGLISH - 2<br />
Model number: <strong>PT</strong>-F100NTU / <strong>PT</strong>-<strong>F100U</strong><br />
Serial number:<br />
WARNING: TO REDUCE THE RISK OF FIRE OR ELECTRIC SHOCK, DONOT EXPOSE THIS PRODUCT<br />
TO RAIN OR MOISTURE.<br />
Power Supply: This LCD Projector is designed to operate on 100 V - 240 V, 50 Hz/60 Hz AC, house current<br />
only.<br />
CAUTION: The AC power cord which is supplied with the projector as an accessory can only be used for<br />
power supplies up to 125 V, 7 A. If you need to use higher voltages or currents than this, you will<br />
need to obtain a separate 250 V power cord. If you use the accessory cord in such situations, fire<br />
may result.<br />
The lightning flash with arrowhead symbol, within an equilateral triangle, is intended to alert the<br />
user to the presence of uninsulated “dangerous voltage” within the product’s enclosure that may<br />
be of sufficient magnitude to constitute a risk of electric shock to persons.<br />
The exclamation point within an equilateral triangle is intended to alert the user to the presence of<br />
important operating and maintenance (servicing) instructions in the literature accompanying the<br />
product.<br />
CAUTION: This equipment is equipped with a three-pin grounding-type power<br />
plug. Do not remove the grounding pin on the power plug. This plug<br />
will only fit a grounding-type power outlet. This is a safety feature. If<br />
you are unable to insert the plug into the outlet, contact an electrician.<br />
Do not defeat the purpose of the grounding plug.<br />
Indication based on the German law "Geräte- und Produktsicherheitsgesetz”<br />
Directive 2001/95/EC (Article 5);<br />
Panasonic Marketing Europe GmbH<br />
Hagenauer Str. 43 65203 Wiesbaden F.R.GERMANY<br />
Do not remove<br />
NOTICE:<br />
A This product has a High Intensity Discharge (HID) lamp that contains mercury. Dispose may be regulated in<br />
your community due to environmental considerations. For disposal or recycling information, please contact<br />
your local authorities, or the Electronics Industries Alliance: http://www.eiae.org
Important Safety Notice<br />
WARNING:<br />
This equipment has been tested and found to comply with the limits for a Class B digital device, pursuant to Part<br />
15 of the FCC Rules. These limits are designed to provide reasonable protection against harmful interference in<br />
a residential installation. This equipment generates, uses and can radiate radio frequency energy and, if not<br />
installed and used in accordance with the instructions, may cause harmful interference to radio communications.<br />
However, there is no guarantee that interference will not occur in a particular installation. If this equipment does<br />
cause harmful interference to radio or television reception, which can be determined by turning the equipment off<br />
and on, the user is encouraged to try to correct the interference by one or more of the following measures:<br />
- Reorient or relocate the receiving antenna.<br />
- Increase the separation between the equipment and receiver.<br />
- Connect the equipment into an outlet on a circuit different from that to which the receiver is connected.<br />
- Consult the dealer or an experienced radio/TV technician for help.<br />
FCC CAUTION: To assure continued compliance, use only shielded interface cables when connecting to<br />
computers or peripheral devices. Any unauthorized changes or modifications to this<br />
equipment will void the users authority to operate.<br />
If you use serial port to connect PC for external control of projector, you must use optional<br />
RS-232C serial interface cable with ferrite core. Any unauthorized changes or modifications<br />
to this equipment will void the user’s authority to operate.<br />
FCC RF Exposure Warning: (if provided with wireless device)<br />
- This equipment complied with FCC radiation exposure limits set forth for an unconrolled environment.<br />
- This equipment has been approved for mobile operation and requires minimum 20 cm spacing be provided<br />
between antenna(s) and all person’s body (excluding extremities of hands, wrist and feet) during wireless<br />
modes of operation.<br />
- This equipment may not be used with other installed transmitters, which may be capable of simultaneous<br />
transmission.<br />
WARNING:<br />
A Not for use in a computer room as defined in the Standard for the Protection of Electronic Computer/Data<br />
Processing Equipment, ANSI/NFPA 75.<br />
A For permanently connected equipment, a readily accessible disconnect device shall be incorporated in the<br />
building installation wiring.<br />
A For pluggable equipment, the socket-outlet shall be installed near the equipment and shall be easily<br />
accessible.<br />
Declaration of Conformity<br />
Model Number: <strong>PT</strong>-F100NTU / <strong>PT</strong>-<strong>F100U</strong><br />
Trade Name: Panasonic<br />
Responsible party: Panasonic North America<br />
Address: One Panasonic Way 4B - 9 Secaucus, New Jersey 07094<br />
Telephone number: 1 - 800 - 528 - 8601 or 1 - 800 - 222 - 0741<br />
E-mail: pjscservice@us.panasonic.com<br />
This device complies with Part 15 of the FCC Rules. Operation is subject to the following two conditions: (1) This<br />
device may not cause harmful interference, and (2) this device must accept any interference received, including<br />
interference that may cause undesired operation.<br />
Information on Disposal in other Countries outside the European<br />
This symbol is only valid in the European Union.<br />
If you wish to discard this product, please contact your local authorities or dealer and ask for the correct<br />
method of disposal.<br />
ENGLISH - 3<br />
Important<br />
Information
Important<br />
Information<br />
Declaration of Conformity<br />
Declaration of Conformity (DoC)<br />
This equipment is in compliance with the essential requirements and other relevant provisions of Directive 1999/5/EC.<br />
Customers can download a copy of the original DoC for this product from our DoC server: http://www.doc.panasonic.de<br />
Contact in the EU: Panasonic Services Europe, a Division of Panasonic Marketing Europe GmbH, Panasonic Testing Centre,<br />
Winsbergring 15, 22525 Hamburg, F.R.Germany<br />
This product is intended to be used in the following countries.<br />
Austria, Belgium, Bulgaria, Czech, Cyprus, Denmark, Estonia, Finland, France, Germany, Greece, Hungary, Iceland, Ireland, Italy, Latvia,<br />
Lithuania, Luxembourg, Malta, Netherlands, Norway, Poland, Portugal, Romania, Slovenia, Slovak, Spain, Sweden, Switzerland & UK<br />
Konformitätserklärung (KE)<br />
Dieses Gerät entspricht den grundlegenden Anforderungen und den weiteren entsprechenden Vorgaben der Richtlinie 1999/5/EU.<br />
Kunden können eine Kopie der Original-KE für dieses Produkt von unserem KE-Server herunterladen: http://www.doc.panasonic.de<br />
Kontaktadresse in der EG: Panasonic Services Europe, a Division of Panasonic Marketing Europe GmbH, Panasonic Testing Centre,<br />
Winsbergring 15, 22525 Hamburg, F.R.Germany<br />
Dieses Produkt ist für den Einsatz in den folgenden Ländern vorgesehen.<br />
Österreich, Belgien, Bulgarien, Tschechische Republik, Zypern, Dänemark, Estland, Finnland, Frankreich, Deutschland, Griechenland,<br />
Ungarn, Island, Irland, Italien, Lettland, Litauen, Luxemburg, Malta, Niederlande, Norwegen, Polen, Portugal, Rumänien, Slowenien,<br />
Slowakei, Spanien, Schweden, Schweiz und Großbritannien<br />
Déclaration de Conformité (DC)<br />
Cet appareil est conforme aux exigences essentielles et aux autres dispositions pertinentes de la Directive 1999/5/EC.<br />
Les clients peuvent télécharger une copie de la DC originale pour ce produit à partir de notre serveur DC: http://www.doc.panasonic.de<br />
Coordonnées dans l’UE : Panasonic Services Europe, a Division of Panasonic Marketing Europe GmbH, Panasonic Testing Centre,<br />
Winsbergring 15, 22525 Hamburg, F.R.Germany<br />
Ce produit est conçu pour l’utilisation dans les pays suivants.<br />
Autriche, Belgique, Bulgarie, République Tchéquie, Chypre, Danemark, Estonie, Finlande, France, Allemagne, Grèce, Hongrie, Islande,<br />
Irlande, Italie, Lettonie, Lituanie, Luxembourg, Malte, Pays-Bas, Norvège, Pologne, Portugal, Roumanie, Slovénie, Slovaquie, Espagne,<br />
Suède, Suisse et Royaume-Uni<br />
Declaración de conformidad (DC)<br />
Este equipo cumple con los requisitos esenciales asi como con otras disposiciones de la Directiva 1999/5/CE.<br />
El cliente puede descargar una copia de la DC original de este producto desde nuestro servidor DC: http://www.doc.panasonic.de<br />
Contacto en la U.E.: Panasonic Services Europe, a Division of Panasonic Marketing Europe GmbH, Panasonic Testing Centre,<br />
Winsbergring 15, 22525 Hamburg, F.R.Germany<br />
Este producto ha sido desarrollado para el uso en los siguientes países.<br />
Austria, Bélgica, Bulgaria, República Checa, Chipre, Dinamarca, Estonia, Finlandia, Francia, Alemania, Grecia, Hungría, Islandia, Irlanda,<br />
Italia, Letonia, Lituania, Luxemburgo, Malta, Holanda, Noruega, Polonia, Portugal, Rumania, Eslovenia, Eslovaquia, España, Suecia,<br />
Suiza y el Reino Unido<br />
Dichiarazione di conformità (DoC)<br />
Questo apparato é conforme ai requisiti essenziali ed agli altri principi sanciti dalla Direttiva 1999/5/CE.<br />
I clienti possono scaricare la copia del DoC originale per questo prodotto dal nostro server DoC: http://www.doc.panasonic.de<br />
Contatto nella EU: Panasonic Services Europe, a Division of Panasonic Marketing Europe GmbH, Panasonic Testing Centre,<br />
Winsbergring 15, 22525 Hamburg, F.R.Germany<br />
I prodotti sono stati prodotti per l’uso nei seguenti paesi.<br />
Austria, Belgio, Bulgaria, Repubblica Ceca, Cipro, Danimarca, Estonia, Finlandia, Francia, Germania, Grecia, Irlanda, Islanda, Italia,<br />
Lettonia, Lituania, Lussembugo, Malta, Olanda, Norvegia, Polonia, Portogallo, Romania, Regno Unito, Slovenia, Slovacchia, Spagna,<br />
Svezia, Svizzera, Ungheria<br />
ENGLISH - 4
ENGLISH - 5<br />
Important<br />
Infomation
Contents<br />
Quick steps<br />
1. Set up your projector<br />
See “Setting up” on page 16.<br />
2. Connect with other devices<br />
See “Connections” on page 20.<br />
3. Prepare the Remote control<br />
See “Remote control” on page 13.<br />
4. Start projecting<br />
See “Switching the projector on/off” on<br />
page 22.<br />
5. Adjust the image<br />
See “Menu Navigation” on page 29.<br />
B When you start the projection for the first<br />
time, the minimum required setting screen<br />
for projection will be displayed.<br />
See “Minimum required setting screen” on<br />
page 12.<br />
ENGLISH - 6<br />
Important Information<br />
Important Safety Notice............................................. 2<br />
Declaration of Conformity..................................................4<br />
Precautions with regard to safety............................. 8<br />
WARNINGS ......................................................................8<br />
CAUTIONS........................................................................9<br />
Cautions when transporting ............................................10<br />
Cautions when installing .................................................10<br />
Cautions on use ..............................................................11<br />
Accessories.....................................................................11<br />
Preparation<br />
Read this first ........................................................... 12<br />
Minimum required setting screen ....................................12<br />
About Your Projector ............................................... 13<br />
Remote control................................................................13<br />
Projector body .................................................................14<br />
Getting Started<br />
Setting up.................................................................. 16<br />
Screen size and throw distance ......................................16<br />
Projection method ...........................................................17<br />
Front leg adjusters and throwing angle ...........................17<br />
Lens shift and positioning................................................18<br />
Connections.............................................................. 20<br />
Before connection to the projector ..................................20<br />
Connecting with computers.............................................20<br />
Connecting with AV equipment .......................................21<br />
Basic Operation<br />
Switching the projector on/off ................................ 22<br />
Power cord ......................................................................22<br />
POWER indicator ............................................................22<br />
Switching on the projector...............................................23<br />
Switching off the projector...............................................23<br />
Projecting an image ................................................. 24<br />
Selecting the input signal ................................................24<br />
Positioning the image......................................................24<br />
Remote control operation........................................ 25<br />
Operating range ..............................................................25<br />
Setting up the image position automatically....................25<br />
Switching the input signal................................................26<br />
Using the laser pointer ....................................................26<br />
Capturing an image.........................................................27<br />
Stopping the projection temporary ..................................27<br />
Resetting to the factory default settings ..........................27<br />
Projecting an image in INDEX-WINDOW mode..............27<br />
Enlarging the centered area............................................28<br />
Controlling the volume of the speaker.............................28
Settings<br />
Menu Navigation .......................................................29<br />
Navigating through the MENU ........................................ 29<br />
Main menu and Sub-menu.............................................. 30<br />
PICTURE menu..........................................................32<br />
PICTURE MODE ............................................................ 32<br />
CONTRAST .................................................................... 32<br />
BRIGHTNESS................................................................. 32<br />
COLOR ........................................................................... 32<br />
TINT................................................................................ 32<br />
SHARPNESS.................................................................. 32<br />
COLOR TEMPERATURE............................................... 32<br />
DAYLIGHT VIEW............................................................ 32<br />
DETAILED SETUP ......................................................... 33<br />
POSITION menu ........................................................34<br />
KEYSTONE .................................................................... 34<br />
POSITION....................................................................... 34<br />
DOT CLOCK................................................................... 34<br />
CLOCK PHASE .............................................................. 34<br />
ASPECT.......................................................................... 34<br />
RESIZING ....................................................................... 35<br />
FRAME LOCK................................................................. 35<br />
O<strong>PT</strong>ION menu............................................................36<br />
INPUT GUIDE................................................................. 36<br />
STARTUP LOGO............................................................ 36<br />
COMPUTER2 SELECT .................................................. 36<br />
LAMP RUNTIME............................................................. 36<br />
FILTER REMAINING ...................................................... 37<br />
POWER OFF TIMER ...................................................... 37<br />
DIRECT POWER ON...................................................... 37<br />
CONTROL PANEL.......................................................... 37<br />
AUTO SETUP................................................................. 37<br />
SIGNAL SEARCH........................................................... 37<br />
INSTALLATION .............................................................. 37<br />
HIGHLAND ..................................................................... 38<br />
CLOSED CA<strong>PT</strong>ION ........................................................ 38<br />
TEST PATTERN............................................................. 38<br />
DETAILED SETUP ......................................................... 38<br />
SECURITY menu .......................................................39<br />
INPUT PASSWORD ....................................................... 39<br />
PASSWORD CHANGE................................................... 39<br />
TEXT DISPLAY............................................................... 39<br />
TEXT CHANGE .............................................................. 39<br />
NETWORK menu .......................................................40<br />
Items in NETWORK menu .............................................. 40<br />
Maintenance<br />
TEMP, LAMP and ARF Indicators ............................41<br />
Managing the indicated problems ................................... 41<br />
Care and Replacement .............................................42<br />
Cleaning the projector..................................................... 42<br />
Replacing the ARF (Auto Rolling Filter) .......................... 42<br />
Replacing the Lamp unit ................................................. 43<br />
Ceiling mount bracket safeguards .................................. 44<br />
Troubleshooting........................................................45<br />
Appendix<br />
Technical Information .............................................. 46<br />
List of compatible signals ............................................... 46<br />
Serial terminal................................................................. 47<br />
Computer connection guidance...................................... 48<br />
REMOTE terminal .......................................................... 49<br />
Specifications ................................................................. 50<br />
Screen size and throw distance for 16:9 aspect ratio..... 52<br />
Dimensions..................................................................... 53<br />
Trademark acknowledgements ...................................... 53<br />
Index .......................................................................... 54<br />
Avis important concernant la sécurité ................... 56<br />
Précautions de sécurité........................................... 59<br />
AVERTISSEMENT ......................................................... 59<br />
MISES EN GARDE......................................................... 60<br />
Précautions lors du transport.......................................... 62<br />
Précautions lors de l'installation ..................................... 62<br />
Précautions lors de l'utilisation ....................................... 62<br />
Remplacement de l'unité de la lampe..................... 63<br />
Protections du support de montage au plafond.............. 65<br />
ENGLISH - 7<br />
Important<br />
Infomation<br />
Preparation<br />
Getting Started<br />
Basic Operation<br />
Settings<br />
Maintenance<br />
Appendix
Important<br />
Information<br />
Precautions with regard to safety<br />
WARNINGS<br />
If you notice smoke, strange smells or noise coming<br />
from the projector, disconnect the power plug from<br />
the wall socket.<br />
Do not continue to use the projector in such cases,<br />
otherwise fire or electric shocks could result.<br />
Check that no more smoke is coming out, and then<br />
contact an Authorized Service Center for repairs.<br />
Do not attempt to repair the projector yourself, as this<br />
can be dangerous.<br />
Do not install this projector in a place which is not<br />
strong enough to take the full weight of the<br />
projector.<br />
If the installation location is not strong enough, it may<br />
fall down or tip over, and severe injury or damage<br />
could result.<br />
Installation work (such as ceiling suspension)<br />
should only be carried out by a qualified technician.<br />
If installation is not carried out correctly, there is the<br />
danger that injury or electric shocks may occur.<br />
Do not use other than an authorized ceiling mount<br />
bracket.<br />
If foreign objects or water get inside the projector, or<br />
if the projector is dropped or the cabinet is broken,<br />
disconnect the power plug from the wall socket.<br />
Continued use of the projector in this condition may<br />
result in fire or electric shocks.<br />
Contact an Authorized Service Center for repairs.<br />
Do not overload the wall socket.<br />
If the power supply is overloaded (for example, by<br />
using too many adapters), overheating may occur<br />
and fire may result.<br />
Never attempt to modify or disassemble the<br />
projector.<br />
High voltages can cause fire or electric shocks.<br />
For any inspection, adjustment and repair work,<br />
please contact an Authorized Service Center.<br />
Clean the power plug regularly to prevent it from<br />
becoming covered in dust.<br />
If dust builds up on the power plug, the resulting<br />
humidity can damage the insulation, which could<br />
result in fire. Pull the power plug out from the wall<br />
socket and wipe it with a dry cloth.<br />
If not using the projector for an extended period of<br />
time, pull the power plug out from the wall socket.<br />
Do not handle the power plug with wet hands.<br />
Failure to observe this may result in electric shocks.<br />
Insert the power plug securely into the wall socket.<br />
If the plug is not inserted correctly, electric shocks or<br />
overheating could result.<br />
Do not use plugs which are damaged or wall sockets<br />
which are coming loose from the wall.<br />
ENGLISH - 8<br />
Do not place the projector on top of surfaces which<br />
are unstable.<br />
If the projector is placed on top of a surface which is<br />
sloped or unstable, it may fall down or tip over, and<br />
injury or damage could result.<br />
Do not place the projector into water or let it become<br />
wet.<br />
Failure to observe this may result in fire or electric<br />
shocks.<br />
Do not do anything that might damage the power<br />
cord or the power plug.<br />
Do not damage the power cord, make any<br />
modifications to it, place it near any hot objects, bend<br />
it excessively, twist it, pull it, place heavy objects on<br />
top of it or wrap it into a bundle.<br />
If the power cord is used while damaged, electric<br />
shocks, short-circuits or fire may result.<br />
Ask an Authorized Service Center to carry out any<br />
repairs to the power cord that might be necessary.<br />
Do not place the projector on soft materials such as<br />
carpets or sponge mats.<br />
Doing so may cause the projector to overheat, which<br />
can cause burns, fire or damage to the projector.<br />
Do not place liquid containers on top of the<br />
projector.<br />
If water spills onto the projector or gets inside it, fire<br />
or electric shocks could result.<br />
If any water gets inside the projector, contact an<br />
Authorized Service Center.<br />
Do not insert any foreign objects into the projector.<br />
Do not insert any metal objects or flammable objects<br />
into the projector or drop them onto the projector, as<br />
doing so can result in fire or electric shocks.<br />
Do not allow the + and - terminals of the batteries to<br />
come into contact with metallic objects such as<br />
necklaces or hairpins.<br />
Failure to observe this may cause the batteries to<br />
leak, overheat, explode or catch fire.<br />
Store the batteries in a plastic bag and keep them<br />
away from metallic objects.<br />
Do not touch the leaked liquid from the batteries.<br />
If you touch the leaked liquid, it may hurt your skin.<br />
Immediately wash away the liquid with water and<br />
seek medical advice.<br />
If you get the leaked liquid in your eye, it may cause<br />
blindness or damage. Never rub your eye, and<br />
immediately wash away the liquid with water and<br />
seek medical advice.<br />
During a thunderstorm, do not touch the projector or<br />
the cable.<br />
Electric shocks can result.
Do not use the projector in a bath or shower.<br />
Fire or electric shocks can result.<br />
Do not place your skin into the light beam while the<br />
projector is being used.<br />
Strong light is emitted from the projector’s lens. If you<br />
place directly into this light, it can hurt or damage<br />
your skin.<br />
Do not look into the lens while the projector is being<br />
used.<br />
Strong light is emitted from the projector’s lens. If you<br />
look directly into this light, it can hurt and damage<br />
your eyes.<br />
Be especially careful not to let young children look<br />
into the lens. In addition, turn off the power and<br />
disconnect the power plug when you are away from<br />
the projector.<br />
Do not place your hands or other objects close to the<br />
air outlet port.<br />
Heated air comes out of the air outlet port. Do not<br />
place your hands or face, or objects which cannot<br />
withstand heat close to this port [allow at least<br />
50 cm (20") of space], otherwise burns or damage<br />
could result.<br />
CAUTIONS<br />
Do not cover the air inlet port or the air outlet port.<br />
Doing so may cause the projector to overheat, which<br />
can cause fire or damage to the projector.<br />
Do not place the projector in narrow, badly ventilated<br />
places such as closets or bookshelves.<br />
Do not place the projector on cloth or papers, as<br />
these materials could be drawn into the air inlet port.<br />
Do not set up the projector in humid or dusty places<br />
or in places where the projector may come into<br />
contact with oily smoke or steam.<br />
Using the projector under such conditions may result<br />
in fire, electric shocks or plastic deterioration. The<br />
plastic deterioration may cause the falling down of<br />
the projector which is mounted in the ceiling.<br />
Do not set up the projector in a high temperature<br />
environment, such as near a heater or in direct<br />
sunlight.<br />
Failure to observe this may result in fire, malfunction<br />
or plastic deterioration.<br />
When disconnecting the power cord, hold the plug,<br />
not the lead.<br />
If the power cord itself is pulled, the lead will become<br />
damaged, and fire, short-circuits or serious electric<br />
shocks may result.<br />
Precautions with regard to safety<br />
Replacement of the lamp is recommended to be<br />
carried out by a qualified technician.<br />
The lamp has high internal pressure. If improperly<br />
handled, explosion might result.<br />
The lamp can easily become damaged if struck<br />
against hard objects or dropped, and injury or<br />
malfunctions may result.<br />
When replacing the lamp, allow it to cool for at least<br />
one hour before handling it.<br />
The lamp cover gets very hot, and touching it can<br />
cause burns.<br />
Before replacing the lamp, be sure to disconnect the<br />
power plug from the wall socket.<br />
Electric shocks or explosions can result if this is not<br />
done.<br />
Do not allow infants or pets to touch the remote<br />
control unit.<br />
Keep the remote control unit out of the reach of<br />
infants and pets after using it.<br />
Always disconnect all cables before moving the<br />
projector.<br />
Moving the projector with cables still attached can<br />
damage the cables, which could cause fire or electric<br />
shocks to occur.<br />
Do not place any heavy objects on top of the<br />
projector.<br />
Failure to observe this may cause the projector to<br />
become unbalanced and fall, which could result in<br />
damage or injury.<br />
Do not short-circuit, heat or disassemble the<br />
batteries or place them into water or fire.<br />
Failure to observe this may cause the batteries to<br />
overheat, leak, explode or catch fire, and burns or<br />
other injury may result.<br />
When inserting the batteries, make sure the<br />
polarities (+ and -) are correct.<br />
If the batteries are inserted incorrectly, they may<br />
explode or leak, and fire, injury or contamination of<br />
the battery compartment and surrounding area may<br />
result.<br />
Use only the specified batteries.<br />
If incorrect or different kind of batteries are used, they<br />
may explode or leak, and fire, injury or contamination<br />
of the battery compartment and surrounding area<br />
may result.<br />
ENGLISH - 9<br />
Important<br />
Information
Important<br />
Information<br />
Precautions with regard to safety<br />
Do not mix old and new batteries.<br />
If the batteries are inserted incorrectly, they may<br />
explode or leak, and fire, injury or contamination of<br />
the battery compartment and surrounding area may<br />
result.<br />
Remove the used batteries from the remote control<br />
promptly.<br />
If you leave used batteries in the remote control for<br />
an extended period of time, it may cause liquid<br />
leaking, abnormal internal temperature rising or<br />
explosion.<br />
If not using the projector for an extended period of<br />
time, disconnect the power plug from the wall socket<br />
and remove the batteries from the remote control.<br />
If dust builds up on the power plug, the resulting<br />
humidity may damage the insulation, which could<br />
result in fire.<br />
Keeping or leaving the remote control with batteries<br />
inside may cause insulation deterioration, electrical<br />
leakage or explosion which could result in fire.<br />
Do not put your weight on this projector.<br />
You could fall or the projector could break, and injury<br />
may result.<br />
Be especially careful not to let young children stand<br />
or sit on the projector.<br />
ENGLISH - 10<br />
Disconnect the power plug from the wall socket as a<br />
safety precaution before carrying out any cleaning.<br />
Electric shocks can result if this is not done.<br />
If the lamp has broken, ventilate the room<br />
immediately. Do not touch or bring your face close<br />
to the broken pieces.<br />
Failure to observe this may cause the user to absorb<br />
the gas which was released when the lamp broke and<br />
which contains nearly the same amount of mercury<br />
as fluorescent lamps, and the broken pieces may<br />
cause injury.<br />
If you believe that you have absorbed the gas or that<br />
the gas has got into your eyes or mouth, seek<br />
medical advice immediately.<br />
Ask your dealer about the replacement of the lamp<br />
unit and check the inside of the projector.<br />
Ask an Authorized Service Center to clean inside the<br />
projector at least once a year.<br />
If dust is left to build up inside the projector without<br />
being cleaned out, it can result in fire or problems<br />
with operation.<br />
It is a good idea to clean the inside of the projector<br />
before the season for humid weather arrives. Ask<br />
your nearest Authorized Service Center to clean the<br />
projector when required. Please discuss with the<br />
Authorized Service Center regarding cleaning costs.<br />
We are constantly making efforts to preserve and maintain a clean environment. Please take non repairable<br />
units back to your dealer or a recycling company.<br />
Cautions when transporting<br />
Do not subject the projector to excessive vibration<br />
or shocks.<br />
The projector lens need to be handled with care.<br />
Cover the lens with the lens cover when transporting<br />
the projector.<br />
Cautions when installing<br />
Avoid setting up in places which are subject to<br />
vibration or shocks.<br />
The internal parts can be damaged, which may cause<br />
malfunctions or accidents.<br />
Avoid setting up in places which are subject to<br />
sudden temperature changes, such as near an air<br />
conditioner or lighting equipment.<br />
The life of the lamp may be shortened or the projector<br />
may be turned off. See “TEMP indicator” on page 40.<br />
Do not set up the projector near high-voltage power<br />
lines or near motors.<br />
The projector may be subject to electromagnetic<br />
interference.<br />
When transporting the projector, hold the body at<br />
the bottom securely.<br />
Do not hold the adjuster legs or the top cover to move<br />
the projector, as this may damage the projector.<br />
If installing the projector to the ceiling, ask a<br />
qualified technician to carry out all installation work.<br />
You will need to purchase the separate installation kit<br />
(Model No. ET-PKF100H, ET-PKF100S).<br />
Furthermore, all installation work is should only be<br />
carried out by a qualified technician.<br />
See “Ceiling mount bracket safeguards” on page 44<br />
for the Safety cable installation.<br />
If using this projector at high elevations<br />
(above 1 400 m), set the HIGHLAND to ON. See<br />
“HIGHLAND” on page 38.<br />
Failure to observe this may result in malfunctions or<br />
the life of the lamp or the other components may be<br />
shortened.
Cautions on use<br />
In order to get the best picture quality<br />
Draw curtains or blinds over any windows and turn off<br />
any lights near the screen to prevent outside light or<br />
light from indoor lamps from shining onto the screen.<br />
Do not touch the surfaces of the lens or the front<br />
glass with your bare hands.<br />
If the surface of the lens becomes dirty from<br />
fingerprints or anything else, this will be magnified<br />
and projected onto the screen. Moreover, when not<br />
using the projector, close the Front panel cover.<br />
Liquid crystal panel<br />
Do not project the same image for long periods of<br />
time, as this may remain as an afterimage on the<br />
liquid crystal panel.<br />
The liquid crystal panel of the projector is built with<br />
very high precision technology to provide fine picture<br />
details. Occasionally, a few stuck pixels may appear<br />
on the screen as fixed points of blue, green or red. It<br />
is recommended to switch off the projector once and<br />
try after 1hour later again. Please note that this does<br />
not affect the performance of your LCD.<br />
Accessories<br />
Make sure the following accessories are provided with your projector.<br />
Remote control for<br />
<strong>PT</strong>-F100NTU *1 (x1)<br />
N2QAYB000152<br />
*1. <strong>PT</strong>-F100NTU only<br />
*2. <strong>PT</strong>-<strong>F100U</strong> only<br />
*3. <strong>PT</strong>-F100NTU only<br />
Remote control for<br />
<strong>PT</strong>-<strong>F100U</strong> *2 (x1)<br />
N2QAYB000154<br />
Precautions with regard to safety<br />
The projector has a high pressure mercury lamp and<br />
that is characterised as follows.<br />
The brightness of the lamp depends on the duration<br />
of use.<br />
The lamp may explode or shorten the lamp life by<br />
shocks or chipping damage.<br />
The lamp may explode only occasionally after using<br />
the projector.<br />
The lamp may explode if using the projector after the<br />
instructed lamp replacement timing.<br />
The lamp life is depends on individual lamp<br />
characteristics, usage condition and the installation<br />
environment. Especially the consecutive use of the<br />
projector for more than 10 hours, or the frequent<br />
switching on or off may greatly affect on the lamp life.<br />
Screen<br />
Do not apply any volatile substances which may<br />
cause discoloration to the screen, and do not let it<br />
become dirty or damaged.<br />
Optical components<br />
If you use the projector consecutively 6 hours every<br />
day, the optical components may need to be replaced<br />
in less than 1 year.<br />
AAA batteries for Remote<br />
control (x2)<br />
Mains lead (x1)<br />
K2CG3DH0053<br />
Safety cable (x1)<br />
TTRA0141<br />
Attachment screw (x1)<br />
Safety cable (x1)<br />
CD-ROM *3 (x1)<br />
TQBH9009<br />
ENGLISH - 11<br />
Important<br />
Information
Preparation<br />
Read this first<br />
Minimum required setting screen<br />
When you start the projection for the first time, the minimum required setting screen for projection will be displayed.<br />
LANGUAGE<br />
Select the required language setting.<br />
LANGUAGE<br />
Press F G I H buttons of the Remote control or<br />
Control panel on the projector to highlight the<br />
required language, and press ENTER to proceed to<br />
the next setting.<br />
O<strong>PT</strong>IONS<br />
Select the current projection method and fan speed<br />
setting. If you need return to the previous setting,<br />
press the RETURTN button.<br />
O<strong>PT</strong>ION<br />
ENGLISH - 12<br />
SELECT<br />
INSTALLATION<br />
ENTER<br />
FRONT/DESK<br />
HIGHLAND OFF<br />
SELECT<br />
RETURN<br />
ENTER<br />
INSTALLATION<br />
Press I H buttons of the Remote control or<br />
Control panel on the projector to select the<br />
required installation method. Press G to proceed to<br />
the HIGHLAND setting.<br />
FRONT/DESK<br />
FRONT/CEILING<br />
REAR/DESK<br />
REAR/CEILING<br />
Setting on a desk/floor and<br />
projecting from front<br />
Mounting in the ceiling and<br />
projecting from front<br />
Setting on a desk/floor and<br />
projecting from rear<br />
Mounting in the ceiling and<br />
projecting from rear<br />
HIGHLAND<br />
If you use the projector at high elevation, the<br />
HIGHLAND setting need to be ON to set the fan<br />
speed high. Press I H to select the required<br />
option. If you need to return to the INSTALLATION,<br />
press F.<br />
OFF The fan speed is low.<br />
ON The fan speed is high.<br />
NOTE:<br />
• At 1 400 m (4 593 ft) above sea level, the setting must<br />
be ON.<br />
• The loudness of fan noise depends on the HIGHLAND<br />
setting.<br />
Press the ENTER button to start the projection.<br />
Once you finish the minimum requirement setting, it will not be displayed again unless the projector is<br />
initialised. See “INITIALIZE ALL” on page 38.<br />
You can change the settings from the MAIN MENU. See “Menu Navigation” on page 29.
About Your Projector<br />
Remote control<br />
POWER button<br />
While the MAIN POWER is on,<br />
switch between stand-by mode<br />
and projection mode.<br />
(page 22)<br />
Project a laser pointer.<br />
(page 26)<br />
Display the MAIN MENU.<br />
(page 29)<br />
Navigate through the<br />
menus with FGIH, and<br />
activate the menu item with<br />
ENTER. (page 29)<br />
Capture the projected image<br />
as a frozen picture. (page 27)<br />
Reset some of the settings to<br />
the factory default settings.<br />
(page 27)<br />
MULTI-LIVE is only<br />
for <strong>PT</strong>-F100NTU.<br />
See CD-ROM<br />
contents.<br />
Control to change the<br />
scale by means of digital<br />
zoom. (page 28)<br />
Battery compartment<br />
1. Press the tab and lift up the cover.<br />
2. Insert the batteries according to the polarity diagram<br />
indicated inside.<br />
Top view<br />
Remote control signal and Laser pointer<br />
beam emitters. (page 25)<br />
Control to adjust the<br />
volume of the speakers.<br />
(page 28)<br />
Attaching a hand strap<br />
You can attach a favourite strap<br />
on to the Remote control.<br />
Remote control indicator<br />
If you press any button except the<br />
LASER button, the Remote control<br />
indicator will flash. If you press the<br />
LASER button, it will lit.<br />
Automatically adjust the<br />
setting of DOT CLOCK,<br />
CLOCK PHASE and SIGNAL<br />
SEARCH for the projected<br />
image of COMPUTER signal.<br />
(page 25)<br />
INPUT SELECT buttons<br />
Switch the required input<br />
signal button to select.<br />
NETWORK button is<br />
only for <strong>PT</strong>-F100NTU.<br />
See CD-ROM contents.<br />
PAGE buttons are only<br />
for <strong>PT</strong>-F100NTU.<br />
See CD-ROM contents.<br />
Return to the previous menu.<br />
(page 29)<br />
Turn off the projection<br />
temporarily.<br />
Display the frozen image<br />
while the display of<br />
subsequent images<br />
continues. (page 27)<br />
COMPUTER SEARCH<br />
button is only for<br />
<strong>PT</strong>-F100NTU.<br />
See CD-ROM contents.<br />
Remote control<br />
indicator<br />
NOTE:<br />
• Do not drop the Remote control.<br />
• Avoid contact with liquids or moisture.<br />
• Use manganese batteries or alkaline batteries with the Remote control.<br />
• Do not attempt to modify or disassemble the Remote control. Contact an Authorized Service Center for repairs.<br />
• Do not keep pressing the Remote control buttons as this may shorten battery life.<br />
• Do not point the laser in other people’s eyes or stare into beam.<br />
• See “Remote control operation” on page 25.<br />
ENGLISH - 13<br />
Preparation
Preparation<br />
About Your Projector<br />
Projector body<br />
Top and front view<br />
Control panel<br />
NOTE:<br />
• Do not cover the ventilation openings or place anything within 50 cm (20") of them as this may cause damage or injury.<br />
• While the projector is not in use, keep the FRONT PANEL COVER closed to protect the lens.<br />
ENGLISH - 14<br />
Levers<br />
Focus lever (page 24)<br />
Zoom lever (page 24)<br />
INPUT SELECT button<br />
Switch to cycle through the input<br />
method. (page 24)<br />
Indicators<br />
POWER indicator (page 22)<br />
LAMP indicator (page 41)<br />
TEMP indicator (page 41)<br />
FILTER indicator (page 41)<br />
Projection lens Front panel cover<br />
POWER button<br />
While the MAIN POWER is on,<br />
switch between stand-by mode<br />
and projection mode. (page 22)<br />
Hold both side of the top corner of<br />
the Front panel cover to open or<br />
close.<br />
While not operating the<br />
controls panel, keep the Front<br />
panel cover closed.<br />
MENU button<br />
Display the MAIN MENU.<br />
(page 29)<br />
Remote control signal receptor (page 25)<br />
ALS (Ambient Luminance Sensor)<br />
(page 32)<br />
Speaker<br />
Lens shift lever (page 18)<br />
Air intake port<br />
Navigation buttons<br />
Navigate through the menus with FGIH,<br />
and activate the menu item with ENTER.<br />
(page 29)<br />
RETURN button<br />
Return to the previous menu.<br />
(page 29)
Back and bottom view<br />
Security lock<br />
Attache the commercial shackle<br />
lock, manufactured by Kensington,<br />
to protect your projector.<br />
Compatible with the Kensington<br />
MicroSaver Security System.<br />
ARF (Auto Rolling Filter)<br />
compartment<br />
(page 42)<br />
LAN<br />
Connect a LAN cable for network<br />
connection. This terminal is<br />
<strong>PT</strong>-F100NTU only<br />
SERIAL<br />
See “Serial terminal” on page 47.<br />
REMOTE<br />
See “REMOTE terminal” on<br />
page 49.<br />
Font leg adjusters<br />
Screw up/down to adjust the<br />
projection angle. (page 17)<br />
COMPUTER1 IN<br />
Connect an RGB signal cable from<br />
a computer.<br />
COMPUTER2 IN/1 OUT<br />
Connect an RGB signal cable from<br />
a computer. Selectable for input<br />
and output by menu operation.<br />
COMPUTER AUDIO IN<br />
Connect audio cables for inputting<br />
audio signals corresponding to<br />
COMPUTER1 IN and<br />
COMPUTER2 IN/1 OUT.<br />
About Your Projector<br />
Lamp unit compartment<br />
(page 43)<br />
Air exhaust port<br />
Heated air comes out of this<br />
opening.<br />
MAIN POWER<br />
Switch the projector on/off.<br />
(page 23)<br />
AC IN<br />
Connect the Mains lead to supply<br />
electronic power to the projector.<br />
(page 22)<br />
Safety cable attachment point<br />
Attach the Safety cable when<br />
mounted in the ceiling. (page 44)<br />
S-VIDEO IN<br />
Connect a S-VIDEO signal cable.<br />
VIDEO IN<br />
Connect an RCA composite video<br />
cable.<br />
AUDIO IN<br />
Connect audio cables for inputting<br />
audio signal corresponding to<br />
VIDEO IN, S-VIDEO IN and<br />
COMPONENT IN.<br />
COMPONENT IN<br />
Connect a YPBPR signal cable.<br />
VARIABLE AUDIO OUT<br />
Connect an audio cables for<br />
outputting audio signals to the<br />
connected equipment.<br />
NOTE:<br />
• Do not cover the ventilation openings or place anything within 50 cm (20") of them as this may cause damage or injury.<br />
• When a cable is connected to the VARIABLE AUDIO OUT, the built-in speaker will be disabled.<br />
ENGLISH - 15<br />
Preparation
Projection method<br />
Setting up<br />
You can use the projector with any of the following 4 projection methods. To set the desired method in the projector,<br />
See “INSTALLATION” on page 37..<br />
Setting on a desk/floor and<br />
projecting from front<br />
Setting on a desk/floor and<br />
projecting from rear<br />
INSTALLATION: FRONT/DESK INSTALLATION: REAR/DESK<br />
Mounting in the ceiling and<br />
projecting from front<br />
Mounting in the ceiling and<br />
projecting from rear<br />
INSTALLATION: FRONT/CEILING INSTALLATION: REAR/CEILING<br />
NOTE:<br />
• A translucent screen is required for rear projection.<br />
• When mounting the projector in the ceiling, the optional ceiling mount bracket (ET-PKF100H, ET-PKF100S) is required.<br />
• See “Ceiling mount bracket safeguards” on page 44.<br />
Front leg adjusters and throwing angle<br />
You can screw up/down the front leg adjusters to control the angle of the projector for adjusting the throwing angle.<br />
See “Positioning the image” on page 24.<br />
NOTE:<br />
• Heated air comes out of the Air exhaust port. Do not touch the Air exhaust port directly.<br />
• If keystone distortion occurs, see “KEYSTONE” on page 34.<br />
ENGLISH - 17<br />
Getting Started
Getting Started<br />
Setting up<br />
Lens shift and positioning<br />
If the projector is not positioned right in front of the center of the screen, you can adjust the projected image position<br />
by moving the Lens shift lever within the shift range of the lens.<br />
Adjusting the Lens shift lever<br />
1. Open the Front panel cover.<br />
2. Screw the Lens shift lever counterclockwise to<br />
unlock.<br />
3. Move the Lens shift lever to adjust the projected<br />
image position.<br />
4. Screw the Lens shift lever clockwise to lock.<br />
Horizontal shift<br />
You can place the projector where the projector lens is up to 32% horizontally off-center from the screen and<br />
then adjust the image position with the Lens shift lever.<br />
Shifting the lever right:<br />
Moving to screen’s<br />
right.<br />
Vertical shift<br />
You can place the projector where the projector lens is up to 50% vertically off-center from the screen and the<br />
adjust the image position with the Lens shift lever.<br />
Up to about 50 %<br />
of the projection<br />
Up to about 50 %<br />
of the projection<br />
ENGLISH - 18<br />
Up to about 32 %<br />
of the projection<br />
Up to about 32 %<br />
of the projection<br />
Shifting the lever left:<br />
Moving to screen’s left.<br />
Shifting the lever down:<br />
Moving to screen’s<br />
bottom.<br />
Shifting the lever up:<br />
Moving to screen’s top.
Projector location range<br />
Setting up<br />
You can determine where to locate the screen and the projector by considering the lens shift possibilities. See<br />
“Positioning the image” on page 24.<br />
When the screen position is fixed<br />
Vertical center of<br />
screen<br />
SH<br />
Screen<br />
Projector<br />
SW<br />
When the projector position is fixed<br />
V<br />
NOTE:<br />
• When the projector is located right in front of the screen and the Lens shift lever is centered, you will get the best quality<br />
of the projection image.<br />
• When the Lens shift lever is at the vertical limit of the shift range, you cannot move the lever to the horizontal limit,<br />
likewise when the Lens shift lever is at the horizontal limit of the shift range, you cannot move the lever to the horizontal<br />
limit.<br />
• When the projector is tilted and you adjust KEYSTONE, the center of the screen and the lens need to be realigned.<br />
• Do not attempt to pull the Lens shift lever hard while adjusting.<br />
H<br />
Center of lens<br />
Projector<br />
Placement<br />
Shift range<br />
ENGLISH - 19<br />
Getting Started
Getting Started<br />
Connections<br />
Before connection to the projector<br />
Read and follow the operating and connecting instructions of each peripheral device.<br />
The peripheral devices must be turned off.<br />
Use cables that match each peripheral device to be connected.<br />
If the input signal is affected by signal jitter, the projected image may have poor image quality and timebase<br />
correction is effective.<br />
Confirm the type of video signals. See “List of compatible signals” on page 46.<br />
Connecting with computers<br />
LAN cable<br />
(Commercial)<br />
NOTE:<br />
• When COMPUTER2 SELECT in the O<strong>PT</strong>ION menu is set to OUTPUT, do not connect any input signals.<br />
• See CD-ROM contents for the LAN network connection.<br />
ENGLISH - 20<br />
Computer for<br />
controlling<br />
Computers Monitor<br />
RGB signal cable<br />
(Commercial)<br />
Audio system
Connecting with AV equipment<br />
Connecting with VIDEO IN/S-VIDEO IN<br />
Connecting with COMPONENT IN<br />
To S-VIDEO output<br />
To video output or<br />
audio output<br />
NOTE:<br />
• When you connect more than one AV equipment, switch the audio connection manually.<br />
To audio output<br />
NOTE:<br />
• If you connect the BNC cables, use with a commercial BNC-RCA adaptor.<br />
Audio system<br />
Audio system<br />
Video player<br />
DVD player<br />
Video player<br />
DVD player<br />
Connections<br />
ENGLISH - 21<br />
Getting Started
Basic Operation<br />
Switching the projector on/off<br />
Power cord<br />
Connecting<br />
1. Make sure the shape<br />
of the power cord and<br />
the AC IN connector<br />
on the back of the<br />
projector match, then<br />
push the plug all the way in.<br />
2. Connect the Mains lead to a wall socket.<br />
Disconnecting<br />
1. Make sure the MAIN POWER is switched off and<br />
unplug the Mains lead from the wall socket.<br />
2. Hold the plug and unplug the Mains lead from the<br />
AC IN connector on the back of the projector.<br />
ENGLISH - 22<br />
Direct power off function<br />
You can disconnect the Mains lead from the<br />
projector or switch off the MAIN POWER button<br />
while projecting or soon after projecting. The<br />
internal lamp cooling fan will keep operating by the<br />
internal power supply.<br />
NOTE:<br />
• If the projector is switched on again while the internal<br />
cooling fan is still operating by the internal power<br />
supply, it may take a while to start the projection.<br />
Direct power on function<br />
NOTE:<br />
• Do not use other than a provided Mains lead.<br />
• Ensure all the input devices are connected and turned off before connecting the Mains lead.<br />
• Do not force the connector as this may damage the projector and/or the power cord.<br />
• Dirt or dust build-up around plugs may cause fire or electrical hazards.<br />
• Switch off the power to the projector when not in use.<br />
POWER indicator<br />
Indicator status Status<br />
No illumination or flashing The MAIN POWER is switched off.<br />
RED<br />
GREEN<br />
ORANGE<br />
Lit<br />
If you activate the DIRECT POWER ON, you can<br />
start the projection only with connecting the Mains<br />
lead or switching on the MAIN POWER. See<br />
“DIRECT POWER ON” on page 37.<br />
The MAIN POWER is switched on and the projector is in standby.<br />
When the LAMP or TEMP indicator is flashing, the POWER indicator will<br />
not be lit.<br />
Flashing Network connection is ready while the POWER is turned off.<br />
Flashing The POWER is switched on and the projector is getting ready to project.<br />
Lit The projector is ready to project.<br />
Lit The POWER is switched off and the projector is cooling the lamp.<br />
Flashing<br />
POWER indicator<br />
The POWER is switched on again when cooling the lamp and recovering<br />
to projection mode. Recovery may take a while.<br />
NOTE:<br />
• If the projector is switched on again while the internal cooling fan is still operating by the internal power supply, it may take<br />
a while to start the projection.<br />
• The electric consumption in standby mode is 3 W.
Switching on the projector<br />
1. Switch the MAIN POWER on.<br />
The power indicator lights up in RED.<br />
2. Open the Front panel cover.<br />
This is not necessary in Remote control operation.<br />
Switching the projector on/off<br />
3. Press the POWER button.<br />
The power indicator lights up in GREEN after<br />
flashing for a while.<br />
The STARTUP LOGO is displayed on the screen.<br />
See “STARTUP LOGO” on page 36.<br />
NOTE:<br />
• Some small rattling or tinkling sound may be heard when starting up, but this is normal and does not affect the<br />
performance of the projector.<br />
• If you disconnected the Mains lead or switched off the MAIN POWER while on projecting mode, the projection will start<br />
with connecting the Mains lead or switching on the MAIN POWER. See “DIRECT POWER ON” on page 37.<br />
Switching off the projector<br />
1. Open the Front panel cover.<br />
This is not necessary in Remote control operation.<br />
2. Press the POWER button.<br />
The confirmation screen is displayed.<br />
To return to the projection, press any button except<br />
the POWER button.<br />
3. Press the POWER button.<br />
The power indicator lights up in ORANGE while<br />
cooling the lamp, then illuminates RED when is<br />
ready to switch off the MAIN POWER.<br />
4. Switch off the MAIN POWER on the back of the<br />
projector.<br />
NOTE:<br />
• Press the POWER twice or for a long duration to switch the power off.<br />
• You can disconnect the Mains lead or switch off the MAIN POWER instead of following this procedure. See “DIRECT<br />
POWER ON” on page 37.<br />
ENGLISH - 23<br />
Basic Operation
Basic Operation<br />
Projecting an image<br />
Selecting the input signal<br />
1. Switch on the connected devices.<br />
Press the play button of the required device.<br />
2. Press the INPUT SELECT buttons to select the<br />
required input method if needed. See “Selecting<br />
the input signal” on page 24.<br />
The image will be projected on the screen.<br />
Positioning the image<br />
1. Open the Front panel cover.<br />
2. Adjust the projected image with the Lens shift<br />
lever. See “Lens shift and positioning” on page 18.<br />
3. Adjust the angle of the projector.<br />
Screw down the Front leg adjusters and adjust the<br />
angle vertically.<br />
See “Front leg adjusters and throwing angle” on<br />
page 17.<br />
ENGLISH - 24<br />
NOTE:<br />
• SIGNAL SEARCH is ON as default and the signal from<br />
the connected devices is detected automatically. See<br />
“SIGNAL SEARCH” on page 37.<br />
4. Adjust the focus and the projected image size.<br />
Turn the Focus lever and Zoom lever to adjust the<br />
image.<br />
You can confirm the adjusted effect with the TEST<br />
PATTERN in O<strong>PT</strong>ION menu. See “TEST PATTERN”<br />
on page 38.<br />
Focus lever<br />
Zoom lever<br />
NOTE:<br />
• Do not touch the Air Exhaust port as this may cause<br />
burns or injury.<br />
• If keystone distortion occurs, see “KEYSTONE” on<br />
page 34.<br />
• If you adjust the focus, you may need to adjust the size<br />
of the image by moving the Zoom lever again.
Remote control operation<br />
Operating range<br />
Setting up the image position automatically<br />
You can adjust the setting of SIGNAL<br />
SEARCH, DOT CLOCK and CLOCK PHASE<br />
automatically for the projected COMPUTER<br />
signal image.<br />
NOTE:<br />
• SIGNAL SEARCH will be adjusted only when the<br />
SIGNAL SEARCH is set to ON.<br />
• If the dot clock frequency is 108 MHz or higher, AUTO<br />
SETUP is not effective.<br />
• If the projected image is dark or blurred around the<br />
edge, AUTO SETUP may stop the processing before<br />
complete. Project a much clearer or lighter image and<br />
press the AUTO SETUP button again.<br />
You can operate the projector with the Remote control<br />
within the remote range 15 m (49'2").<br />
Facing to the projector<br />
Ensure the Remote control emitter is facing to<br />
the Remote control signal receptor on front/back<br />
of the projector and press the required buttons to<br />
operate.<br />
Facing to the screen<br />
Ensure the Remote control emitter is facing to<br />
the screen and press the required buttons to<br />
operate the projector. The signal will be reflected<br />
off the screen. The operating range may differ due<br />
to the screen material.<br />
NOTE:<br />
• Do not let strong light shine onto the signal receptor.<br />
The Remote control may malfunction under strong<br />
light such as fluorescent.<br />
• If there are any obstacles between the Remote control<br />
and the Remote control signal receptor, the Remote<br />
control may not operate correctly.<br />
Screen Projected image<br />
ENGLISH - 25<br />
Basic Operation
Basic Operation<br />
Remote control operation<br />
Switching the input signal<br />
You can switch the input method manually by<br />
pressing the COMPUTER, NETWORK<br />
(<strong>PT</strong>-F100NTU only) and VIDEO buttons.<br />
Press the required button several times or I<br />
H to cycle through the input methods as<br />
follows. The actual projected image will be<br />
changed in a while.<br />
The graphical guidance will be displayed on the upper<br />
right of the projected image and you can confirm the<br />
selected input method which is highlighted in yellow. See<br />
“INPUT GUIDE” on page 36.<br />
Pressing the COMPUTER button<br />
COMPUTER1 COMPUTER2<br />
NOTE:<br />
• Only when the COMPUTER2 SELECT is set to<br />
COMPUTER2 IN, you can switch between<br />
COMPUTER1 and COMPUTER2.<br />
You can highlight items on the screen with<br />
the red laser pointer while projecting the<br />
image in presentations or visual<br />
demonstrations as an eye-catching pointing<br />
device.<br />
Hold down the LASER button to goes on the<br />
laser pointer and release to goes off.<br />
Deactivating the LASER button<br />
You can deactivate the LASER button for an<br />
accidental operation.<br />
1. Open the battery compartment cover of the<br />
Remote control.<br />
2. Slide the switch tab.<br />
3. Close the battery compartment cover of the<br />
Remote control.<br />
See “Battery compartment” on page 13.<br />
ENGLISH - 26<br />
Pressing the NETWORK button<br />
The NETWORK button is only for <strong>PT</strong>-F100NTU.<br />
See CD-ROM contents for more detailed information.<br />
Pressing the VIDEO button<br />
VIDEO S-VIDEO<br />
COMPONENT<br />
Pressing the INPUT SELECT<br />
button on the projector<br />
COMPUTER1<br />
NETWORK<br />
COMPONENT<br />
NETWORK is only for <strong>PT</strong>-F100NTU.<br />
NOTE:<br />
• If you select an unplugged input method, the guidance will blink on and off several times.<br />
• See “List of compatible signals” on page 46.<br />
• See “Connections” on page 20.<br />
Using the laser pointer<br />
On<br />
Off<br />
COMPUTER2<br />
S-VIDEO<br />
VIDEO<br />
NOTE:<br />
• The laser pointer should never be projected directly into<br />
the eyes of a person or animal.<br />
• Do not aim the laser at reflective surfaces.<br />
• Do not allow children to use laser pointer.<br />
• Never look directly into the laser beam.<br />
• The laser pointer is not effective with translucent<br />
screens.<br />
• Please read the cautions on the Remote control.<br />
• This is a Class II laser product.
Capturing an image<br />
When projecting an image, press FREEZE to<br />
capture the projected image and display it on<br />
the screen as a still picture. Press again to<br />
escape. While the image is frozen, the sound<br />
will be stopped.<br />
Stopping the projection temporary<br />
You can turn off the lamp and stop the<br />
projection temporary for electrical power save.<br />
Resetting to the factory default settings<br />
You can reset most of the customized settings<br />
to the factory defaults by pressing DEFAULT<br />
button of the Remote control. Display the<br />
required sub menu or the menu items and<br />
press the button again.<br />
See “Main menu and Sub-menu” on page 30.<br />
You can project an image in split 2 windows<br />
as an INDEX-WINDOW, one is frozen, stored<br />
in memory and displayed on the screen’s left<br />
side, while the display of subsequent images<br />
continues on the right.<br />
To escape from the INDEX-WINDOW, press<br />
the MENU or RETURN button.<br />
Switching the position<br />
In default, the frozen image is displayed on the left<br />
and the subsequent image is displayed on the<br />
right. Press I H to switch the position.<br />
Remote control operation<br />
NOTE:<br />
• Escaping from the freeze mode is available by pressing<br />
any button.<br />
Press the SHUTTER button to return to the projection.<br />
NOTE:<br />
• Some menu items are not available to reset by pressing<br />
the DEFAULT button. Adjust each menu items<br />
manually.<br />
• To reset all the settings to the factory defaults, see<br />
“INITIALIZE ALL” on page 38.<br />
Projecting an image in INDEX-WINDOW mode<br />
Projected image Frozen image<br />
Frozen image<br />
Continuing image<br />
Continuing image<br />
Continuing image<br />
Frozen image<br />
Changing the image size<br />
Press F G to switch and cycle through in 3 size.<br />
Frozen image<br />
Continuing image<br />
NOTE:<br />
• If you change the window size, the aspect ratio of the<br />
image is changed and becomes vertically elongated.<br />
Capturing a new image<br />
While in INDEX-WINDOW mode, press ENTER to<br />
capture a new image and the frozen image window<br />
will be updated in a while.<br />
ENGLISH - 27<br />
Basic Operation
Basic Operation<br />
Remote control operation<br />
Enlarging the centered area<br />
ENGLISH - 28<br />
You can enlarge the projected image down<br />
to a centered area for emphasizing within<br />
the range of 1x to 2x.<br />
Enlarging the image<br />
1. Press DIGITAL ZOOM +/- once.<br />
The centered area of the image will then be enlarged<br />
to 1.5x.<br />
2. Adjust the image size by pressing DIGITAL ZOOM<br />
+/-.<br />
The image size will be changed in steps of 0.1.<br />
You can control the volume of the built-in<br />
speakers and output sound. Press +/- to<br />
control the volume.<br />
Shifting the center point<br />
Press F G I H to shift the center point.<br />
NOTE:<br />
• When the COMPUTER signal is projected, the enlargement range will be changed to 1x to 3x. When the FRAME LOCK<br />
in POSITION menu is set to ON, the enlargement range is 1x to 2x. See “FRAME LOCK” on page 35.<br />
• When the input signal is changed while the DIGITAL ZOOM is activated, the DIGITAL ZOOM will be cancelled.<br />
Controlling the volume of the speaker<br />
NOTE:<br />
• Power consumption can be reduced if the volume level<br />
is lowered.
Menu Navigation<br />
The menu system allows you to access functions which do not have their own dedicated buttons on the Remote<br />
control. The menu options are structured and categorised. You can navigate through the menu with F G H I<br />
buttons.<br />
Navigating through the MENU<br />
Displaying the Main menu<br />
Press the MENU button to display the Main<br />
menu and the operating guidance.<br />
Main menu Sub-menu<br />
PICTURE<br />
POSITION<br />
LANGUAGE<br />
O<strong>PT</strong>ION<br />
SECURITY<br />
NETWORK<br />
SELECT<br />
RETURN<br />
ENTER<br />
PICTURE MODE<br />
CONTRAST<br />
BRIGHTNESS<br />
COLOR<br />
TINT<br />
SHARPNESS<br />
COLOR TEMPERATURE<br />
DAYLIGHT VIEW<br />
DETAILED SETUP<br />
Current<br />
settings<br />
STANDARD<br />
STANDARD<br />
AUTO<br />
Operating guidance<br />
Contains the required buttons to adjust the settings.<br />
Adjusting with the bar scale<br />
items<br />
The triangle mark under the bar indicates factory<br />
default setting and the square indicates the current<br />
setting.<br />
Current setting<br />
KEYSTONE<br />
Default<br />
Returning to the previous menu<br />
Press the MENU or RETURN button to return to<br />
the previous menu. Press repeatedly to escape<br />
from the menu mode and return to the<br />
projection.<br />
Operating procedure<br />
1. Press F G to scroll to the required Main menu<br />
item and press ENTER to select.<br />
The selected item is highlighted in orange and the<br />
Sub-menu is displayed on the right.<br />
See “Main menu and Sub-menu” on page 30.<br />
PICTURE<br />
POSITION<br />
LANGUAGE<br />
O<strong>PT</strong>ION<br />
SECURITY<br />
NETWORK<br />
SELECT<br />
RETURN<br />
ENTER<br />
KEYSTONE<br />
POSITION<br />
DOT CLOCK<br />
CLOCK PHASE<br />
ASPECT<br />
RESIZING<br />
FRAME LOCK<br />
4:3<br />
ON<br />
OFF<br />
2. Press F G to scroll to the required Sub-menu<br />
item and press I H or ENTER to adjust.<br />
The selected item is called up and the other menu<br />
items disappear from the screen. Called up item will<br />
be disappear after 5 seconds and return to the menu<br />
mode.<br />
If there is a lower level, the next level will be<br />
displayed.<br />
PICTURE<br />
POSITION<br />
LANGUAGE<br />
O<strong>PT</strong>ION<br />
SECURITY<br />
NETWORK<br />
SELECT<br />
DEFAULT<br />
RETURN<br />
ENTER<br />
KEYSTONE<br />
POSITION<br />
DOT CLOCK<br />
CLOCK PHASE<br />
ASPECT<br />
RESIZING<br />
FRAME LOCK<br />
4:3<br />
ON<br />
OFF<br />
3. Press I H to adjust or set the selected item.<br />
For items using a bar scale, the current settings are<br />
displayed on the left of the bar scale.<br />
You can cycle through the options of an item by<br />
pressing I H.<br />
KEYSTONE<br />
NOTE:<br />
• See “Resetting to the factory default settings” on page 27 to reset each menu items.<br />
• See “INITIALIZE ALL” on page 38 to reset all the settings.<br />
4. Press MENU or RETURN to return to the previous<br />
menu.<br />
ENGLISH - 29<br />
Settings
Settings<br />
Menu Navigation<br />
Main menu and Sub-menu<br />
The Main menu has 6 options. Select the required menu item and press ENTER to display the Sub-menu.<br />
NOTE:<br />
• Some default settings vary by the selected input signal.<br />
• Sub-menu items vary according to the selected input signal.<br />
• Some settings are adjustable without any signals.<br />
Main menu Sub-menu Options ( * is default setting) Page<br />
PICTURE PICTURE MODE NATURAL DYNAMIC page 32<br />
STANDARD* BLACKBOARD<br />
CONTRAST • Default: 0 page 32<br />
BRIGHTNESS • Default: 0 page 32<br />
COLOR • Default: 0 page 32<br />
TINT • Default: 0 page 32<br />
SHARPNESS • Default: 0 page 32<br />
COLOR TEMPERATURE LOW<br />
HIGH<br />
STANDARD* page 32<br />
DAYLIGHT VIEW AUTO*<br />
OFF<br />
ON page 32<br />
DETAILED SETUP *1 WHITE BALANCE WHITE BALANCE RED page 33<br />
(RGB signals only) WHITE BALANCE GREEN<br />
• Default: 0 WHITE BALANCE BLUE<br />
TV-SYSTEM AUTO* NTSC<br />
(S-VIDEO/VIDEO NTSC 4.43 PAL<br />
signals only) PAL-M<br />
SECAM<br />
PAL-N<br />
STILL MODE OFF*<br />
(S-VIDEO/VIDEO) ON<br />
NOISE REDUCTION ON*<br />
(S-VIDEO/VIDEO) OFF<br />
POSITION KEYSTONE *2<br />
• Default: 0 page 34<br />
POSITION H • Default: 0 page 34<br />
V • Default: 0<br />
DOT CLOCK *3<br />
• Default: 0 page 34<br />
CLOCK PHASE *4<br />
• Default: 0 page 34<br />
ASPECT 4:3 S4:3 page 34<br />
16:9 AUTO<br />
RESIZING OFF* ON page 35<br />
FRAME LOCK *2 OFF* ON page 35<br />
LANGUAGE<br />
*1. S-VIDEO/VIDEO/COMPUTER signals only<br />
*2. Only KEYSTONE is available in POSITION menu with signals from WIRED LAN or WIRELESS LAN.<br />
*3. COMPUTER signals only<br />
*4. COMPUTER/COMPONENT signals only<br />
ENGLISH - 30
Menu Navigation<br />
Main menu Sub-menu Options ( * is default setting) Page<br />
O<strong>PT</strong>ION INPUT GUIDE DETAILED*<br />
OFF<br />
SIMPLE page 36<br />
STARTUP LOGO<br />
ON*<br />
USER<br />
OFF<br />
page 36<br />
COMPUTER2 SELECT INPUT* OUTPUT page 36<br />
LAMP RUNTIME page 36<br />
FILTER REMAINING page 37<br />
POWER OFF TIMER OFF* 35 MIN. page 37<br />
15 MIN. 40 MIN.<br />
20 MIN. 45 MIN.<br />
25 MIN. 50 MIN.<br />
30 MIN. 60 MIN.<br />
DIRECT POWER ON OFF* ON page 37<br />
CONTROL PANEL VALID* INVALID page 37<br />
AUTO SETUP AUTO* BUTTON page 37<br />
SIGNAL SEARCH ON* OFF page 37<br />
INSTALLATION FRONT/DESK REAR/DESK page 37<br />
FRONT/CEILING REAR/CEILING<br />
HIGHLAND OFF<br />
OFF<br />
ON page 38<br />
CLOSED CA<strong>PT</strong>ION CC1 TT1<br />
page 38<br />
CC2 TT2<br />
TEST PATTERN page 38<br />
DETAILED SETUP OSD DESIGN TYPE1<br />
TYPE3<br />
TYPE2 page 38<br />
SXGA MODE SXGA SXGA+<br />
XGA MODE XGA WXGA<br />
BLACKBOARD ON* OFF<br />
BACK COLOR BLUE* BLACK<br />
VOLUME • Default: 0<br />
AUDIO BALANCE<br />
INITIALIZE ALL<br />
• Default: 0<br />
SECURITY INPUT PASSWORD OFF* ON page 39<br />
PASSWORD CHANGE page 39<br />
TEXT DISPLAY OFF* ON page 39<br />
TEXT CHANGE page 39<br />
NETWORK WIRED LAN<br />
WIRELESS LAN<br />
NAME CHANGE<br />
INPUT PASSWORD<br />
page 40<br />
(<strong>PT</strong>-F100NTU NETWORK STANDBY<br />
only)<br />
WEB CONTROL<br />
LIVE MODE CUT IN<br />
STATUS<br />
INITIALIZE (See CD-ROM contents for detailed information)<br />
ENGLISH - 31<br />
Settings
Settings<br />
PICTURE menu<br />
Remote control Control panel<br />
See “Navigating through the MENU” on page 29.<br />
See “Main menu and Sub-menu” on page 30.<br />
PICTURE MODE<br />
Depending on the projection environment, you can use<br />
these preset parameter settings to optimize image<br />
projection. Press I H to cycle through the options.<br />
NATURAL<br />
You can adjust the contrast of the projected image.<br />
Adjust the BRIGHTNESS in advance if necessary.<br />
You can adjust the brightness of the projected image.<br />
ENGLISH - 32<br />
Reproduces the original color<br />
of the image<br />
STANDARD Setting for a general image<br />
DYNAMIC Bright and sharp setting<br />
BLACKBOARD<br />
Setting for when projecting on<br />
a blackboard<br />
See “BLACKBOARD” on<br />
page 38.<br />
NOTE:<br />
• It may take for a while until the selected mode is<br />
stabilised.<br />
CONTRAST<br />
Lower<br />
BRIGHTNESS<br />
Darker<br />
Higher<br />
Brighter<br />
COLOR<br />
You can adjust the color saturation of the projected<br />
image.<br />
TINT<br />
Lighter<br />
You can adjust the skin tone in the projected image.<br />
More<br />
reddish<br />
SHARPNESS<br />
You can adjust the sharpness of the projected image.<br />
Less<br />
sharp<br />
COLOR TEMPERATURE<br />
You can adjust the white balance of the projected image.<br />
LOW More bluish<br />
STANDARD Balanced white<br />
HIGH More reddish<br />
DAYLIGHT VIEW<br />
Darker<br />
More<br />
greenish<br />
More<br />
sharp<br />
You can keep the projected image bright and vivid even<br />
in well-lit rooms where the ambient light sources cannot<br />
be controlled, such as when a door opens or when<br />
window coverings fail to block out sunlight.<br />
AUTO: Automatic adjustment<br />
ON: Active<br />
OFF: Deactive<br />
NOTE:<br />
• Do not cover the ALS (Ambient Luminance Sensor) of<br />
the projector. See “ALS (Ambient Luminance Sensor)”<br />
on page 14.<br />
• AUTO is not available when INSTALLATION setting in<br />
O<strong>PT</strong>ION menu is set to REAR/DESK or REAR/<br />
CEILING.
DETAILED SETUP<br />
You can perform more detailed image adjustment<br />
manually.<br />
For S-VIDEO/VIDEO signals<br />
TV-SYSTEM<br />
When the video signal is changed, the setting<br />
switches automatically. You can switch the setting<br />
manually to match the video data. Press I H to<br />
cycle through the options.<br />
NTSC<br />
NTSC 4.43<br />
PAL<br />
AUTO<br />
SECAM<br />
PAL-N<br />
PAL-M<br />
NOTE:<br />
• AUTO setting will select from NTSC/NTSC 4.43/PAL/<br />
PAL60/PAL-M/PAL-N/SECAM.<br />
PICTURE menu<br />
STILL MODE<br />
You can reduce the vertical flicker when projecting<br />
a still image.<br />
OFF: Deactive<br />
ON: Active<br />
NOTE:<br />
• Set to OFF when projecting a moving image.<br />
NOISE REDUCTION<br />
You can switch the automatic noise reduction<br />
system on/off. Press I H to select the required<br />
setting.<br />
ON: Automatic noise reduction<br />
OFF: No noise reduction<br />
NOTE:<br />
• Applying noise reduction may affect image quality.<br />
For RGB signals<br />
WHITE BALANCE<br />
You can adjust the white balance more properly in<br />
3 colors temperature by pressing I H.<br />
WHITE BALANCE RED<br />
WHITE BALANCE GREEN<br />
WHITE BALANCE BLUE<br />
ENGLISH - 33<br />
Settings
Settings<br />
POSITION menu<br />
Remote control Control panel<br />
See “Navigating through the MENU” on page 29.<br />
See “Main menu and Sub-menu” on page 30.<br />
KEYSTONE<br />
If the projector is aligned non-perpendicularly to the<br />
screen, or if the projection screen has an angled surface,<br />
you can correct keystone.<br />
Setting range: -32 to +32<br />
You can move the projected image for fine adjustment.<br />
Press I H to move horizontally and F G vertically.<br />
ENGLISH - 34<br />
Image Operation<br />
NOTE:<br />
• You can correct the distortion ± 30 degrees from the<br />
plane. For a better quality image, installing the projector<br />
with a minimum of distortion is recommended.<br />
• Some distortion may be retained for lens shift<br />
adjustment.<br />
• The distortion of the Main menu screen is not<br />
correctable.<br />
• The result of the keystone correction will affect the<br />
aspect ratio and the size of the image.<br />
POSITION<br />
POSITION H<br />
V<br />
DOT CLOCK<br />
If you have interference patterns of the projected image,<br />
which is sometimes referred to as moire or noise, you<br />
can minimize it by pressing I H to adjust the clock<br />
frequency.<br />
NOTE:<br />
• If the projecting signal’s dot clock frequency is higher<br />
than 108 MHz, the adjustment may not make a<br />
difference.<br />
• DOT CLOCK needs to be adjusted before adjusting the<br />
CLOCK PHASE.<br />
CLOCK PHASE<br />
If you require further adjustment for the same reason as<br />
the DOT CLOCK adjustment, you can fine adjust the<br />
timing of the clock. Press I H to adjust.<br />
NOTE:<br />
• If the projecting signal’s dot clock frequency is higher<br />
than 108 MHz, the adjustment may not make a<br />
difference.<br />
• CLOCK PHASE is available with PC signals and the<br />
following COMPONENT connection.<br />
ASPECT<br />
You can switch the aspect ratio manually when needed.<br />
Press I H to cycle through the options.<br />
4:3<br />
16:9<br />
AUTO<br />
S4:3<br />
4:3<br />
The input signal will be projected without any<br />
change.
16:9<br />
The squeezed signal will be projected in 16:9 ratio.<br />
S4:3<br />
The input signal will be sized down 75 % and<br />
projected. S4:3 mode is effective when projecting<br />
4:3 image on to a 16:9 screen.<br />
AUTO<br />
The S1 signal which contains an identifying signal<br />
will be detected and automatically project the<br />
image in proper ratio.<br />
NOTE:<br />
• If you project an image with an unmatched aspect ratio,<br />
the image may distort or some portions may be<br />
cropped. Select an aspect ratio which preserves the<br />
intention of the image creator.<br />
• The order of ASPECT types is defined not only by the<br />
input method but also by the input signals. “List of<br />
compatible signals” on page 46<br />
• If you project a copyrighted image enlarged or distorted<br />
by using ASPECT function in commercial use in a<br />
public place, such as a restaurant or hotel, you might<br />
infringe on the copyright of the creator which is<br />
protected by copyright law.<br />
RESIZING<br />
POSITION menu<br />
When the input signal resolution is lower than the<br />
projector resolution, it will be projected at the projector<br />
resolution. You can deactivate the RESIZING and<br />
project the lower resolution input signal at its original<br />
resolution. Press I H to select the required setting.<br />
ON Active<br />
OFF Deactive<br />
NOTE:<br />
• Usually the recommended setting is ON.<br />
• When the RESIZING is set to ON, the lower resolution<br />
input signal may be projected in less quality.<br />
When the RESIZING is set to OFF;<br />
• The size of the image will be projected smaller and you<br />
may need to adjust ZOOM and FOCUS, or the<br />
projector position backwards and forwards.<br />
• DIGITAL ZOOM, KEYSTONE and INDEX-WINDOW<br />
are not available.<br />
FRAME LOCK<br />
If the projected image is degraded, you can activate<br />
FRAME LOCK for synchronisation. Press I H to select<br />
the required option.<br />
OFF Deactive<br />
ON Active<br />
NOTE:<br />
• This function is available with COMPUTER signals only.<br />
ENGLISH - 35<br />
Settings
Settings<br />
O<strong>PT</strong>ION menu<br />
Remote control Control panel<br />
See “Navigating through the MENU” on page 29.<br />
See “Main menu and Sub-menu” on page 30.<br />
INPUT GUIDE<br />
When you change the input method, the guidance<br />
appears in the upper right corner of the screen. The<br />
following display methods are available. Press I H to<br />
cycle through the options.<br />
Options Function<br />
OFF Turn off the guidance.<br />
SIMPLE<br />
DETAILED<br />
ENGLISH - 36<br />
Display the input method by text.<br />
The INPUT GUIDE will go out after<br />
5 seconds without any operation.<br />
Display the input method by graphic.<br />
The INPUT GUIDE will go out after<br />
10 seconds without any operation.<br />
If you select any COMPUTER<br />
terminal which has no signal, the<br />
computer connection guidance will<br />
be displayed. See “Computer<br />
connection guidance” on page 48.<br />
STARTUP LOGO<br />
You can switch the logo on/off that is displayed when<br />
starting up the projector. Press I H to select the<br />
required option.<br />
ON Active<br />
OFF Deactive<br />
USER Display the original text<br />
Editing the original text<br />
If you select USER, you can display the 2 lines of<br />
original text up to 40 characters in 1 line instead of<br />
the logo.<br />
TEXT CHANGE<br />
OK CANCEL<br />
1. Select USER and press ENTER.<br />
2. Select the required line to enter or edit the original<br />
text, and press ENTER.<br />
3. Use F G I H to specify the location of the<br />
required character and press ENTER.<br />
The selected character will be displayed in the box.<br />
Select DELETE to delete the last entered character<br />
and press ENTER.<br />
4. Repeat the step 3 until you finish the text to display<br />
in a line.<br />
5. Select OK and press ENTER to set the entered<br />
text in a box.<br />
Press G and edit the TEXT2 if you need to, and<br />
repeat the step 3 - 5.<br />
COMPUTER2 SELECT<br />
You can switch the function of the COMPUTER2 IN/<br />
1OUT terminal.<br />
INPUT COMPUTER2 IN<br />
OUTPUT COMPUTER1 OUT<br />
LAMP RUNTIME<br />
DELETE<br />
You can check how long the lamp has been used.<br />
NOTE:<br />
• LAMP RUNTIME is a relevant matter for lamp<br />
replacement timing. See “Replacing the Lamp unit” on<br />
page 43.<br />
• When the lamp unit is replaced with the new one<br />
(ET-LAF100), the setting will be reset to “0”.
FILTER REMAINING<br />
You can check the remaining amount of the ARF (Auto<br />
Rolling Filter). The color of the bar scale is indicating the<br />
condition of the ARF.<br />
Yellow The filter remaining amount is getting<br />
low.<br />
Red No more remaining.<br />
NOTE:<br />
• See “Replacing the ARF (Auto Rolling Filter)” on<br />
page 42.<br />
• After you replace the ARF, FILTER REMAINING<br />
should be reset to “0” by pressing the ENTER button for<br />
3 seconds.<br />
POWER OFF TIMER<br />
You can set the off timer to switch off the POWER of the<br />
projector after a certain period of time automatically<br />
when no signal is detected. Press I H to select the<br />
required period from 15 to 60 minutes at intervals of<br />
5 minutes.<br />
15 MIN.<br />
20 MIN.<br />
25 MIN.<br />
30 MIN.<br />
35 MIN.<br />
DISABLE<br />
60 MIN.<br />
55 MIN.<br />
50 MIN.<br />
45 MIN.<br />
40 MIN.<br />
DIRECT POWER ON<br />
You can switch the projector start up status for when the<br />
Mains lead is connected while the MAIN POWER is on,<br />
or for when the MAIN POWER is switched on while the<br />
Mains lead is connected. Press I H to select the<br />
required option.<br />
OFF The projector will start from the<br />
standby mode or the projecting<br />
mode.<br />
ON The projector will start from the<br />
projecting mode.<br />
NOTE:<br />
• When the projector is started from the projecting mode,<br />
pressing the POWER button procedure is skippable.<br />
CONTROL PANEL<br />
O<strong>PT</strong>ION menu<br />
You can turn off the function of the control panel buttons<br />
on the projector body. Press I H to select the required<br />
option.<br />
INVALID Invalidate the control panel buttons<br />
Confirmation screen will be<br />
displayed.<br />
VALID Validate the control panel buttons<br />
AUTO SETUP<br />
You can turn off the AUTO SETUP function for when the<br />
COMPUTER signal is detected.<br />
AUTO When the projector detect a<br />
COMPUTER signal, adjust the<br />
projected image position<br />
automatically for SIGNAL SEARCH,<br />
DOT CLOCK and CLOCK PHASE.<br />
BUTTON Only when the AUTO SETUP button<br />
is pressed, the projected image<br />
position will be adjusted for DOT<br />
CLOCK and CLOCK PHASE. See<br />
“Remote control” on page 13.<br />
NOTE:<br />
• Usually the recommended setting is AUTO.<br />
SIGNAL SEARCH<br />
You can turn off the auto signal detecting system.<br />
ON Detect the input signal from the<br />
terminals and project the image.<br />
OFF Deactive<br />
NOTE:<br />
• SIGNAL SEARCH is not available when any input<br />
signal is projecting.<br />
• Usually the recommended setting is ON.<br />
INSTALLATION<br />
When installing the projector, select the projection<br />
method according to the projector position. Press I H<br />
to cycle through the options. See “Projection method” on<br />
page 17.<br />
FRONT/DESK<br />
FRONT/CEILING<br />
REAR/DESK<br />
REAR/CEILING<br />
Setting on a desk/floor and<br />
projecting from front<br />
Mounting in the ceiling and<br />
projecting from front<br />
Setting on a desk/floor and<br />
projecting from rear<br />
Mounting in the ceiling and<br />
projecting from rear<br />
ENGLISH - 37<br />
Settings
Settings<br />
O<strong>PT</strong>ION menu<br />
HIGHLAND<br />
If you use the projector at high elevation, the HIGHLAND<br />
setting need to be ON to set the fan speed high. Press<br />
I H to select the required option.<br />
OFF The fan speed is low.<br />
ON The fan speed is high.<br />
NOTE:<br />
• At 1 400 m (4 593 ft) above sea level, the setting must<br />
be ON.<br />
• The loudness of fan noise depends on the HIGHLAND<br />
setting.<br />
CLOSED CA<strong>PT</strong>ION<br />
If the input signal contains closed captions, you can turn<br />
on the feature and switch the channels. Press I H to<br />
select the required option.<br />
You can use the 7 different test patterns to adjust the<br />
focus of the image. See “Lens shift and positioning” on<br />
page 18.<br />
1. Press ENTER to display the test pattern 1.<br />
2. Press F G to select the required test pattern.<br />
3. Adjust the focus with the Focus lever.<br />
4. Press MENU or RETURN to return to the previous<br />
menu, oar press repeatedly to escape the menu<br />
mode.<br />
ENGLISH - 38<br />
OFF Deactive<br />
CC1<br />
CC2<br />
TT1<br />
TT2<br />
TEST PATTERN<br />
Caption channels<br />
Text channels<br />
NOTE:<br />
• When the projector and/or the screen is tilted, adjust<br />
the focus at the center of the image. The upper and<br />
lower edge might be out of focus.<br />
• When the image is distorted in keystone, adjust the<br />
KEYSTONE in POSITION menu.<br />
DETAILED SETUP<br />
You can perform more detailed setting in various items.<br />
OSD DESIGN<br />
You can change the background color of the menu.<br />
Press I H to select the required option.<br />
TYPE1 Semi transparent black<br />
TYPE2 Solid blue<br />
TYPE3 Semi transparent dark blue<br />
SXGA MODE<br />
You can switch the setting between SXGA and the<br />
larger setting, SXGA+. Press I H to select the<br />
required option.<br />
XGA MODE<br />
You can switch the setting between XGA and the<br />
wider setting, WXGA. Press I H to select the<br />
required option.<br />
BLACKBOARD<br />
You can exclude the BLACKBOARD in menu<br />
items of PICTURE MODE in PICTURE menu.<br />
Press I H to select the required option.<br />
ON Include the BLACKBOARD in menu<br />
items.<br />
OFF Exclude the BLACKBOARD in menu<br />
items.<br />
BACK COLOR<br />
You can choose a BLUE or BLACK screen for<br />
when the projector is idle. Press I H to select the<br />
required option.<br />
VOLUME<br />
You can adjust the volume of the built-in monaural<br />
speaker and VARIABLE AUDIO OUT terminal.<br />
I Decrease<br />
H Increase<br />
AUDIO BALANCE<br />
You can adjust to hear the sound played equally<br />
through both right and left external stereo<br />
speakers, or shift the balance so more sound plays<br />
through the left or right side.<br />
I More sound plays through the left<br />
side<br />
H More sound plays through the right<br />
side<br />
INITIALIZE ALL<br />
You can reset all of the customized settings to the<br />
factory defaults except LAMP RUNTIME and<br />
FILTER REMAINING menu settings. Press<br />
ENTER to initialize and restart the projector by<br />
pressing the POWER button.
SECURITY menu<br />
Remote control Control panel<br />
See “Navigating through the MENU” on page 29.<br />
See “Main menu and Sub-menu” on page 30.<br />
Entering the SECURITY<br />
Every time when you apply to the SECURITY<br />
menu, you will be asked to perform the password<br />
operation.<br />
PICTURE<br />
POSITION<br />
LANGUAGE<br />
O<strong>PT</strong>ION<br />
SECURITY<br />
NETWORK<br />
INPUT PASSWORD<br />
PASSWORD CHANGE<br />
TEXT DISPLAY<br />
TEXT CHANGE<br />
PASSWORD<br />
When you apply to the SECURITY menu before you<br />
change the password to your original, perform to input<br />
the following factory default password operation.<br />
Press F H G I F H G I and ENTER.<br />
After you change the password<br />
When you apply to the SECURITY menu after you<br />
change the password to your original in the<br />
PASSWORD CHANGE menu, input the original<br />
password operation.<br />
NOTE:<br />
• The factory default password is valid until you change<br />
the password in PASSWORD CHANGE menu.<br />
• The entered password operations will appear as<br />
asterisks in the box.<br />
INPUT PASSWORD<br />
You can activate the security system and the password<br />
operation will be asked to perform when the projecting<br />
mode started. Unless you perform the correct password<br />
operation, all of the button controls will be disabled<br />
except the POWER button.<br />
OFF Deactive<br />
ON Active<br />
OFF<br />
OFF<br />
NOTE:<br />
• When you activated the security system, make sure to<br />
change the password to your original for safety.<br />
• The factory default password is valid until you change<br />
the password in PASSWORD CHANGE menu.<br />
PASSWORD CHANGE<br />
You can change the password operation to your original.<br />
1. Press a series of button operation up to 8 as a<br />
password by using F G I and H buttons.<br />
2. Press ENTER.<br />
3. Press the exact same series of button operation<br />
you entered in the NEW password box for<br />
confirmation.<br />
If a series of button operation is incorrect, you will be<br />
asked to perform again.<br />
4. Press ENTER.<br />
NOTE:<br />
• The entered password operations will appear as<br />
asterisks in the box.<br />
TEXT DISPLAY<br />
You can set your original text, such as company name or<br />
URL information, to display regularly at the bottom of the<br />
projected image while projecting.<br />
OFF Deactive<br />
ON Active<br />
TEXT CHANGE<br />
You can enter your original text up to 22 characters for<br />
TEXT DISPLAY.<br />
TEXT CHANGE<br />
OK CANCEL<br />
DELETE<br />
1. Use F G I H to specify the location of the<br />
required character.<br />
2. Press ENTER.<br />
The selected character will be displayed in the TEXT<br />
CHANGE box.<br />
3. Repeat until finish your original text.<br />
Select DELETE to delete the last entered character<br />
and press ENTER.<br />
4. Select OK and press ENTER to set the entered<br />
text.<br />
Select CANCEL or press MENU/RETURN buttons to<br />
return to the previous menu.<br />
ENGLISH - 39<br />
Settings
Settings<br />
NETWORK menu<br />
Remote control Control panel<br />
See “Navigating through the MENU” on page 29.<br />
See “Main menu and Sub-menu” on page 30.<br />
NOTE:<br />
• The NETWORK menu is available only with<br />
<strong>PT</strong>-F100NTU.<br />
• See more detailed instructions in the contents of the<br />
CD-ROM which is provided with the projector.<br />
ENGLISH - 40<br />
Items in NETWORK menu<br />
In NETWORK menu, the following items are available.<br />
WIRED LAN<br />
WIRELESS LAN<br />
NAME CHANGE<br />
PASSWORD CHANGE<br />
INPUT PASSWORD<br />
NETWORK STANDBY<br />
WEB CONTROL<br />
LIVE MODE CUT IN<br />
STATUS<br />
INITIALIZE
TEMP, LAMP and ARF Indicators<br />
Managing the indicated problems<br />
If a problem should occur with the projector, the TEMP , LAMP and/or<br />
FILTER indicators will inform you. Manage the indicated problems as<br />
follow.<br />
1. Confirm the status of all indicators and projector, and switch off the<br />
projector in proper way.<br />
2. Find out the cause of the problem by status of the TEMP , LAMP<br />
and/or FILTER indicators.<br />
3. Follow the instruction for each indication below and solve the<br />
problem.<br />
4. Turn on the projector in the correct way and confirm the indicator is<br />
not indicating a problem any longer.<br />
NOTE:<br />
• If no problem is found or the problem remains, do not turn on the projector. Instead contact an Authorized Service Center.<br />
LAMP indicator<br />
Indicator<br />
Problem<br />
Cause<br />
Remedy<br />
TEMP indicator<br />
Indicator<br />
FILTER indicator<br />
Illuminating RED Flashing RED<br />
LAMP RUNTIME has<br />
reached 2 800 hours.<br />
Lamp unit will run out<br />
soon and needs to be<br />
replaced.<br />
See “Replacing the<br />
Lamp unit” on page 43.<br />
LAMP circuit failure, abnormal function or Lamp unit is damaged.<br />
The MAIN POWER is<br />
switched on again<br />
before the Lamp unit<br />
is cooled enough.<br />
Let the Lamp unit cool<br />
down and turn on the<br />
MAIN POWER.<br />
Illuminating RED and still projecting<br />
Flashing RED and POWER is turned off<br />
LAMP circuit failure,<br />
abnormal function.<br />
Contact an Authorized<br />
Service Center.<br />
Problem The temperature inside and/or outside the projector is abnormally high.<br />
Cause<br />
Remedy<br />
The ventilation<br />
openings are covered.<br />
Remove the object(s)<br />
from the ventilation<br />
openings or clear<br />
around the projector.<br />
The room temperature<br />
is too high.<br />
Reinstall the t a<br />
temperature controlled<br />
place. See page 16.<br />
*1. The projector will perform only 2 minutes with OFF setting at high elevation.<br />
The ARFis excessively<br />
dirty and the ventilation<br />
is poor.<br />
Replace the ARF in the<br />
proper method. See<br />
page 42.<br />
Lamp unit is<br />
damaged.<br />
See “Replacing the<br />
Lamp unit” on page 43.<br />
The projector is located<br />
at high elevations<br />
(above 1 400 m).<br />
Turn on the projector *1<br />
and set the<br />
HIGHLAND to ON.<br />
See page 38.<br />
When the ARF indicator is flashing GREEN, the ARF is normally rolling up.<br />
Indicator Illuminating RED Flashing RED Illuminating ORANGE Flashing ORANGE<br />
Problem<br />
FILTER REMAINING<br />
has turned red. See<br />
page 37.<br />
The projector cannot<br />
detect the ARF.<br />
Cause ARF has been run out. ARF is not attached.<br />
Remedy<br />
See “Replacing the<br />
ARF (Auto Rolling<br />
Filter)” on page 42.<br />
Attach the ARF.<br />
The ARF cannot<br />
operate properly.<br />
Foreign object is<br />
blocking the ARF<br />
operation.<br />
Remove the foreign<br />
object or contact an<br />
Authorized Center.<br />
POWER LAMP TEMP<br />
ARF<br />
FILTER REMAINING<br />
has turned yellow. See<br />
page 37.<br />
ARF is running out.<br />
Prepare the ARF for<br />
replacement.<br />
ENGLISH - 41<br />
Maintenance
Maintenance<br />
Care and Replacement<br />
Cleaning the projector<br />
Before cleaning the projector<br />
Switch off the MAIN POWER and disconnect the power plug from the wall socket.<br />
Unplug all the cables from the projector.<br />
Cleaning the outer surface of the projector<br />
Wipe off dirt and dust gently with a soft cloth.<br />
If it is difficult to remove the dirt, soak a cloth in a neutral detergent diluted with water, wring the cloth well<br />
and then wipe the projector. Dry off the projector with dry cloth.<br />
If you use a chemical treated wipe, follow the instructions supplied with it.<br />
Cleaning the lens and front glass surface<br />
Wipe off dirt and dust gently with a lint-free cloth.<br />
Make sure no dirt or dust remains on the surface of the lens. It will be enlarged and projected onto a<br />
screen.<br />
Replacing the ARF (Auto Rolling Filter)<br />
Before replacing the ARF<br />
Switch off the MAIN POWER and disconnect the power plug from the wall socket.<br />
Prepare a Phillips-head screw driver.<br />
Contact an Authorized Service Center to purchase a replacement ARF (ET-RFF100).<br />
When to replace the ARF<br />
ARF is consumable product and effects on ventilation. ARF indicator will inform you of the replacement timing.<br />
You can check the remaining amount of the ARF in FILTER REMAINING menu.<br />
NOTE:<br />
• See “FILTER REMAINING” on page 37.<br />
• See “FILTER indicator” on page 41.<br />
Replacement procedure<br />
1. Turn the projector upside down and place it gently<br />
on a soft cloth.<br />
2. Use a Phillips-head screwdriver to loosen 2 ARF<br />
cover fixing screws until the screws turn freely and<br />
remove the ARF cover.<br />
3. Use a Phillips-head screwdriver to loosen an ARF<br />
fixing screws and release the clamp, then slightly<br />
slide up the used ARF to remove.<br />
4. Insert the new ARF into the compartment in<br />
correct direction and slightly push down until it<br />
clicks.<br />
5. Tighten the ARF fixing screws securely with a<br />
Phillips-head screwdriver.<br />
6. Attach the ARF cover and tighten the ARF cover<br />
fixing screws securely with a Phillips-head<br />
screwdriver.<br />
7. Turn on the projector and reset FILTER<br />
REMAINING to “0”. See “FILTER REMAINING” on<br />
page 37.<br />
NOTE:<br />
• If the ARF and/or ARF cover are attached incorrectly,<br />
the projector may not be turned on.<br />
• Do not switch the power on while the ARF cover<br />
removed.<br />
ENGLISH - 42<br />
ARF cover fixing screw<br />
ARF fixing screw<br />
ARF<br />
ARF cover<br />
Clamp
Replacing the Lamp unit<br />
Before replacing the Lamp unit<br />
Care and Replacement<br />
Switch off the MAIN POWER and disconnect the power plug from the wall socket.<br />
Make sure the Lamp unit and the surroundings are cooled enough.<br />
Prepare a Phillips-head screwdriver.<br />
Contact an Authorized Service Center to purchase a replacement Lamp unit (ET-LAF100).<br />
When the projector is mounted in the ceiling, do not work directly under the projector or put your face closer<br />
to the projector.<br />
NOTE:<br />
• Prior to replacing the lamp unit, allow it to cool down to prevent the risk of burns, damage and other hazards.<br />
• Do not attempt replacement with an unauthorized lamp unit.<br />
When to replace the Lamp unit<br />
The Lamp unit is consumable and the brightness decreases by duration of usage. The LAMP indicator will<br />
inform you of the replacement timing at 2 800 hours, and at 3 000 hours, the projector will be turned off. Those<br />
figures are rough guidance and might be shortened by the usage conditions, characteristics of the Lamp unit,<br />
environmental conditions, and so on. You can check the duration of usage time using LAMP RUNTIME in the<br />
O<strong>PT</strong>ION menu.<br />
Indication<br />
Over 2 800 hours<br />
Over 3 000 hours<br />
On screen LAMP indicator<br />
REPLACE LAMP<br />
“REPLACEMENT LAMP” is displayed on<br />
the upper left of the screen for 30 seconds.<br />
“REPLACEMENT LAMP” is displayed on<br />
the upper left of the screen, and it will stay<br />
until you respond.<br />
To clear the screen, press any button.<br />
Illuminates RED.<br />
NOTE:<br />
• The guide times, 2 800 and 3 000 hours, are rough estimates based on certain conditions and is not a guaranteed time.<br />
• For more information about the Lamp unit, such as guaranteed time, see the instructions which is provided with the<br />
Lamp unit.<br />
• If the lamp usage time has passed 3 000 hours, the projector will switch to standby mode after approximately 10 minutes<br />
of operation.<br />
ENGLISH - 43<br />
Maintenance
Maintenance<br />
Care and Replacement<br />
Replacement procedure<br />
Removing and replacing the lamp unit<br />
1. Use a Phillips-head screwdriver to loosen the 3<br />
Lamp unit cover fixing screws on the back of the<br />
projector until the screws turn freely, and remove<br />
the Lamp unit cover.<br />
Lamp unit cover<br />
2. Use a Phillips-head screwdriver to loosen the 2<br />
Lamp unit fixing screws.<br />
3. Hold the handles of the Lamp unit and release the<br />
lamp unit lock.<br />
4. Pull the used Lamp unit gently from the projector.<br />
Lamp unit<br />
fixing screws<br />
ENGLISH - 44<br />
Lamp unit cover fixing screws<br />
5. Replace the new Lamp unit in correct direction.<br />
6. Press in the Lamp unit until it clicks and make<br />
sure the unit is installed securely.<br />
7. Tighten the 2 Lamp unit fixing screws securely<br />
with a Phillips-head screwdriver.<br />
8. Attach the Lamp unit cover and tighten the 3<br />
Lamp unit cover fixing screws securely with a<br />
Phillips-head screwdriver.<br />
The projector and the ceiling mount bracket are designed sufficiently safety though, make sure the safety cable<br />
provided with the projector is installed and attached to the bottom of the projector when mounting in the ceiling for<br />
safety and security.<br />
Installing the safety cable<br />
Handles<br />
Ceiling mount bracket safeguards<br />
Lamp unit<br />
fixing screws<br />
1. Install the ceiling mount bracket according to the installation instructions.<br />
2. Loop the security cable around the ceiling mount bracket with less slack.<br />
Lace the cable of the end with a latch through the loop on the other end of the cable.<br />
3. Attach the latch on to the bottom of the projector with a provided screw.<br />
Torque: 125±20 CN·m<br />
Press here<br />
NOTE:<br />
• Even if it is guarantee period, the manufacturer is not responsible for any hazard or damage caused by using a ceiling<br />
mount bracket which is not purchased from an authorized distributors, or environmental conditions.<br />
• Make sure to use a torque driver and do not use an electrical screwdriver or an impact screwdriver.<br />
• Installation work of the ceiling mount bracket should only be carried by a qualified technician.<br />
• Remove an unused ceiling mount bracket promptly.
Troubleshooting<br />
Should any problem persist, contact your dealer.<br />
Problem Cause<br />
Power does not turn on.<br />
No picture appears.<br />
The picture is fuzzy.<br />
The color is pale or greyish.<br />
No sound can be heard<br />
from the internal speaker.<br />
The control buttons of the<br />
projector do not operate.<br />
The Remote control does<br />
not operate.<br />
The picture does not<br />
display correctly.<br />
Picture from a computer<br />
does not appear.<br />
The power cord may not be connected.<br />
The MAIN POWER switch is turned off.<br />
No electric supply is at the wall socket.<br />
TEMP indicator is lit or flashes.<br />
LAMP indicator is lit or flashes.<br />
The lamp unit cover has not been securely installed.<br />
The circuit breakers have tripped.<br />
The video signal input source may not be connected to a terminal<br />
properly.<br />
The input selection setting may not be correct.<br />
The BRIGHTNESS adjustment setting may be at the minimum setting.<br />
The SHUTTER function may be in use.<br />
The lens focus may not have been set correctly.<br />
The projector may not be at the correct distance from the screen.<br />
The lens may be dirty.<br />
The projector may be tilted too much.<br />
COLOR or TINT adjustment may be incorrect.<br />
The input source which is connected to the projector may not be<br />
adjusted correctly.<br />
The audio signal source may not be connected properly.<br />
A cable may be connected to the VARIABLE AUDIO OUT terminal.<br />
The volume adjustment may be at the lowest possible setting.<br />
CONTROL PANEL in O<strong>PT</strong>ION menu is invalidated. If you have a loss<br />
of the Remote control while the CONTROL PANEL is invalidated,<br />
press and hold the MENU button for 2 seconds with pressing the<br />
ENTER button.<br />
The batteries may be weak.<br />
The batteries may not have been inserted correctly.<br />
The remote control signal receptor on the projector may be<br />
obstructed.<br />
The remote control unit may be out of the operation range.<br />
The signal format (TV-SYSTEM) may not have been set correctly.<br />
There may be a problem with the VCR or other signal source.<br />
A signal which is not compatible with the projector is being input.<br />
The cable may be longer than the optional cable.<br />
The external video output from a laptop computer may not be correct.<br />
(You may be able to change the external output settings by pressing<br />
the [Fn] + [F3] or [Fn] + [F10] keys simultaneously. The actual method<br />
varies depending on the type of computer; refer to the documentation<br />
provided with your computer for further details.)<br />
COMPUTER2 SELECT setting in O<strong>PT</strong>ION menu is not correct.<br />
Reference<br />
page<br />
22<br />
23<br />
22<br />
41<br />
41<br />
44<br />
-<br />
21<br />
26<br />
32<br />
27<br />
18<br />
16<br />
11<br />
18<br />
32<br />
30<br />
20<br />
15<br />
28<br />
37<br />
-<br />
15<br />
25<br />
25<br />
33<br />
-<br />
46<br />
-<br />
48<br />
36<br />
ENGLISH - 45<br />
Maintenance
Appendix<br />
Technical Information<br />
List of compatible signals<br />
Mode<br />
Display<br />
resolution<br />
(dots) *1<br />
Scanning<br />
frequency<br />
Dot clock<br />
frequency<br />
(MHz)<br />
Picture<br />
quality<br />
*1. The “i” appearing after the resolution indicates an interlaced signal.<br />
*2<br />
H (kHz) V (kHz)<br />
NTSC/NTSC 4.43/<br />
PAL-M/PAL60<br />
720 x 480i 15.7 59.9 A<br />
PAL/PAL-N/SECAM 720 x 576i 15.6 50.0 A<br />
480i 720 x 480i 15.7 59.9 13.5 A<br />
576i 720 x 576i 15.6 50.0 13.5 A<br />
480p 720 x 483 31.5 59.9 27.0 A<br />
576p 720 x 576 31.3 50.0 27.0 A<br />
1 080/60i 1 920 x 1 080i 33.8 60.0 74.3 A<br />
1 080/50i 1 920 x 1 080i 28.1 50.0 74.3 A<br />
720/60p 1 280 x 720 45.0 60.0 74.3 A<br />
720/50p 1 280 x 720 37.5 50.0 74.3 A<br />
VESA 640 x 400 31.5 70.1 25.2 A<br />
640 x 400 37.9 85.1 31.5 A<br />
VGA480 640 x 480 31.5 59.9 25.2 A<br />
640 x 480 35.0 66.7 30.2 A<br />
640 x 480 37.9 72.8 31.5 A<br />
640 x 480 37.5 75.0 31.5 A<br />
640 x 480 43.3 85.0 36.0 A<br />
SVGA 800 x 600 35.2 56.3 36.0 A<br />
800 x 600 37.9 60.3 40.0 A<br />
800 x 600 48.1 72.2 50.0 A<br />
800 x 600 46.9 75.0 49.5 A<br />
800 x 600 53.7 85.1 56.3 A<br />
MAC 832 x 624 49.7 74.6 57.3 A<br />
1 152 x 870 68.7 75.1 100.0 A<br />
XGA 1 024 x 768 48.4 60.0 65.0 AA<br />
1 024 x 768 56.5 70.1 75.0 AA<br />
1 024 x 768 60.0 75.0 78.8 AA<br />
1 024 x 768 68.7 85.0 94.5 AA<br />
MXGA 1 152 x 864 64.0 71.2 94.2 A<br />
1 152 x 864 67.5 74.9 108.0 A<br />
1 152 x 864 76.7 85.0 121.5 A<br />
MSXGA 1 280 x 960 60.0 60.0 108.0 A<br />
SXGA 1 280 x 1 024 64.0 60.0 108.0 A<br />
1 280 x 1 024 80.0 75.0 135.0 A<br />
1 280 x 1 024 91.1 85.0 157.5 A<br />
SXGA60+ 1 400 x 1 050 64.0 60.0 108 A<br />
1 400 x 1 050 65.1 59.9 122.4 A<br />
UXGA 1 600 x 1 200 75.0 60.0 162.0 A<br />
WXGA 1 280 x 768 47.8 59.9 79.5 A<br />
1 280 x 800 49.1 60.2 69.1 A<br />
1 280 x 800 49.7 59.8 83.5 A<br />
WXGA+ 1 440 x 900 55.9 59.9 106.5 A<br />
*2. The following symbols are used to indicate picture quality.<br />
AA Maximum picture quality can be obtained.<br />
A Signals are converted by the image processing circuit before picture is projected.<br />
ENGLISH - 46<br />
Terminals<br />
VIDEO/S-VIDEO<br />
COMPONENT/<br />
COMPUTER<br />
COMPONENT<br />
COMPUTER
Serial terminal<br />
Technical Information<br />
The serial connector which is on the connector panel of the projector conforms to the RS-232C interface<br />
specification, so that the projector can be controlled by a personal computer which is connected to this connecter.<br />
Connection<br />
COMPUTER1<br />
Pin assignments and signal names<br />
Communication settings<br />
Basic format<br />
D-sub 9 pin (male)<br />
Pin No. Signal name Contents<br />
A NC<br />
B TXD Transmitted data<br />
C RXD Received data<br />
D NC<br />
E GND Earth<br />
F NC<br />
G<br />
H<br />
RTS<br />
CTS<br />
Connected internally<br />
I NC<br />
Signal level RS-232C Character length 8bits<br />
Sync. method Asynchronous Stop bit 1bit<br />
Baud rate 9600bps X parameter None<br />
Parity None S parameter None<br />
STX Command : Parameter ETX<br />
Start byte<br />
(02h)<br />
1byte End<br />
3bytes 1byte -<br />
(03h)<br />
4bytes<br />
Serial terminal (male)<br />
The data streaming from the computer will<br />
start with STX, and proceed to Command,<br />
Parameter and end with ETX. You can<br />
add the required parameter.<br />
The projector can not receive any command for 10 seconds after the lamp is switched on. Wait 10 seconds<br />
before sending the command.<br />
If sending multiple commands, check that a response has been received from the projector for one<br />
command before sending the next command.<br />
When a command which does not require parameters to be sent, the colon (:) is not required.<br />
If an incorrect command is sent from the personal computer, the ER401 command will be sent from the<br />
projector to the personal computer.<br />
ENGLISH - 47<br />
Appendix
Appendix<br />
Technical Information<br />
Cable specifications<br />
(When connected to a personal computer)<br />
Control commands<br />
Command Control contents Remarks<br />
PON Power ON<br />
POF Power OFF<br />
AVL Volume<br />
You can switch the signals which to output from the COMPUTER1 OUT terminal by pressing the computer key<br />
command. The key commands are depend on the manufactures. If you select the computer terminals which has no<br />
signals while the INPUT GUIDE is set to DETAILED, the computer connection guidance will be displayed.<br />
ENGLISH - 48<br />
IIS INPUT<br />
Q$S<br />
Lamp condition<br />
query<br />
OSH SHUTTER<br />
In standby mode, all commands other than the PON command are<br />
ignored.<br />
The PON command is ignored during lamp ON control.<br />
If a PON command is received while the cooling fan is operating after the<br />
lamp has switched off, the lamp is not turned back on again straight away<br />
in order to protect the lamp.<br />
Parameter<br />
000 - 063 (Adjustment value 0 - 63)<br />
Parameter:<br />
VID = VIDEO IN<br />
RG1 = COMPUTER1<br />
NWP = WIRELESS (<strong>PT</strong>-F100NTU only)<br />
Call back<br />
0 = Standby<br />
1 = Lamp ON control active<br />
Computer connection guidance<br />
SVD = S-VIDEO IN<br />
RG2 = COMPUTER2<br />
2 = Lamp ON<br />
3 = Lamp OFF control active<br />
Turning off the projection temporarily.<br />
Send the command to switch between ON and OFF.<br />
Do not send the command consecutively.<br />
Manufacturer Key command Manufacturer Key command Manufacturer Key command<br />
Panasonic<br />
NEC<br />
FUJITSU +<br />
+<br />
NC<br />
NC<br />
Projector PC (DTE)<br />
NC<br />
NC<br />
TOSHIBA<br />
SHARP<br />
HP<br />
EPSON<br />
DELL<br />
+<br />
IBM<br />
SONY<br />
Apple<br />
+ Other +<br />
NOTE:<br />
• The computer connection guidance will disappear after 5 minutes.<br />
• Please refer the instructions which provided with the computers for more detailed information.<br />
NC<br />
NC<br />
NC<br />
NC<br />
+
REMOTE terminal<br />
Technical Information<br />
You can remotely operate the projector from the outside the Remote control range by connecting to the REMOTE<br />
terminal.<br />
Pin assignments and signal names<br />
LAMP switching<br />
Switching input signals<br />
Pin No. Signal name Contents<br />
A GND Ground<br />
B POWER POWER ON<br />
C INPUT SEL3 Select input signal 3<br />
D NC<br />
E INPUT SEL1 Select input signal 1<br />
F INPUT SEL2 Select input signal 2<br />
G<br />
Connect internally<br />
H<br />
I ENABLE Control by external contact<br />
Pin No. Settings<br />
B - A Short Open<br />
Operation On Off<br />
Pin No. Settings<br />
C - A Open Open Short Short Short Open<br />
E - A Open Short Open Open Short Short<br />
F - A Open Open Short Open Open Short<br />
Input signal COMPUTER1 COMPUTER2 COMPONENT VIDEO S-VIDEO NETWORK<br />
NOTE:<br />
• When pin A and pin I are short-circuited, the buttons on the projector’s control panel, POWER and INPUT SELECT<br />
buttons on the Remote control cannot be used. In addition, the RS-232C commands and network functions that<br />
correspond to these functions cannot be used either.<br />
• While pin I is “Open”, do not short-circuit pin A, B, C, E and F. The projector would reject all the signals from the<br />
Remote control.<br />
ENGLISH - 49<br />
Appendix
Appendix<br />
Technical Information<br />
Specifications<br />
Power supply AC 100 - 240 V 50 Hz/60 Hz<br />
Power consumption<br />
Amps 3.9 A - 1.4 A<br />
LCD panel<br />
Lens<br />
ENGLISH - 50<br />
Panel size (diagonal) 0.7 type (17.78 mm)<br />
Aspect ratio 4 : 3<br />
330 W<br />
During standby (when fan is stopped): 3.5 W<br />
Display method 3 transparent LCD panels (RGB)<br />
Drive method Active matrix method<br />
Pixels 786 432 (1 024 x 768) x 3 panels<br />
Manual zoom (2 x)/Manual focus<br />
F 1.7 - 2.6, f 21.6 mm - 43.0 mm<br />
Lamp UHM lamp (250 W)<br />
Luminosity 3200lm<br />
Operating environment<br />
Scanning<br />
frequency *1<br />
(for RGB signal)<br />
Horizontal scanning<br />
frequency<br />
Vertical scanning<br />
frequency<br />
*1. See “List of compatible signals” on page 46 for available signals.<br />
0°C - 40°C (32°F - 104°F)<br />
When the HIGHLAND (page 38)<br />
Temperature<br />
is set to ON: 0 °C - 35 °C (32 °F -<br />
95 °F)<br />
Humidity 20% - 80% (no condensation)<br />
15 kHz - 91 kHz<br />
50 Hz - 85 Hz<br />
Dot clock frequency Less than 108 MHz<br />
COMPONENT (YPBPR) signals 480i, 480p, 576i, 576p, 720/50p, 720/60p, 1 080/50i, 1 080/60i,<br />
Color system 7 (NTSC/NTSC 4.43/PAL/PAL-M/PAL-N/PAL60/SECAM)<br />
Projection size 33" - 300" (838.2 mm - 7 620 mm)<br />
Throw distance 1.2 m - 18.1 m (3'11" - 59'4")<br />
Screen aspect ratio 4 : 3<br />
Installation<br />
FRONT/DESK, FRONT/CEILING, REAR/DESK, REAR/CEILING<br />
(Menu selection method)<br />
Speaker 1 piece 4 cm (1-9/16")<br />
Max. useable volume output 3.0 W
Terminals<br />
Wireless LAN<br />
S-VIDEO IN<br />
VIDEO IN<br />
COMPUTER1 IN<br />
COMPUTER2 IN/<br />
1OUT<br />
COMPONENT IN<br />
Single - line, Mini DIN 4p<br />
Y: 1.0 V [p-p], C: 0.286 V [p-p], 75 Ω<br />
Single - line, RCA pin jack<br />
1.0 V [p-p], 75Ω<br />
Single - line, D - sub HD 15-pin (female)<br />
R.G.B. 0.7 V [p-p], 75 Ω<br />
HD, VD/SYNC<br />
Technical Information<br />
TTL high impedance, automatic<br />
positive/negative polarity<br />
compatible<br />
Single - line, D - sub HD 15-pin (female)<br />
Selectable for input and output by menu operation.<br />
R.G.B. 0.7 V [p-p], 75 Ω<br />
HD, VD/SYNC<br />
TTL high impedance, automatic<br />
positive/negative polarity<br />
compatible<br />
Y, PB/CB, PR/CR Single - line, RCA pin jack x 3<br />
Y: 1.0 V [p-p] (including sync), 75 Ω<br />
PB/CB, (PR/CR) 0.7 V [p-p], 75 Ω<br />
AUDIO IN Single - line, 0.5V [rms], RCA pin jack x 2 (L - R)<br />
COMPUTER AUDIO IN Single - line, 0.5V [rms], M3 jack (Stereo MINI)<br />
VARIABLE AUDIO<br />
OUT<br />
Single - line, 0.5V [rms], M3 jack (Stereo MINI)<br />
Monitor output/stereo compatible<br />
0 V [rms] - 2.0 V [rms] (variable)<br />
SERIAL D-sub 9-pin RS-232C compatible<br />
REMOTE D-sub 9-pin For external control<br />
LAN (RJ-45)<br />
Single - line, For network connection<br />
10 Base-T/100Base-TX/1000Base-T<br />
Compatible IEEE802.11b/IEEE802.11g (Wireless LAN standard protocol)<br />
Wireless channel IEEE802.11b/IEEE802.11g: 1 - 13 channels<br />
Distance 30 m (98'5") Depends on the usage environment<br />
Cabinet Moulded plastic (PC+ABS)<br />
Width 432 mm (17")<br />
Dimensions<br />
Height 124.5 mm (4 - 7/8")<br />
Length 319 mm (12 - 17/32")<br />
Weight 6.0 kg (13.2 lbs.)<br />
Certifications<br />
Remote control<br />
Options<br />
UL60950-1<br />
FCC Class B<br />
Power supply 3 V DC (AA battery x 2)<br />
Operating range<br />
C-UL<br />
ICES-003<br />
Approx. 15 m (49'2") (when operated directly in front of signal<br />
receptor)<br />
Weight 117 g (4.2 ozs.) (including batteries)<br />
Dimensions<br />
Width 48 mm (1 - 7/8")<br />
Length 163 mm (6 - 13/32")<br />
Height<br />
Ceiling bracket ET-PKF100H/ET-PKF100S<br />
AV Cables TY-SC10CP<br />
24.5 mm (-15/16") (not including<br />
surface projection parts)<br />
ENGLISH - 51<br />
Appendix
Appendix<br />
Technical Information<br />
Screen size and throw distance for 16:9 aspect ratio<br />
Screen Diagonal<br />
(SD)<br />
* All measurements above are approximate and may differ slightly from the actual measurements.<br />
Calculation methods for screen dimensions<br />
You can calculate more detailed screen dimension from the screen diagonal.<br />
ENGLISH - 52<br />
Projection size (16 : 9) Throw distance (L)<br />
Screen height (SH) Screen width (SW)<br />
SW = SD x 0.0221 SH = SD x 0.0125 Unit: m<br />
LW = 0.0332 x SD - 0.049 LT = 0.066 x SD - 0.055<br />
Minimum distance<br />
(LW)<br />
* The results above are approximate and may differ slightly from the actual measurements.<br />
Maximum distance<br />
(LT)<br />
(0.84 m) 33" 0.41 m (1'4") 0.73 m (2'4") 2.1 m (6'10")<br />
(1.02 m) 40" 0.50 m (1'7") 0.89 m (2'11") 1.3 m (4'3") 2.6 m (8'6")<br />
(1.27 m) 50" 0.62 m (2') 1.11 m (3'7") 1.6 m (5'2") 3.2 m (10'5")<br />
(1.52 m) 60" 0.75 m (2'5") 1.33 m (4'4") 1.9 m (6'2") 3.9 m (12'9")<br />
(1.78 m) 70" 0.87 m (2'10") 1.55 m (5'1") 2.3 m (7'6") 4.6 m (15'1")<br />
(2.03 m) 80" 1.00 m (3'3") 1.77 m (5'9") 2.6 m (8'6") 5.2 m (17')<br />
(2.29 m) 90" 1.12 m (3'8") 1.99 m (6'6") 2.9 m (9'6") 5.9 m (19'4")<br />
(2.54 m) 100" 1.25 m (4'1") 2.21 m (7'3") 3.3 m (10'9") 6.5 m (21'3")<br />
(3.05 m) 120" 1.49 m (4'10") 2.66 m (8'8") 3.9 m (12'9") 7.9 m (25'11")<br />
(3.81 m) 150" 1.87 m (6'1") 3.32 m (10'10") 4.9 m (16') 9.8 m (32'1")<br />
(5.08 m) 200" 2.49 m (8'2") 4.43 m (14'6") 6.6 m (21'7") 13.1 m (42'11")<br />
(6.37 m) 250" 3.11 m (10'2") 5.53 m (18'1") 8.3 m (27'2") 16.4 m (53'9")<br />
(7.62 m) 300" 3.74 m (12'3") 6.64 m (21'9") 9.9 m (32'5") 19.7 m (64'7")
Dimensions<br />
319<br />
Trademark acknowledgements<br />
432<br />
53<br />
Technical Information<br />
VGA and XGA are trademarks of International Business Machines Corporation.<br />
S-VGA is a registered trademark of the Video Electronics Standards Association.<br />
HDMI, the HDMI logo and High-Definition Multimedia Interface are trademarks or registered trademarks of<br />
HDMI Licensing LLC.<br />
The font used in the on-screen displays is a Ricoh bitmap font, which is manufactured and sold by Ricoh<br />
Company, Ltd.<br />
All other trademarks are the property of the various trademark owners.<br />
60.5<br />
9.5<br />
85.4<br />
These Operating Instructions are printed on recycled paper.<br />
124.5<br />
ENGLISH - 53<br />
Appendix
Appendix<br />
Index<br />
A<br />
AC IN .........................................................15<br />
Accessories ................................................11<br />
Air exhaust port ............................................15<br />
Air intake port ..............................................14<br />
ALS (Ambient Luminance Sensor) ...................14<br />
ARF (Auto Rolling Filter)<br />
Compartment ...........................................15<br />
FILTER indicator .......................................14<br />
FILTER REMAINING ..................................37<br />
Indicator status .........................................41<br />
Replacing ................................................42<br />
ASPECT .....................................................34<br />
AUDIO BALANCE ........................................38<br />
AUDIO IN ...................................................15<br />
AUTO SETUP<br />
Menu .....................................................37<br />
Remote control .........................................25<br />
Remote control button .................................13<br />
B<br />
BACK COLOR .............................................38<br />
Battery compartment .....................................13<br />
BLACKBOARD ............................................38<br />
BRIGHTNESS .............................................32<br />
C<br />
Calculation methods<br />
16:9 ......................................................52<br />
4:3 ........................................................16<br />
CD-ROM<br />
Accessories .............................................11<br />
Cleaning .....................................................42<br />
CLOCK PHASE ...........................................34<br />
CLOSED CA<strong>PT</strong>ION ......................................38<br />
COLOR ......................................................32<br />
COLOR TEMPERATURE ...............................32<br />
COMPONENT IN .........................................15<br />
COMPUTER<br />
Connection guidance ..................................48<br />
Remote control .........................................26<br />
Remote control button .................................13<br />
COMPUTER AUDIO IN .................................15<br />
COMPUTER SEARCH ..................................13<br />
COMPUTER1 IN ..........................................15<br />
COMPUTER2 IN/1 OUT ................................15<br />
COMPUTER2 SELECT .................................36<br />
Connections ................................................20<br />
CONTRAST ................................................32<br />
CONTROL PANEL .......................................37<br />
D<br />
DAYLIGHT VIEW .........................................32<br />
DEFAULT<br />
Remote control .........................................27<br />
Remote control button .................................13<br />
DETAILED SETUP<br />
O<strong>PT</strong>ION menu ..........................................38<br />
PICTURE menu ........................................33<br />
DIGITAL ZOOM<br />
Remote control .........................................28<br />
Remote control button .................................13<br />
Dimensions .................................................53<br />
ENGLISH - 54<br />
Direct power off ........................................... 22<br />
DIRECT POWER ON<br />
Function ................................................. 22<br />
Menu ..................................................... 37<br />
DOT CLOCK ............................................... 34<br />
E<br />
ENTER<br />
Control panel button ................................... 14<br />
Remote control button ................................. 13<br />
F<br />
FILTER REMAINING .................................... 37<br />
Focus lever ........................................... 14, 24<br />
FRAME LOCK ............................................. 35<br />
FREEZE<br />
Remote control ......................................... 27<br />
Remote control button ................................. 13<br />
Front leg adjusters ............................ 15, 17, 24<br />
Front panel cover ......................................... 14<br />
H<br />
Hand strap .................................................. 13<br />
HIGHLAND ................................................. 38<br />
I<br />
INDEX-WINDOW<br />
Remote control ......................................... 27<br />
Remote control button ................................. 13<br />
INITIALISE ALL ........................................... 38<br />
INPUT GUIDE ............................................. 36<br />
INPUT PASSWORD ..................................... 39<br />
INPUT SELECT<br />
Control panel button ................................... 14<br />
Remote control button ................................. 13<br />
Selecting .......................................... 24, 26<br />
INSTALLATION<br />
Menu ..................................................... 37<br />
Projection method ...................................... 17<br />
K<br />
KEYSTONE ................................................ 34<br />
L<br />
LAMP<br />
Indicator ................................................. 14<br />
Indicator status ......................................... 41<br />
LAMP RUNTIME ....................................... 36<br />
Lamp unit compartment ............................... 15<br />
Replacing ............................................... 43<br />
LAN ........................................................... 15<br />
LANGUAGE ................................................ 30<br />
LASER<br />
Remote control ......................................... 26<br />
Remote control button ................................. 13<br />
Lens shift lever ................................ 14, 18, 24<br />
Lever<br />
Focus lever ............................................. 14<br />
Lens shift lever ......................................... 14<br />
Zoom lever .............................................. 14
M<br />
MENU<br />
Control panel button ................................... 14<br />
Main menu .............................................. 30<br />
Navigation .............................................. 29<br />
Remote control button ................................. 13<br />
N<br />
Navigation buttons<br />
Control panel button ................................... 14<br />
Remote control button ................................. 13<br />
NETWORK<br />
Remote control ......................................... 26<br />
Remote control button ................................. 13<br />
NOISE REDUCTION .................................... 33<br />
O<br />
O<strong>PT</strong>ION menu ............................................ 36<br />
OSD DESIGN ............................................. 38<br />
P<br />
PAGE ........................................................ 13<br />
PASSWORD CHANGE ................................. 39<br />
PICTURE menu ........................................... 32<br />
PICTURE MODE ......................................... 32<br />
POSITION .................................................. 34<br />
POSITION menu .......................................... 34<br />
POWER<br />
Control panel ........................................... 14<br />
Indicator ................................................. 14<br />
Indicator status ......................................... 22<br />
Remote control button ................................. 13<br />
Power cord<br />
Accessories ............................................. 11<br />
Connecting ............................................. 22<br />
POWER OFF TIMER .................................... 37<br />
Projection lens ............................................. 14<br />
R<br />
REMOTE ................................................... 15<br />
LAMP switching ........................................ 49<br />
Pin assignments ....................................... 49<br />
Switching input signals ................................ 49<br />
Remote control<br />
Accessories ............................................. 11<br />
Indicator ................................................. 13<br />
Signal emitter ........................................... 13<br />
Signal receptor ......................................... 14<br />
RESIZING .................................................. 35<br />
RETURN<br />
Control panel button ................................... 14<br />
Remote control button ................................. 13<br />
S<br />
Safety cable<br />
Accessories ............................................. 11<br />
Attachment point ....................................... 15<br />
Safeguards ............................................. 44<br />
Screen size<br />
16:9 ...................................................... 52<br />
4:3 ....................................................... 16<br />
Security lock ............................................... 15<br />
SECURITY menu ......................................... 39<br />
Index<br />
SERIAL ......................................................15<br />
Basic format .............................................47<br />
Cable specifications ....................................48<br />
Communication settings ...............................47<br />
Connection ..............................................47<br />
Control commands .....................................48<br />
Pin assignments ........................................47<br />
SHARPNESS ..............................................32<br />
SHUTTER<br />
Remote control ..........................................27<br />
Remote control button .................................13<br />
SIGNAL SEARCH .........................................37<br />
Speaker ......................................................14<br />
Specifications ..............................................50<br />
STARTUP LOGO .........................................36<br />
STILL MODE ...............................................33<br />
Sub-menu ...................................................30<br />
S-VIDEO IN .................................................15<br />
SXGA MODE ...............................................38<br />
T<br />
Technical Information ....................................46<br />
TEMP<br />
Indicator ..................................................14<br />
Indicator status ..........................................41<br />
TEST PATTERN ..........................................38<br />
TEXT CHANGE ............................................39<br />
TEXT DISPLAY ............................................39<br />
Throw distance<br />
16:9 .......................................................52<br />
4:3 ........................................................16<br />
Throwing angle ............................................17<br />
TINT ..........................................................32<br />
Troubleshooting ...........................................45<br />
TV-SYSTEM ................................................33<br />
V<br />
VARIABLE AUDIO OUT .................................15<br />
VIDEO<br />
Remote control ..........................................26<br />
Remote control button .................................13<br />
VIDEO IN ....................................................15<br />
VOLUME ....................................................38<br />
Remote control ..........................................28<br />
Remote control button .................................13<br />
W<br />
X<br />
WHITE BALANCE ........................................33<br />
XGA MODE .................................................38<br />
Z<br />
Zoom lever ............................................14, 24<br />
ENGLISH - 55<br />
Appendix
Imformation<br />
Importante<br />
Avis important concernant la sécurité<br />
Cher client Panasonic:<br />
Ce mode d'emploi vous donne toutes les informations concernant l'utilisation de ce projecteur. Nous espérons qu'il<br />
vous aidera à utiliser au mieux votre nouvel appareil, et que votre projecteur à cristaux liquides Panasonic vous<br />
donnera entière satisfaction. Le numéro de série du produit se trouve au bas du produit. Le noter dans l'espace prévu<br />
ci-dessous et conserver ce manuel pour le cas où des réparations seraient nécessaires à l'avenir.<br />
FRANÇAIS - 56<br />
Numéro de modèle: <strong>PT</strong>-F100NTU / <strong>PT</strong>-<strong>F100U</strong><br />
Numéro de série:<br />
AVERTISSEMENT: POUR REDUIRE LES RISQUES DE FEU OU DE CHOC ÉLECTRIQUE, NE PAS<br />
EXPOSER CE PRODUIT À L'EAU OU À L'HUMIDITÉ.<br />
Alimentation: Ce projecteur LCD est conçu pour fonctionner sur secteur de 100 V - 240 V, 50 Hz/60 Hz<br />
seulement.<br />
ATTENTION: Le cordon d'alimentation secteur fourni avec le projecteur peut être utilisé uniquement pour<br />
une alimentation électrique de 125 V, 7 A maximum. Si on veut l'utiliser avec une tension ou<br />
un courant plus forts, on doit se procurer un autre cordon d'alimentation de 250 V. Si on utilise<br />
le cordon fourni sous ces conditions, risque de provoquer un incendie.<br />
Le symbole de la flèche en forme d'éclair, dans un triangle, avertit l'usager de la présence de<br />
«tensions dangereuses» à l'intérieur du produit qui peuvent être de force suffisante pour constituer<br />
un risque de choc électrique aux personnes.<br />
Le point d'exclamation dans un triangle avertit l'usager de la présence d'instructions importantes<br />
concernant l'utilisation et l'entretien (réparation) dans la littérature accompagnant le produit.<br />
ATTENTION: Cet appareil est équipé d'une fiche de courant à trois broches avec<br />
mise à la terre. Ne pas retirer la broche de mise à la masse de la<br />
fiche.<br />
Cette fiche ne pourra être utilisée que dans une prise avec mise à<br />
la terre. Ceci est une précaution sécuritaire. S'il est impossible<br />
d'insérer la fiche dans la prise, s'adresser à un électricien. Ne pas<br />
annuler la protection de la fiche à mise à la terre.<br />
Indication basée sur la loi allemande «Geräte- und Produktsicherheitsgesetz»<br />
Directive 2001/95/EC (Article 5);<br />
Panasonic Marketing Europe GmbH<br />
Hagenauer Str. 43 65203 Wiesbaden F.R.GERMANY<br />
Ne pas retirer<br />
NOTICE:<br />
A Ce produit possède une lampe à décharge haute intensité (DHI) qui contient du mercure. Son élimination<br />
peut être réglementée dans votre s à cause de considérations environnementales. Pour d'amples<br />
informations sur la mise au rebut ou le recyclage, veuillez contacter vos autorités locales ou aller au site<br />
Web de l'Electronics Industries Alliance: http://www.eiae.org
Avis important concernant la sécurité<br />
AVERTISSEMENT:<br />
Cet équipement a été soumis à des tests qui ont démontré que celui-ci respectait les limites spécifiées pour les<br />
appareils numériques de la classe B aux termes de la partie 15 des règles de la FCC (Federal Communications<br />
Commission U.S.A.). Ces limites ont pour objet de fournir une protection raisonnable contre les interférences<br />
nuisibles dans le cas d'une installation en milieu résidentiel. Cet équipement produit, utilise et peut rayonner de<br />
l'énergie de haute fréquence, et s'il n'est pas installé et utilisé conformément aux instructions fournies avec celuici,<br />
peut provoquer des interférences nuisibles aux communications radio. En outre, même en cas d'utilisation<br />
conforme, il n'est pas garanti qu'aucune interférence ne saurait survenir avec certaines installations. Si cet<br />
équipement s'avère nuire à la bonne réception d'émissions de radiophonie ou de télévision, ce que l'on pourra<br />
déterminer en mettant l'équipement successivement hors tension puis sous tension, il est conseillé de tenter de<br />
remédier au problème par l'une des méthodes suivantes:<br />
- Réorientez ou déplacez l'antenne du récepteur;<br />
- Éloignez l'équipement du récepteur;<br />
- Branchez l'équipement dans une prise de courant située sur un circuit autre que celui qui alimente la prise<br />
de courant du récepteur;<br />
- Demandez conseil à votre distributeur ou à un technicien de radio/télévision expérimenté.<br />
ATTENTION: Pour assurer la bonne conformité, utilisez uniquement des câbles d'interface blindés<br />
lorsque vous connectez des ordinateurs ou des périphériques. Toute modification non<br />
autorisée de cet équipement annulera le droit de l'utilisateur à utiliser cet équipement.<br />
Si le port sériel est utilisé pour connecter un ordinateur personnel afin de commander le<br />
projecteur depuis l'extérieur, il faut utiliser le câble d'interface sériel en option RS-232C<br />
avec une âme en ferrite. Tout changement ou modification non autorisé à cet équipement<br />
annule l'autorité de faire fonctionner cet appareil.<br />
Avertissement de la FCC relative à l'exposition RF : (si fourni avec un appareil sans fil)<br />
- Cet équipement est conforme aux limitations concernant l'exposition aux radiations établies par la FCC dans<br />
un environnement non contrôlé.<br />
- Cet équipement a été approuvé pour un fonctionnement mobile et requiert de respecter une distance<br />
minimum de 20 cm entre l'antenne(s) et toutes les parties de votre corps (sauf les extrémités des mains,<br />
poignets et pieds) durant les modes de fonctionnement sans fil.<br />
- Cet équipement ne peut pas être utilisé avec d'autres transmetteurs installés, qui peuvent être capable de<br />
transmission simultanée.<br />
ADVERTENCIA:<br />
A Ne peut être utilisé dans une salle d'ordinateurs telle que définie dans la norme ANSI/NFPA 75 Standard for<br />
Protection of Electronic Computer/Data Processing Equipment.<br />
A Pour l'équipement branché en permanence, un dispositif de dis connexion d'accès facile doit être incorporé<br />
dans le câble d'installation du bâtiment;<br />
A Pour l'équipement bran chable, une prise secteur d'accès facile doit être installée près de l'équipement.<br />
FRANÇAIS - 57<br />
Information<br />
Importante
Information<br />
Importante<br />
Avis important concernant la sécurité<br />
Informations sur l'évacuation des déchets dans les pays ne faisant pas partie de l'Union européenne<br />
Ce symbole n'est reconnu que dans l'Union européenne. Pour vous débarrasser de ce produit, veuillez<br />
contacter les autorités locales ou votre revendeur afin de connaître la procédure d'élimination á suivre.<br />
FRANÇAIS - 58<br />
Déclaration de conformité<br />
Modèle n°: <strong>PT</strong>-F100NTU / <strong>PT</strong>-<strong>F100U</strong><br />
Désignation commerciale:Panasonic<br />
Fabricant responsable: Panasonic North America<br />
Adresse: One Panasonic Way 4B - 9 Secaucus, New Jersey 07094<br />
Téléphone: 1 - 800 - 528 - 8601 or 1 - 800 - 222 - 0741<br />
Email: pjscservice@us.panasonic.com<br />
Cet appareil est conforme à la partie 15 des règles de la FCC (Federal Communicaitions Commission U.S.A.) ce<br />
qui signifie: (1) que l'appareil ne produit pas d'interférences nuisibles, et (2) que l'appareil est capable de<br />
supporter sans danger les interférences reçues, y compris celles susceptibles de perturber son fonctionnement.
Précautions de sécurité<br />
AVERTISSEMENT<br />
Si l'on remarque une émission de fumée, d'odeurs<br />
suspectes ou de bruits provenant du projecteur,<br />
débrancher la fiche du cordon d'alimentation de la<br />
prise de courant.<br />
Ne pas continuer d'utiliser le projecteur dans ces cas,<br />
autrement cela peut entraîner un incendie ou des<br />
chocs électriques.<br />
Après s'être assuré que de la fumée ne se dégage<br />
plus, s'adresser à un centre technique agréé et<br />
demander que les réparations nécessaires soient<br />
faites.<br />
Le fait de réparer le projecteur soi-même est très<br />
dangereux, et ne doit jamais être fait.<br />
Ne pas installer ce projecteur dans un endroit qui<br />
n'est pas assez résistant pour supporter le poids du<br />
projecteur.<br />
Si l'emplacement d'installation n'est pas assez<br />
résistant, le projecteur risque de tomber et causer de<br />
graves blessures et (ou) des dommages.<br />
Demander à un technicien qualifié d'installer le<br />
projecteur par exemple s'il est installé au plafond.<br />
Si l'installation n'est pas faite correctement, cela peut<br />
entraîner des blessures ou des chocs électriques.<br />
Ne pas utiliser un support de montage au plafond qui<br />
n'est pas agréé.<br />
Si de l'eau ou des objets étrangers entrent dans le<br />
projecteur, si le projecteur tombe, ou si le boîtier est<br />
endommagé, débrancher immédiatement la fiche du<br />
cordon d'alimentation de la prise de courant.<br />
Si l'on continue d'utiliser le projecteur dans cette<br />
condition, cela peut entraîner un incendie ou des<br />
chocs électriques.<br />
S'adresser à un centre technique agréé pour que les<br />
réparations nécessaires puissent être faites.<br />
Ne pas surcharger la prise de courant.<br />
Si l'alimentation est surchargée (par exemple, par<br />
l'utilisation de trop d'adaptateurs), cela risque de faire<br />
surchauffer le projecteur et peut entraîner un<br />
incendie.<br />
Ne jamais tenter de modifier ou de démonter le<br />
projecteur.<br />
Des hautes tensions qui peuvent causer de graves<br />
blessures sont présentes à l'intérieur du projecteur.<br />
Pour toute inspection, réglage ou réparation,<br />
s'adresser à un centre technique agréé.<br />
Ne pas manipuler le cordon d'alimentation avec les<br />
mains mouillées.<br />
Cela peut entraîner des chocs électriques.<br />
Ne pas placer le projecteur dans l'eau ou ne pas le<br />
laisser se mouiller.<br />
Sinon cela peut causer un incendie ou des chocs<br />
électriques.<br />
Nettoyer la fiche du cordon d'alimentation<br />
régulièrement afin d'éviter toute accumulation de<br />
poussière.<br />
Si de la poussière s'accumule sur la fiche du cordon<br />
d'alimentation, l'humidité peut endommager l'isolant<br />
et entraîner un incendie. Débrancher la fiche du<br />
cordon d'alimentation de la prise de courant et<br />
l'essuyer avec un tissu sec.<br />
Si le projecteur n'est pas utilisé pendant une période<br />
prolongée, débrancher la fiche du cordon<br />
d'alimentation de la prise de courant.<br />
Faire attention à ne pas endommager le cordon<br />
d'alimentation.<br />
Ne pas endommager le cordon d'alimentation, ne pas<br />
le modifier, ne pas le placer sous des objets lourds,<br />
ne pas le chauffer, ne pas le placer près d'objets<br />
chauffants, ne pas le tordre, ne pas le plier ou le tirer<br />
excessivement et ne pas le rouler en boule.<br />
Si le cordon d'alimentation est endommagé, cela<br />
peut entraîner un incendie et des chocs électriques.<br />
Si le cordon d'alimentation est endommagé, le faire<br />
réparer par un centre technique agréé.<br />
Brancher la fiche du cordon d'alimentation<br />
fermement dans la prise de courant.<br />
Si la fiche n'est pas complètement insérée, cela peut<br />
entraîner des chocs électriques ou la faire<br />
surchauffer.<br />
Si la fiche est endommagée ou la plaque de la prise<br />
desserrée, celles-ci ne devraient pas être utilisées.<br />
Ne pas placer le projecteur sur des surfaces<br />
instables.<br />
Si le projecteur est placé sur une surface qui est<br />
inclinée ou instable, il risque de tomber ou de se<br />
renverser et cela peut causer des blessures ou des<br />
dommages.<br />
Ne pas placer le projecteur sur des matériaux<br />
comme du tapis ou du tissus éponge.<br />
Cela peut provoquer une surchauffe du projecteur,<br />
pouvant entraîner des brûlures, un incendie ou<br />
endommager le projecteur.<br />
Ne pas placer des récipients de liquide sur le<br />
projecteur.<br />
Si de l'eau se renverse sur le projecteur ou pénètre<br />
dans celui-ci, il y aura risque d'incendie ou<br />
d'électrocution.<br />
Si de l'eau entre à l'intérieur du projecteur, entrer en<br />
contact avec un centre technique agréé.<br />
Ne pas mettre d'objets étrangers dans le projecteur.<br />
Ne pas insérer d'objets métalliques ou inflammables<br />
dans les orifices de ventilation ou les faire tomber sur<br />
le projecteur, car cela peut causer un incendie ou des<br />
chocs électriques.<br />
FRANÇAIS - 59<br />
Information<br />
Importante
Information<br />
Importante<br />
Précautions de sécurité<br />
Veiller à ce que les bornes + et – des piles n'entrent<br />
pas en contact avec des objets métalliques tels que<br />
colliers ou épingles à cheveux.<br />
Sinon, les piles risquent de fuir, de surchauffer,<br />
d'exploser ou de prendre feu.<br />
Ranger les piles dans un sac en plastique, et ne pas<br />
les ranger à proximité d'objets métalliques.<br />
Ne pas toucher le liquide provenant des fuites des<br />
piles.<br />
Si vous touchez le liquide des fuites cela pourrait<br />
abîmer votre peau. Enlever le liquide al'eau claire et<br />
rechercher immédiatement le secours d'un médecin.<br />
Si vous recevez du liquide des fuites dans les yeux,<br />
cela pourrait provoquer la cécité ou des blessures.<br />
Ne pas vous frotter les yeux, enlever le liquide a l'eau<br />
claire et rechercher immédiatement le secours d'un<br />
médecin.<br />
Pendant un orage, ne pas toucher le projecteur ou le<br />
câble.<br />
Il y a risque d'électrocution.<br />
Ne pas utiliser l'appareil dans un bain ou une<br />
douche.<br />
Il y a risque d'incendie ou d'électrocution.<br />
Veillez à ce que le faisceau lumineux n'éclaire pas<br />
directement votre peau pendant que vous utilisez le<br />
projecteur.<br />
Une lumière intense est émise par l'objectif du<br />
projecteur. Si vous vous placez dans ce faisceau<br />
lumineux, celui-ci risquera de vous blesser ou de<br />
vous abîmer la peau.<br />
Lors du remplacement de la lampe, la laisser<br />
refroidir pendant au moins une heure avant de la<br />
manipuler.<br />
Le couvercle de la lampe devient très chaud, et on<br />
risque de se brûler si on le touche.<br />
MISES EN GARDE<br />
Ne pas obstruer les orifices d'entrée et de sortie<br />
d'air.<br />
Cela risque de faire surchauffer le projecteur, et<br />
causer un incendie ou endommager le projecteur.<br />
Ne pas installer le projecteur dans des endroits<br />
étroits, mal ventilés tels que des placards ou des<br />
étagères.<br />
Ne pas placer le projecteur sur des tissus ou du<br />
papier, ces matériaux peuvent être aspirés dans<br />
l'orifice d'entrée d'air.<br />
Débrancher toujours tous les câbles avant de<br />
déplacer le projecteur.<br />
Le fait de déplacer le projecteur avec des câbles<br />
branchés peut endommager les câbles, ce qui<br />
pourrait causer un incendie ou des chocs électriques.<br />
FRANÇAIS - 60<br />
Avant de remplacer la lampe, veiller à débrancher la<br />
fiche du cordon d'alimentation de la prise de<br />
courant.<br />
Il y a risque d'électrocution ou d'explosion.<br />
Ne pas regarder directement dans l'objectif pendant<br />
que le projecteur fonctionne.<br />
Une lumière intense est émise par l'objectif du<br />
projecteur. Si l'on regarde directement dans cette<br />
lumière, elle risque de causer des blessures et de<br />
graves lésions aux yeux.<br />
Veiller particulièrement à ce que les enfants ne<br />
regardent pas dans l'objectif. En outre, éteindre le<br />
projecteur si on le laisse sans surveillance.<br />
Ne pas placer les mains ou autres objets près de<br />
l'orifice de sortie d'air.<br />
De l'air chaud sort par l'orifice de sortie d'air. Ne pas<br />
placer les mains, le visage ou d'autres objets qui ne<br />
peuvent résister à la chaleur près de cette sortie d'air<br />
[laisser un espace d'au moins 50cm], sinon des<br />
brûlures ou des dommages risqueraient de<br />
s'ensuivre.<br />
Le remplacement de la lampe doit être effectué de<br />
préférence par un technicien qualifié.<br />
La lampe a une pression interne élevée. Si elle est<br />
manipulé incorrectement, une explosion peut<br />
s'ensuivre.<br />
La lampe peut être facilement endommagé si elle est<br />
heurté contre des objets durs ou si on le laisse<br />
tomber et des blessures et des mauvais<br />
fonctionnements peuvent s'ensuivre.<br />
Ne pas laisser des enfants ou des animaux<br />
domestiques toucher la télécommande.<br />
Après avoir utilisé la télécommande, la ranger hors<br />
de portée des enfants ou des animaux domestiques.<br />
Ne pas installer le projecteur dans des endroits<br />
humides ou poussiéreux ou dans des endroits où le<br />
projecteur peut entrer en contact avec des fumées<br />
grasses ou de la vapeur.<br />
L'utilisation du projecteur dans de telles conditions<br />
peut causer un incendie, des chocs électriques ou<br />
une détérioration du boîtier en plastique. Une<br />
détérioration du plastique risquerait en effet<br />
d'entraîner une chute du projecteur en cas<br />
d'installation au plafond.<br />
Ne pas installer le projecteur dans un<br />
environnement a haute température, tel qu'a<br />
proximité d'un chauffage ou en plein soleil.<br />
Sinon cela peut causer un incendie, un<br />
dysfonctionnement ou une détérioration au plafond.
Pour débrancher le cordon d'alimentation, tenir la<br />
fiche et non pas le cordon.<br />
Si le cordon d'alimentation est tiré, le cordon sera<br />
endommagé et cela peut causer un incendie, des<br />
courts-circuits ou des chocs électriques sérieux.<br />
Ne pas placer d'objets lourds sur le projecteur.<br />
Cela peut déséquilibrer le projecteur et le faire<br />
tomber, ce qui peut entraîner des dommages ou des<br />
blessures.<br />
Ne pas court-circuiter, chauffer ou démonter les<br />
piles, et ne pas les mettre dans l'eau ou dans le feu.<br />
Sinon, les piles risqueront de surchauffer, de fuir,<br />
d'exploser ou de prendre feu, et donc de causer des<br />
brûlures ou d'autres blessures.<br />
Lorsqu'on insère les piles, veiller à ce que les<br />
polarités (+ et –) soient bien respectées.<br />
Si l'on insère les piles incorrectement, elles<br />
risqueront d'exploser ou de fuir, ce qui peut causer un<br />
incendie, des blessures ou une contamination du<br />
logement des piles et de la zone environnante.<br />
Utiliser uniquement les piles spécifiées.<br />
Si l'on insère des piles d'un type différent, elles<br />
risqueront d'exploser ou de fuir, ce qui peut causer un<br />
incendie, des blessures ou une contamination du<br />
logement des piles et de la zone environnante.<br />
Ne pas mélanger des piles usées et des piles<br />
neuves.<br />
Si l'on insère les piles incorrectement, elles<br />
risqueront d'exploser ou de fuir, ce qui peut causer un<br />
incendie, des blessures ou une contamination du<br />
logement des piles et de la zone environnante.<br />
Si l'on n'utilise pas le projecteur pendant une<br />
période prolongée, débrancher la fiche du cordon<br />
d'alimentation de la prise de courant et retirer les<br />
piles de la télécommande.<br />
Si de la poussière s'accumule sur la fiche du cordon<br />
d'alimentation, l'humidité ainsi créée risquera<br />
d'endommager l'isolation, ce qui peut provoquer un<br />
incendie.<br />
Le fait de laisser les piles à l'intérieur de la<br />
télécommande pendant trop longtemps en cas<br />
d'inactivité risque de causer une dégradation de<br />
l'isolation, une fuite de courant ou même des<br />
explosions, ce qui pourrait causer un incendie.<br />
Précautions de sécurité<br />
Ne pas peser de tout son poids sur ce projecteur.<br />
On risque de tomber ou de casser l'appareil, ce qui<br />
peut causer des blessures.<br />
Veiller tout particulièrement à ce que les enfants ne<br />
se tiennent pas debout ou ne s'asseyent pas sur le<br />
projecteur.<br />
Retirer rapidement les piles de la télécommande.<br />
Si vous laissez des pile usagées dans la<br />
télécommande pendant une longue période, cela<br />
risque de provoquer des fuites, une hausse anormale<br />
de la température interne ou une explosion.<br />
Si la lampe s'est cassée, ventiler immédiatement la<br />
pièce. Ne pas toucher ni approcher le visage des<br />
morceaux cassés.<br />
Le non respect de cette consigne peut entraîner<br />
l'absorption du gaz par l'utilisateur. Ce gaz se dégage<br />
lorsque la lampe est cassée et il contient presque<br />
autant de mercure qu'une lampe fluorescente, de<br />
plus les morceaux cassés peuvent provoquer des<br />
blessures.<br />
Si vous pensez avoir inhalé du gaz ou que du gaz a<br />
pénétré dans votre bouche ou dans vos yeux,<br />
contactez un médecin immédiatement.<br />
S'adresser au revendeur pour le remplacement de la<br />
lampe et l'inspection de l'intérieur du projecteur.<br />
Débrancher la fiche du cordon d'alimentation de la<br />
prise de courant comme mesure de sécurité avant<br />
d'effectuer tout nettoyage.<br />
Sinon cela peut causer des chocs électriques.<br />
Demander à un centre technique agréé de nettoyer<br />
l'intérieur du projecteur au moins une fois par an.<br />
S'il n'est pas nettoyé et que de la poussière<br />
s'accumule à l'intérieur du projecteur, cela peut<br />
causer un incendie ou des problèmes de<br />
fonctionnement.<br />
Il est recommandé de nettoyer l'intérieur du<br />
projecteur avant l'arrivée de la saison humide.<br />
Demander au centre technique agréé le plus proche<br />
de nettoyer le projecteur lorsque cela est requis. Se<br />
renseigner auprès du centre technique agréé pour le<br />
coût du nettoyage.<br />
Nous faisons tous les efforts possibles afin de préserver l'environnement. Prière de rapporter l'appareil, s'il<br />
n'est pas réparable, à votre revendeur ou à un centre de recyclage.<br />
FRANÇAIS - 61<br />
Information<br />
Importante
Information<br />
Importante<br />
Précautions de sécurité<br />
Précautions lors du transport<br />
Ne pas soumettre le projecteur à des vibrations ou<br />
des chocs excessifs.<br />
L'objectif du projecteur doit être manipulé avec soin.<br />
Placer le couvercle sur l'objectif lors du transport du<br />
projecteur.<br />
Précautions lors de l'installation<br />
Éviter de l'installer dans les endroits sujets à des<br />
vibrations ou à des chocs.<br />
Les pièces internes peuvent être endommagées, ce<br />
qui peut causer des pannes ou des accidents.<br />
Éviter d'installer le projecteur à des endroits sujets à<br />
des changements de température brusques, à<br />
proximité d'un climatiseur ou d'un matériel<br />
d'éclairage.<br />
La durée de vie de la lampe risquerait d'être réduite,<br />
ou le projecteur risquerait de s'éteindre. Voir «<br />
Indicateur TEMP » à la page 41.<br />
Ne pas installer le projecteur près de lignes<br />
d'alimentation électrique à haute tension ou de<br />
moteurs.<br />
Le projecteur peut être soumis à des interférences<br />
électromagnétiques.<br />
Précautions lors de l'utilisation<br />
Afin d'obtenir la meilleure qualité d'image<br />
Fermer les rideaux ou les volets de toutes les<br />
fenêtres et éteindre les lampes fluorescentes situées<br />
à proximité de l'écran afin que la lumière extérieure<br />
ou la lumière des lampes intérieures n'éclaire pas<br />
l'écran.<br />
Ne pas toucher aux surfaces de l'objectif ou du verre<br />
avant avec les mains nues.<br />
Si la surface de l'objectif est salie par des empreintes<br />
digitales ou autre, celles-ci seraient agrandies et<br />
projetées sur l'écran. De plus, refermer le Couvercle<br />
du panneau avant lorsque le projecteur n'est pas<br />
utilisé.<br />
Affichage à cristaux liquides<br />
Ne pas projeter la même image pendant une longue<br />
durée, car elle risquerait de former une après-image<br />
sur l'affichage à cristaux liquides.<br />
L'affichage à cristaux liquides du projecteur a été<br />
fabriqué en utilisant une technologie de haute<br />
précision afin d'offrir une image très détaillée. Il est<br />
possible que parfois quelques pixels figés<br />
apparaissent sur l'écran sous forme de points fixes<br />
bleus, verts ou rouges. Bien noter que ceci n'affecte<br />
pas le bon fonctionnement de votre LCD.<br />
FRANÇAIS - 62<br />
Lors du transport du projecteur, bien le tenir par le<br />
bas.<br />
Ne pas tenir le projecteur par les pieds de réglage ou<br />
le couvercle supérieur pour le déplacer car cela<br />
pourrait l'endommager.<br />
Si le projecteur est installé au plafond, demander a<br />
un technicien qualifié de faire tous les travaux<br />
d'installation.<br />
Il faut acheter le kit d'installation séparé (numéro de<br />
modèle: ET-PKF100H, ET-PKF100S). En outre, il est<br />
recommandé que tous les travaux d'installation<br />
soient exécutés uniquement par un technicien<br />
qualifié.<br />
Voir « Installation du câble de sûreté » à la page 44<br />
pour l'installation du Câble de sécurité.<br />
Si l'on utilise ce projecteur à un endroit élevé (au<br />
dessus de 1 400 m), régler MONTAGNE sur OUI. Voir<br />
« MONTAGNE » à la page 38.<br />
Le non-respect de ces consignes peut entraîner un<br />
dysfonctionnement ou peut raccourcir la durée de vie<br />
de la lampe ou d'autres composants.<br />
Écran<br />
N'appliquer aucun produit volatil qui risque de<br />
décolorer l'écran, et veiller à ce que l'écran ne soit<br />
pas sale ou endommagé<br />
Le projecteur possede une lampe au mercure a<br />
haute pression interne avec les caractéristiques<br />
suivantes.<br />
La luminosité de la lampe dépend de la durée<br />
d'utilisation.<br />
Des chocs ou des écaillages sur la lampe pourraient<br />
la faire exploser ou écourter la durée de vie de la<br />
lampe.<br />
La lampe pourrait exploser occasionnellement apres<br />
l'utilisation du projecteur.<br />
La lampe pourrait exploser si le projecteur est utlisé<br />
apres le délai conseillé de remplacement de la<br />
lampe.<br />
La durée de vie de la lampe dépend des<br />
caractéristiques individuels de la lampe, des<br />
conditions d'utilisation et de l'environnement<br />
d'installation. 'utilisation consécutive pendant plus de<br />
10 heures du projecteur ou de la commutaion<br />
fréquente peuvent en particulier affecter<br />
considérablement la durée de vie de la lampe.<br />
Composants optiques<br />
Si vous utilisez la lampe 6 heures cons‘’ecutivement<br />
chaque jour, les composants optiques pourraient<br />
nécessiter un remplacement dans moins d'un an.
Remplacement de l'unité de la lampe<br />
Avant de remplacer le l'Unité de la lampe<br />
Éteindre l'ALIMENTATION PRINCIPALE puis débrancher le cordon principal de la prise du secteur.<br />
Vérifier que l'Unité de la lampe ainsi que les pièces autour aient eu le temps de refroidir.<br />
Préparer un tournevis cruciforme.<br />
Contacter un centre de service aprés-vente agréé pour acheter une Unité de la lampe (ET-LAF100) de<br />
rechange.<br />
En cas d'installation du projecteur au plafond, ne jamais travailler directement dessous et éloigner le visage<br />
du projecteur.<br />
REMARQUE:<br />
• Avant de remplacer la lampe, la laisser refroidir pour éviter les risques de brûlures, les dommages et autres dangers.<br />
• Ne pas essayer de la remplacer par une lampe non autorisée.<br />
Délai de remplacement de l'Unité de la lampe<br />
L'Unité de la lampe est un consommable et sa luminosité diminue avec la durée d'utilisation. L'indicateur<br />
LAMPE vous informera des délais de remplacement de 2800 heures, et coupera le projecteur à 3000 heures.<br />
Ces valeurs sont fournies avant tout à titre indicatif et peuvent être réduites en fonction des conditions<br />
d''utilisation réelles, des caractéristiques de l'Unité de la lampe, de la température ambiante, etc. Vous<br />
pouvez DURÉE DE LA LAMPE dans le menu O<strong>PT</strong>ION.<br />
Indication<br />
Plus de 2 800 heures<br />
Plus de 3 000 heures<br />
A l'écran Indicateur LAMPE<br />
REMPLACER LA LAMPE<br />
«LAMPE DE REMPLACEMENT» est<br />
affiché en haut à gauche de l'écran pendant<br />
30 secondes.<br />
«LAMPE DE REMPLACEMENT» s'affiche<br />
en haut à gauche de l'écran, et attend votre<br />
réponse.<br />
Pour le supprimer immédiatement, appuyer<br />
sur n‘importe quelle touche.<br />
S'allume en ROUGE.<br />
REMARQUE:<br />
• Les durées indiquées, de 2800 et 3000 heures, sont des estimations basé sur certaines conditions et ne représentent en<br />
aucun cas des durées garanties.<br />
• Pour plus d'informations à propos des caractéristiques de l'Unité de la lampe, telles que la durée de garantie, se reporter<br />
aux instructions fournies avec l'Unité de la lampe.<br />
• Lorsque la durée d'utilisation de la lampe dépasse 3000 heures, le projecteur passera en mode de veille après environ<br />
10 minutes d'utilisation.<br />
FRANÇAIS - 63<br />
Information<br />
Importante
Information<br />
Importante<br />
Remplacement de l'unité de la lampe<br />
Procédure de remplacement<br />
Retirer et remplacer la lampe<br />
1. Dévisser à l'aide d'un tournevis cruciforme les<br />
3 vis de fixation du Couvercle de la lampe à<br />
l'arrière du projecteur jusqu'à ce qu'elles tournent<br />
librement, puis retirer le Couvercle de la lampe.<br />
Couvercle de la l'Unité de la lampe<br />
Vis de fixation du couvercle de l'Unité de la lampe<br />
2. Dévisser les 2 vis de fixation de l'Unité de la<br />
lampe à l'aide du tournevis cruciforme.<br />
3. Tenir l'Unité de la lampe par la poignée puis<br />
débloquer le verrou de la lampe.<br />
4. Extraire doucement l'Unité de la lampe du<br />
projecteur.<br />
Vis de fixation<br />
de l'Unité de<br />
la lampe<br />
FRANÇAIS - 64<br />
Poignées<br />
5. Remettre la nouvelle Unité de la lampe à son<br />
emplacement.<br />
6. Appuyer sur l'Unité de la lampe jusqu'à ce qu'elle<br />
s'encliquète et s'assurer qu'elle soit bien fixée en<br />
place.<br />
7. Resserrer les 2 vis de fixation de l'Unité de la<br />
lampe à l'aide du tournevis cruciforme.<br />
Vis de fixation<br />
de l'Unité de<br />
la lampe<br />
Appuyer ici<br />
8. Fixer le Couvercle de la lampe puis resserrer les<br />
3 vis du Couvercle de la lampe à l'aide du<br />
tournevis cruciforme.
Remplacement de l'unité de la lampe<br />
Protections du support de montage au plafond<br />
Bien que le projecteur ainsi que le support d'installation au plafond aient été conçus pour répondre aux plus hauts<br />
critères de sécurité, il est néanmoins recommandé d'installer et d'attacher au bas du projecteur le câble de sécurité<br />
fourni, en cas d<br />
REMARQUE:<br />
• Pendant toute la durée de la garantie, le fabricant ne pourrait en aucun cas être tenu pour responsable de tout danger ou<br />
dommages causés soit par l'utilisation d'un support au plafond non conforme, acheté auprès de distributeurs non<br />
autorisés, soit par ses conditions d'utilisation.<br />
• N'utiliser qu'un tournevis dynamométrique durant l'installation, et ne jamais utiliser un tournevis électrique ou un tournevis<br />
à frapper.<br />
• Les travaux d'installation du support au plafond ne devront être effectués que par un technicien qualifié.<br />
• Démonter au plus vite tout support au plafond qui ne sera plus utilisé.<br />
Installation du câble de sécurité<br />
1. Installer le support de montage au plafond en suivant les consignes d'installation.<br />
2. Faire passer la boucle du câble à l'aide d'un verrou en le bouclant par l'autre extrémité.<br />
Attacher une des extrémités du câble à l'aide d'un verrou en le bouclant par l'autre extrémité.<br />
3. Fixer le verrou au bas du projecteur à l'aide de la vis fournie.<br />
Couple: 125±20 CN·m<br />
FRANÇAIS - 65<br />
Information<br />
Importante
Professional/Industrial Video<br />
Panasonic Projector Systems Company<br />
Unit of Panasonic North America<br />
One Panasonic Way 4B - 9 Secaucus, NJ 07094 (201) 392 - 6591<br />
3330 Cahuenga BLVD West Los Angels, CA 90068 (323) 436 - 3500<br />
Technical Support:<br />
(800) 524 - 1448<br />
(800) 526 - 6610<br />
FAX: (201) 392 - 6514<br />
E-Mail: pjscsupport@us.panasonic.com<br />
© 2007 Matsushita Electric Industrial Co., Ltd. All Rights Reserved.<br />
Printed in Japan<br />
S0207-1037B