
You also want an ePaper? Increase the reach of your titles
YUMPU automatically turns print PDFs into web optimized ePapers that Google loves.
Chapter 4: Initial Setup and Menu<br />
6 Start Scan<br />
Auto Tuning<br />
Start Scan<br />
Press OK .<br />
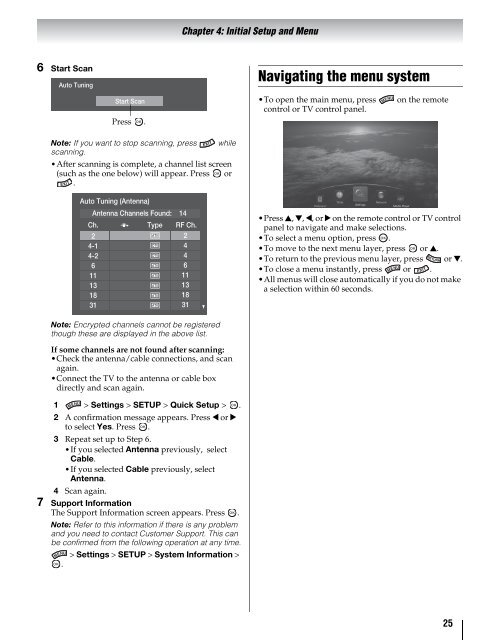
Navigating the menu system<br />
•To open the main menu, press on the remote<br />
control or TV control panel.<br />
Note: If you want to stop scanning, press while<br />
scanning.<br />
•After scanning is complete, a channel list screen<br />
(such as the one below) will appear. Press OK or<br />
.<br />
Auto Tuning (Antenna)<br />
Antenna Channels Found: 14<br />
Ch. Type RF Ch.<br />
2<br />
4-1<br />
4-2<br />
6<br />
11<br />
13<br />
18<br />
31<br />
ATV<br />
DTV<br />
DTV<br />
ATV<br />
ATV<br />
ATV<br />
ATV<br />
ATV<br />
2<br />
4<br />
4<br />
6<br />
11<br />
13<br />
18<br />
31<br />
Wallpaper<br />
Timer<br />
Settings<br />
Network<br />
Media Player<br />
•Press B, b, C, or c on the remote control or TV control<br />
panel to navigate and make selections.<br />
•To select a menu option, press OK .<br />
•To move to the next menu layer, press OK or B.<br />
•To return to the previous menu layer, press or b.<br />
•To close a menu instantly, press or .<br />
•All menus will close automatically if you do not make<br />
a selection within 60 seconds.<br />
Note: Encrypted channels cannot be registered<br />
though these are displayed in the above list.<br />
If some channels are not found after scanning:<br />
•Check the antenna/cable connections, and scan<br />
again.<br />
•Connect the TV to the antenna or cable box<br />
directly and scan again.<br />
1 > Settings > SETUP > Quick Setup ><br />
OK<br />
.<br />
2 A confirmation message appears. Press C or c<br />
to select Yes. Press OK .<br />
3 Repeat set up to Step 6.<br />
•If you selected Antenna previously, select<br />
Cable.<br />
•If you selected Cable previously, select<br />
Antenna.<br />
4 Scan again.<br />
7 Support Information<br />
The Support Information screen appears. Press OK .<br />
Note: Refer to this information if there is any problem<br />
and you need to contact Customer Support. This can<br />
be confirmed from the following operation at any time.<br />
> Settings > SETUP > System Information ><br />
OK .<br />
25