Part II - IPA SA
Part II - IPA SA
Part II - IPA SA

Create successful ePaper yourself
Turn your PDF publications into a flip-book with our unique Google optimized e-Paper software.
REVISTA ROMÂN DE AUTOMATIC<br />
33<br />
• Palletizing cylindrical pieces (flowing of the<br />
cylindrical pieces is supplied by the<br />
workstation number three and workstation<br />
number four. All the pieces must be placed in a<br />
matricial storehouse with eight locations.<br />
• The welding operation (to do this operation<br />
we use storehouses (or Station) 1 and 2, which<br />
are supplied with parallelepipedical pieces. The<br />
robot take these pieces one by one and puts them<br />
together in the assembling place. After that, with<br />
a welding device that is taken from the special<br />
support created for the welding device, the robot<br />
simulates welding-line and welding-point<br />
operations. When the operation is finished, the<br />
robot puts in the support the welding device and<br />
the piece in the matricial storehouse with four<br />
locations (in order 1, 2, 3, 4).<br />
There are also presented programming<br />
examples for the applications of palletizing,<br />
assembling and welding. They differ from the<br />
lab assignments by the positioning of the<br />
pieces in another order.<br />
Activating the section Robot Movies, the user<br />
can see a set of 4 movies with the real robot<br />
applications (Cylindrical Palletizing,<br />
Paralelipipedical Palletizing, Welding,<br />
Assembling).<br />
In the chapter "Help", the section Robot's<br />
Workplace is intended to provide a simulation<br />
tool in which the user can preview his written<br />
programs. After successfully loading the<br />
operating environment and the program to<br />
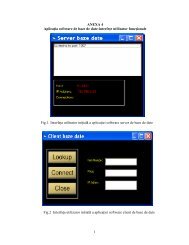
execute, just pushing the RUN button (Figure 6)<br />
will start the program simulation, current<br />
instruction being shown on screen. For greater<br />
customization, the user can define it's own<br />
environment space, containing various objects<br />
defined inside the editor. Those objects can<br />
have different proper-ties, like a piston that<br />
makes a push operation or a parallelepiped<br />
piece with/without holes.<br />
Fig. 6 The GUI interface for the topics ”Simulation”<br />
The third topics presented in the ViReC GUI is<br />
"Exercises". The user opens this window in<br />
the same time with the compiler and can edit<br />
a program. Once the program edited, the user<br />
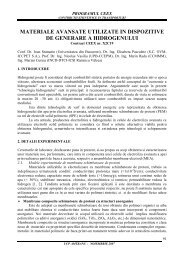
opens the option "Run" of the compiler (Figure<br />
7) to see if the program has or has not errors.<br />
Fig. 7 The GUI interface for the compiler<br />
If errors are observed in the program, the<br />
compiler shows in a bottom window the number<br />
of the line in the program where the error is and<br />
helping explana-tions to make it right. The<br />
running of the program can be made slowly or<br />
step by step. The user can stop the execution and<br />
can pass to the next line, before the iniial line, or<br />
can continue the execution from the iniial line,<br />
if wanted. During the running of the program<br />
the user can visualize the stocked values in<br />
registers. It can be monitoring the activating and<br />
deactivating of some inputs and outputs pressing<br />
the number of the output that needs to be<br />
visualized. After the program being checked