- Page 1 and 2: Operating Instructions Bedienungsan
- Page 3 and 4: Features Recording This unit suppor
- Page 5 and 6: Part names 1 2 bo cp 3 bp cl 4 bq c
- Page 7 and 8: Inserting the battery/Charging Upon
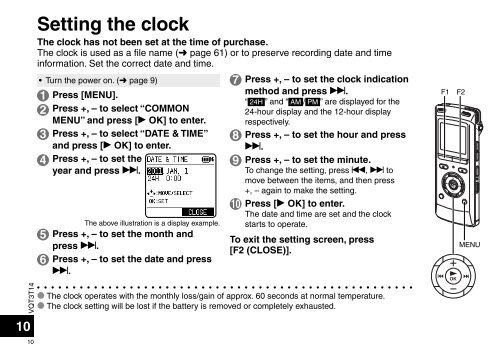
- Page 9: Turning the Power ON/OFF/Hold funct
- Page 13 and 14: Recording g STOP/RETURN F1 F2 * REC
- Page 15 and 16: Playing g STOP/RETURN • Press [g
- Page 17 and 18: Deleting files g STOP/RETURN F2 ERA
- Page 19 and 20: Changing recording scene settings T
- Page 21 and 22: Switching microphone sensitivity Sw
- Page 23 and 24: Level meter OVER indication Recordi
- Page 25 and 26: Self timer You can select your pref
- Page 27 and 28: Past recording function (PRE-RECORD
- Page 29 and 30: Copying to other devices 1 Connect
- Page 31 and 32: 8 Press and hold [* REC] for 1 seco
- Page 33 and 34: Index function g STOP/RETURN F2 ERA
- Page 35 and 36: Playback from a specified position
- Page 37 and 38: F1 F2 MENU Skip at regular interval
- Page 39 and 40: Using an SD Card You can use a micr
- Page 41 and 42: Listening to music on this unit (WM
- Page 43 and 44: Playing tracks registered to the pl
- Page 45 and 46: Editing: Combining files 2 files re
- Page 47 and 48: Recycle bin function When deleting
- Page 49 and 50: Setting Item SETTING REPEAT TIME 1
- Page 51 and 52: Common menu The following are the s
- Page 53 and 54: RECYCLE BIN When the recycle bin fu
- Page 55 and 56: System requirements (As of June 201
- Page 57 and 58: * Operation is not guaranteed in th
- Page 59 and 60: Opening folders of this unit This e
- Page 61 and 62:
File name File naming rules when re
- Page 63 and 64:
Folder structure on this unit Folde
- Page 65 and 66:
Transferring music files to this un
- Page 67 and 68:
Error message CAN’T PLAY THIS FIL
- Page 69 and 70:
Error message EMPTY RECYCLE BIN ✽
- Page 71 and 72:
Troubleshooting guide Before reques
- Page 73 and 74:
Symptom Recording Recorded sound is
- Page 75 and 76:
Symptom Playing The selected file c
- Page 77 and 78:
Symptom Others This unit is not rec
- Page 79 and 80:
Battery life (may be less depending
- Page 81 and 82:
g SD card compatibility microSD car
- Page 83 and 84:
Information for Users on Collection
- Page 85 and 86:
For Latin American Countries Only U
- Page 87 and 88:
HOLD-Funktion Bei aktivierter HOLD-
- Page 89 and 90:
Löschen von Dateien 1 [ERASE] drü
- Page 91 and 92:
Umschalten der Mikrofonempfindlichk
- Page 93 and 94:
Verhindern einer unerwünschten Auf
- Page 95 and 96:
Wahl des Line-Aufnahmemodus 1 [MENU
- Page 97 and 98:
Sprünge in regulären Intervallen
- Page 99 and 100:
Wenn „CALENDAR SRCH“ ausgewähl
- Page 101 and 102:
Bearbeiten: Kopieren oder Verschieb
- Page 103 and 104:
Einstellpunkt Einzelheiten TIME 1 S
- Page 105 and 106:
Systemanforderungen Computer Betrie
- Page 107 and 108:
Verwendung von USB-Stromversorgung
- Page 109 and 110:
Benutzerinformation zur Sammlung un
- Page 111 and 112:
Funzione di blocco Le operazioni co
- Page 113 and 114:
Eliminazione dei file 1 Premere [ER
- Page 115 and 116:
Cambiare la sensibilità del microf
- Page 117 and 118:
Prevenzione delle registrazioni inu
- Page 119 and 120:
Selezione della modalità di regist
- Page 121 and 122:
Salto a intervalli regolari (TIME S
- Page 123 and 124:
Quando è selezionato “CALENDAR S
- Page 125 and 126:
Modifica: copia o spostamento di fi
- Page 127 and 128:
Voce di impostazione Dettagli TIME
- Page 129 and 130:
Requisiti di sistema Computer Siste
- Page 131 and 132:
Uso dell’alimentazione USB 1 Estr
- Page 133 and 134:
Informazioni per gli utenti sulla r
- Page 135 and 136:
Fonction de verrouillage Les comman
- Page 137 and 138:
Supprimer des fichiers 1 Appuyez su
- Page 139 and 140:
Changer la sensibilité du micropho
- Page 141 and 142:
Éviter les enregistrements inutile
- Page 143 and 144:
Sélectionner le mode d’enregistr
- Page 145 and 146:
Sauter à des intervalles régulier
- Page 147 and 148:
Avec “CALENDAR SRCH” sélection
- Page 149 and 150:
Modifier : Copier ou déplacer des
- Page 151 and 152:
Élément réglé TIME 1 REC/PLAY P
- Page 153 and 154:
Configuration système requise (À
- Page 155 and 156:
Utiliser l’alimentation USB 1 Sor
- Page 157 and 158:
Avis aux utilisateurs concernant la
- Page 159 and 160:
Función de retención Las funcione
- Page 161 and 162:
Eliminación de archivos 1 Pulse [E
- Page 163 and 164:
Modificación de la sensibilidad de
- Page 165 and 166:
Prevención de una grabación innec
- Page 167 and 168:
Selección del modo de grabación d
- Page 169 and 170:
Saltos a intervalos regulares (TIME
- Page 171 and 172:
Cuando se selecciona “CALENDAR SR
- Page 173 and 174:
Edición: Copia o movimiento de arc
- Page 175 and 176:
Ajuste Detalles TIME 1 Establezca l
- Page 177 and 178:
Requisitos del sistema (Desde junio
- Page 179 and 180:
Uso de alimentación mediante USB 1
- Page 181 and 182:
Información para Usuarios sobre la
- Page 183 and 184:
Hold-functie Schakel Hold in als u
- Page 185 and 186:
Bestanden wissen 1 Druk op [ERASE].
- Page 187 and 188:
De microfoongevoeligheid veranderen
- Page 189 and 190:
Onnodige opname voorkomen (VAS) 1 D
- Page 191 and 192:
De line-opnamestand selecteren 1 Dr
- Page 193 and 194:
Intervallen overslaan (TIME SKIP) I
- Page 195 and 196:
Als “CALENDAR SRCH” is geselect
- Page 197 and 198:
Bewerken: Bestanden kopiëren of ve
- Page 199 and 200:
Instelling TIME 1 REC/PLAY Detail S
- Page 201 and 202:
Systeemvereisten Computer IBM PC/AT
- Page 203 and 204:
USB-voeding gebruiken 1 Ontkoppel d
- Page 205 and 206:
Informatie voor gebruikers betreffe
- Page 207 and 208:
Hold-funktion Tryk på knapper igno
- Page 209 and 210:
Sletning af filer 1 Tryk på [ERASE
- Page 211 and 212:
Skift af mikrofonfølsomhed 1 Tryk
- Page 213 and 214:
Forhindring af unødvendig optagels
- Page 215 and 216:
Valg af linjeoptagelsestilstand 1 T
- Page 217 and 218:
Spring med regelmæssige intervalle
- Page 219 and 220:
Når “CALENDAR SRCH” er valgt:
- Page 221 and 222:
Redigering: Kopiering eller flytnin
- Page 223 and 224:
Indstillingspunkt Oplysninger TIME
- Page 225 and 226:
Systemkrav Computer Operativsystem
- Page 227 and 228:
Brug af USB-strøm 1 Fjern enhedens
- Page 229 and 230:
Brugerinformation om indsamling og