Create successful ePaper yourself
Turn your PDF publications into a flip-book with our unique Google optimized e-Paper software.
Using marks within a project<br />
If you've made an extended recording, such as of a live performance or a practice session, you<br />
can move between songs or to a desired location by moving while you listen to the sound or by<br />
fast-forwarding or rewinding according to the counter time.<br />
However, the MR-1 also lets you add marks to a project during recording or playback, and use<br />
the rewind and fast-forward buttons to rapidly move between these marks during playback.<br />
Adding a mark<br />
<strong>To</strong> add a mark, simply press the record button during recording or playback.<br />
You can add up to 100 marks, and edit them later.<br />
Markers are automatically added at the beginning of the project, and at locations at which you<br />
resume recording after you pause recording.<br />
You can only add marks to a project that was recorded on the MR-1.<br />
Viewing the mark list<br />
Here's how to view a list showing the marks in a project in the order of their time location.<br />
1. Press the menu button, and in the menu list (MENU) screen, use the P-dial to select<br />
and confirm "LIBRARY."<br />
The library select (LIBRARY) screen will appear.<br />
2. Use the P-dial to select and confirm the project whose mark list you want to see.<br />
(Refer to "Selecting and playing back a project/file," p.18)<br />
The project/file edit screen will appear.<br />
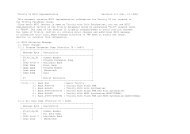
Project/file edit screen<br />
Mark list screen<br />
Push<br />
Push<br />
3. In the project/file edit screen, use the P-dial to select and confirm "Mark List."<br />
The mark list (Mark List) screen will appear.<br />
Using marks to move<br />
1. Press the menu button, and in the menu list (MENU) screen, use the P-dial to select<br />
and confirm "PLAY MODE."<br />
The playback mode select (PLAY MODE) screen will appear.<br />
2. Use the P-dial to select and confirm "Current Proj/File" as the playback mode.<br />
3. Press the menu button, and in the menu list (MENU) screen, use the P-dial to select<br />
and confirm "LIBRARY."<br />
The library select (LIBRARY) screen will appear.<br />
4. Select and confirm a project that contains marks.<br />
Now you can move to the locations where you added the marks.<br />
21