Create successful ePaper yourself
Turn your PDF publications into a flip-book with our unique Google optimized e-Paper software.
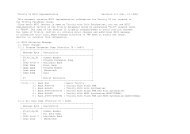
Screens and operations<br />
Level meter screen and menu list (MENU) screen<br />
When you power-on the MR-1, the display will show the level meter screen.<br />
When the display shows the level meter screen, pressing the menu button will show the menu<br />
list (MENU) screen which lets you proceed to various types of settings or informational screen.<br />
You'll use the P-dial from this screen to make various settings.<br />
When the display shows the menu list (MENU) screen, pressing the menu button will take you<br />
back to the level meter screen. In this way, pressing the menu button will alternate between the<br />
menu list (MENU) screen and the level meter screen.<br />
When the display shows the level meter screen, pressing the P-dial will show the meter setting<br />
screen. Here you can specify what will be shown in the level meter screen. When you've finished<br />
making settings, press the menu button to return to the level meter screen.<br />
Menu list screen<br />
Level meter screen<br />
Meter setting screen<br />
Push<br />
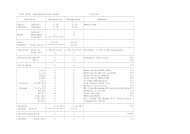
Selecting parameters and setting values<br />
On the MR-1, you select parameters and set values by turning and pushing the P-dial. The<br />
item you've selected by turning the P-dial is shown in the screen by the movement of the<br />
selection icon " " or " ".<br />
" " indicates that an additional setting screen will appear when you press the P-dial.<br />
<strong>To</strong> select parameters and set values, you will turn the P-dial to move this selection icon or<br />
modify the value, and then press the P-dial to confirm the modified value. On the MR-1, we'll<br />
tell you to "use the P-dial to select and confirm" the item you're setting.<br />
Selection icon<br />
Recording mode screen<br />
Turn<br />
Push<br />
Depending on the parameter, selecting and confirming an item may cause a further setting<br />
screen to appear, or may cause a check mark to appear in a check box.<br />
If you've made a setting in a further setting screen, you can press the menu button to return to<br />
the previous screen.<br />
9