- Page 2 and 3:
TABLE OF CONTENTS TABLE OF CONTENTS
- Page 4 and 5:
DISCLAIMER RED ® has made every ef
- Page 6 and 7:
AUSTRALIA AND NEW ZEALAND STATEMENT
- Page 8 and 9:
BEFORE YOU START Congratulations on
- Page 10 and 11:
CAUTION: The power cord plug for th
- Page 12 and 13:
This recording technique permits RG
- Page 14 and 15:
LINE LEVEL ANALOG INPUTS The record
- Page 16 and 17:
REDMOTE ® REDMOTE is a camera cont
- Page 18 and 19:
Where: A = camera A, 001 = reel 001
- Page 20 and 21:
CAMERA OPERATIONAL CONTROLS This se
- Page 22 and 23:
SSD Slot: Slot for REDMAG 1.8” SS
- Page 24 and 25:
FRONT A A Stills / Movie Slider Sid
- Page 26 and 27:
Navigation Group: Allows navigation
- Page 28 and 29:
To remove the side handle: 1. Power
- Page 30 and 31:
DUAL BATTERY MODULE The DUAL BATT
- Page 32 and 33:
5. Tighten the screws again in a cr
- Page 34 and 35:
2. Rotate module down flush with th
- Page 36 and 37:
Default settings for User Function
- Page 38 and 39:
TOUCHSCREEN LCD Red offers a five i
- Page 40 and 41:
QUAD BATTERY MODULE The optional QU
- Page 42 and 43:
AC POWER ADAPTOR - (DSMC) AC POWER
- Page 44 and 45:
POWER UP Locate the camera’s Powe
- Page 46 and 47:
GRAPHICAL USER INTERFACE AND NAVIGA
- Page 48 and 49:
The GUI is broken down into the fol
- Page 50 and 51:
GEN GEN Gray - No genlock signal
- Page 52 and 53:
SIDE HANDLE As you navigate and adj
- Page 54 and 55:
USING TOUCHSCREEN LCD If operating
- Page 56 and 57:
POWER DOWN NOTE: Camera will automa
- Page 58 and 59:
FIRST TIME USE - SETTING UP YOUR RE
- Page 60 and 61:
RED BRICK Attach to the camera usin
- Page 62 and 63:
PERFORM A BLACK SHADING CALIBRATION
- Page 64 and 65:
CAMERA ID (SLATE) If operating on a
- Page 66 and 67:
MENU CONTROLS Displayed in the Uppe
- Page 68 and 69:
MAIN MENU Available options under t
- Page 70 and 71:
ISO (SENSITIVITY) Adjusts the camer
- Page 72 and 73:
FOCUS Provides the ability to enter
- Page 74 and 75:
INTEGRATION TIME Provides the abili
- Page 76 and 77:
ADVANCED SETTINGS When selected, al
- Page 78 and 79:
RESOLUTION Allows adjustment of res
- Page 80 and 81:
HDR ON / OFF By default, HDRx is OF
- Page 82 and 83:
Performance of Auto Focus may be re
- Page 84 and 85:
DSMC CANON MOUNT ELECTRONICALLY SUP
- Page 86 and 87:
SPOT Provides a small, square targe
- Page 88 and 89:
LENS INFORMATION DISPLAY RED DSMC T
- Page 90 and 91:
Select Create and enter a name for
- Page 92 and 93:
COPY PRESETS FROM CAMERA TO SSD U
- Page 94 and 95:
MEDIA MENU The Media Menu is used t
- Page 96 and 97:
UTILITIES Options are SECURE FORMAT
- Page 98 and 99:
EXPOSURE This will show areas of un
- Page 100 and 101:
ORANGE Super White (IRE 105-107) RE
- Page 102 and 103:
RAW RAW displays the image without
- Page 104 and 105:
Low IRE Change the desired setting
- Page 106 and 107:
MODES Available GUI display mode ad
- Page 108 and 109:
SIZE Available options are Off, Ful
- Page 110 and 111:
CONTRAST Adjusts the overall contra
- Page 112 and 113:
COLOR/GAMMA The COLOR/GAMMA sub-men
- Page 114 and 115:
TIME CODE DISPLAY Allows you to cho
- Page 116 and 117:
AUDIO/VIDEO Menu adjusts AUDIO INPU
- Page 118 and 119:
AUDIO OUTPUT Allows adjustment of a
- Page 120 and 121:
Limiter Enables signal limiter circ
- Page 122 and 123:
TEST SIGNALS Permits the video moni
- Page 124 and 125:
OPTIONS Select the desired option
- Page 126 and 127:
DATE / TIME This menu allows the us
- Page 128 and 129:
NETWORK If the Gigabit Ethernet por
- Page 130 and 131:
GPIO GPIO selects the GPIO preferen
- Page 132 and 133:
SYNC MODE Allows the shutter timing
- Page 134 and 135:
INDICATORS Beep Speaker Available o
- Page 136 and 137:
CALIBRATION Sensor calibration is a
- Page 138 and 139:
BLACK SHADING PROCEDURE The calibra
- Page 140 and 141:
ENABLE / DISABLE SENSOR TEST PATTER
- Page 142 and 143:
When selected, you will be asked to
- Page 144 and 145:
PLAYBACK Playback allows you to vie
- Page 146 and 147:
PRESETS Allows you to apply presets
- Page 148 and 149:
SETTINGS Available options are DISP
- Page 150 and 151:
CLIP PLAYBACK STATUS BAR Displays t
- Page 152 and 153:
IN / OUT POINT MARKER Allows you to
- Page 154 and 155:
SHUTDOWN Power OFF controls are int
- Page 156 and 157: APPENDIX B: MANAGING DIGITAL MEDIA
- Page 158 and 159: MEDIA CAPACITY REMAINING STATUS The
- Page 160 and 161: ERASING MEDIA NOTE: If the media wa
- Page 162 and 163: MIC-1, MIC-2 (MICROPHONE AUDIO) Two
- Page 164 and 165: HD-SDI A standard 75 Ohm BNC connec
- Page 166 and 167: The Video Genlock input may be used
- Page 168 and 169: CTRL (RS232 CONTROL) A 4-pin LEMO c
- Page 170 and 171: DC IN (POWER INPUT) The 6-pin LEMO
- Page 172 and 173: SIDE SSD MODULE REAR B FRONT A A B
- Page 174 and 175: APPENDIX D: DEFAULT KEY FUNCTIONS C
- Page 176 and 177: APPENDIX E: REDMOTE OPERATION CONTR
- Page 178 and 179: C A B REDMOTE Navigation Group A Sc
- Page 180 and 181: Note: For illustration only: rear s
- Page 182 and 183: RECORDING To record, press the Red
- Page 184 and 185: ADVANCED OPERATION: REDMOTE MENUS S
- Page 186 and 187: Note: Once this procedure has occur
- Page 188 and 189: OPERATING WITH MULTIPLE CAMERAS FRO
- Page 190 and 191: 6. Select “Setup Slot” and pres
- Page 192 and 193: MAINTENANCE INTERNAL BATTERY CHARGE
- Page 194 and 195: UPGRADING REDMOTE FIRMWARE The REDM
- Page 196 and 197: 7. Click “Connect”. When REDMOT
- Page 198 and 199: 12. Once the File Transfer Status i
- Page 200 and 201: 5. Select “I Agree” to the lice
- Page 202 and 203: 10. The program will now install. A
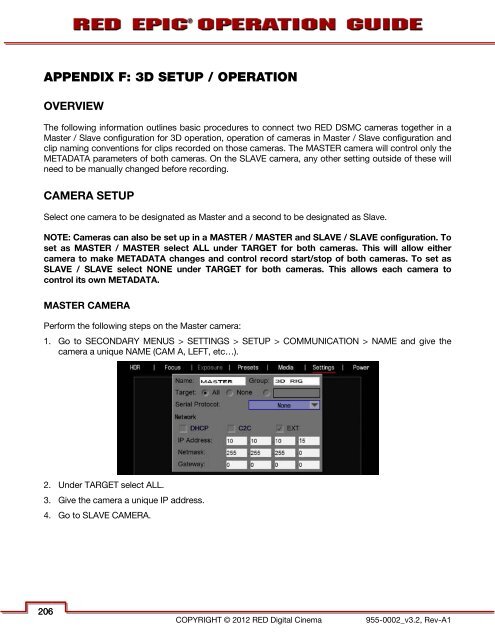
- Page 204 and 205: 9. The selected file is shown in th
- Page 208 and 209: SLAVE CAMERA Perform the following
- Page 210 and 211: Green BNC connector is for Tri-Leve
- Page 212 and 213: ISO 800 - False Color: Exposure Sel
- Page 214 and 215: ISO 800 - False Color: Exposure Sel
- Page 216 and 217: APPROPRIATE EXPOSURE ISO 800 - Moni
- Page 218 and 219: ISO 800 - False Color: Video Select
- Page 220 and 221: ISO 100 - No Exposure Adjustment In
- Page 222 and 223: REDCINE-X ® PRO REDCINE-X PRO is a
- Page 224 and 225: DO NOT USE any other solvents, chem
- Page 226 and 227: 4. Power up the camera. 5. Power up
- Page 228 and 229: APPENDIX J: TROUBLESHOOTING NO MEDI
- Page 230 and 231: CAMERA BRAIN DIMENSIONS Front View
- Page 232 and 233: Top View Bottom View 955-0002_v3.2,
- Page 234 and 235: APPENDIX L: RESOLUTION CHART 955-00
- Page 236 and 237: MAIN MENU DEFAULT VALUES ARE DISPLA
- Page 238 and 239: SECONDARY MENUS PRESS MENU ICON (LC
- Page 240: SECONDARY MENUS PRESS MENU ICON (LC