INSTRUCTION MANUAL
INSTRUCTION MANUAL
INSTRUCTION MANUAL

Create successful ePaper yourself
Turn your PDF publications into a flip-book with our unique Google optimized e-Paper software.
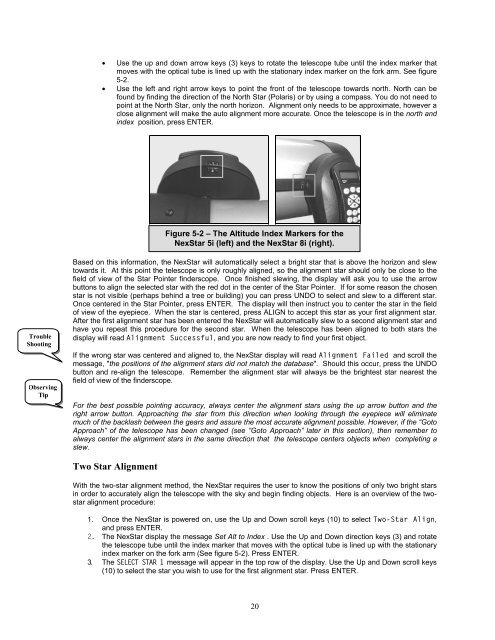
• Use the up and down arrow keys (3) keys to rotate the telescope tube until the index marker that<br />
moves with the optical tube is lined up with the stationary index marker on the fork arm. See figure<br />
5-2.<br />
• Use the left and right arrow keys to point the front of the telescope towards north. North can be<br />
found by finding the direction of the North Star (Polaris) or by using a compass. You do not need to<br />
point at the North Star, only the north horizon. Alignment only needs to be approximate, however a<br />
close alignment will make the auto alignment more accurate. Once the telescope is in the north and<br />
index position, press ENTER.<br />
Figure 5-2 – The Altitude Index Markers for the<br />
NexStar 5i (left) and the NexStar 8i (right).<br />
Trouble<br />
Shooting<br />
Observing<br />
Tip<br />
Based on this information, the NexStar will automatically select a bright star that is above the horizon and slew<br />
towards it. At this point the telescope is only roughly aligned, so the alignment star should only be close to the<br />
field of view of the Star Pointer finderscope. Once finished slewing, the display will ask you to use the arrow<br />
buttons to align the selected star with the red dot in the center of the Star Pointer. If for some reason the chosen<br />
star is not visible (perhaps behind a tree or building) you can press UNDO to select and slew to a different star.<br />
Once centered in the Star Pointer, press ENTER. The display will then instruct you to center the star in the field<br />
of view of the eyepiece. When the star is centered, press ALIGN to accept this star as your first alignment star.<br />
After the first alignment star has been entered the NexStar will automatically slew to a second alignment star and<br />
have you repeat this procedure for the second star. When the telescope has been aligned to both stars the<br />
display will read Alignment Successful, and you are now ready to find your first object.<br />
If the wrong star was centered and aligned to, the NexStar display will read Alignment Failed and scroll the<br />
message, "the positions of the alignment stars did not match the database". Should this occur, press the UNDO<br />
button and re-align the telescope. Remember the alignment star will always be the brightest star nearest the<br />
field of view of the finderscope.<br />
For the best possible pointing accuracy, always center the alignment stars using the up arrow button and the<br />
right arrow button. Approaching the star from this direction when looking through the eyepiece will eliminate<br />
much of the backlash between the gears and assure the most accurate alignment possible. However, if the “Goto<br />
Approach” of the telescope has been changed (see ”Goto Approach” later in this section), then remember to<br />
always center the alignment stars in the same direction that the telescope centers objects when completing a<br />
slew.<br />
Two Star Alignment<br />
With the two-star alignment method, the NexStar requires the user to know the positions of only two bright stars<br />
in order to accurately align the telescope with the sky and begin finding objects. Here is an overview of the twostar<br />
alignment procedure:<br />
1. Once the NexStar is powered on, use the Up and Down scroll keys (10) to select Two-Star Align,<br />
and press ENTER.<br />
2. The NexStar display the message Set Alt to Index . Use the Up and Down direction keys (3) and rotate<br />
the telescope tube until the index marker that moves with the optical tube is lined up with the stationary<br />
index marker on the fork arm (See figure 5-2). Press ENTER.<br />
3. The SELECT STAR 1 message will appear in the top row of the display. Use the Up and Down scroll keys<br />
(10) to select the star you wish to use for the first alignment star. Press ENTER.<br />
20