INSTRUCTION MANUAL
INSTRUCTION MANUAL
INSTRUCTION MANUAL

You also want an ePaper? Increase the reach of your titles
YUMPU automatically turns print PDFs into web optimized ePapers that Google loves.
• T-Max 100<br />
• T-Max 400<br />
• Any 100 to 400 ISO color slide film<br />
• Fuji Super HG 400<br />
• Ektar 25 or 100<br />
2. Center the Moon in the field of your NexStar telescope.<br />
3. Focus the telescope by turning the focus knob until the image is sharp.<br />
4. Set the shutter speed to the appropriate setting (see table below).<br />
5. Trip the shutter using a cable release.<br />
6. Advance the film and repeat the process.<br />
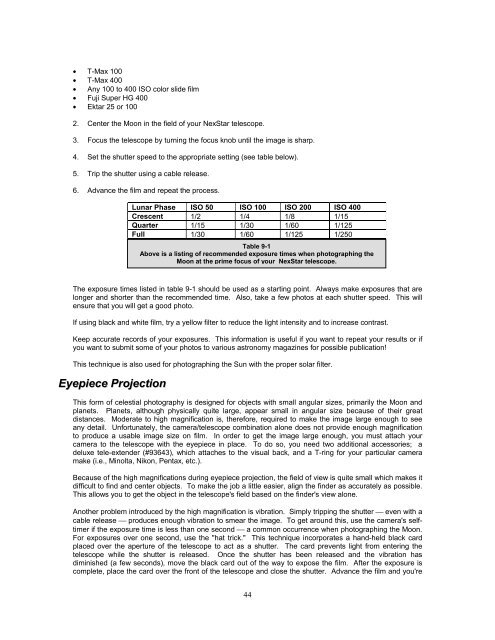
Lunar Phase ISO 50 ISO 100 ISO 200 ISO 400<br />
Crescent 1/2 1/4 1/8 1/15<br />
Quarter 1/15 1/30 1/60 1/125<br />
Full 1/30 1/60 1/125 1/250<br />
Table 9-1<br />
Above is a listing of recommended exposure times when photographing the<br />
Moon at the prime focus of your NexStar telescope.<br />
The exposure times listed in table 9-1 should be used as a starting point. Always make exposures that are<br />
longer and shorter than the recommended time. Also, take a few photos at each shutter speed. This will<br />
ensure that you will get a good photo.<br />
If using black and white film, try a yellow filter to reduce the light intensity and to increase contrast.<br />
Keep accurate records of your exposures. This information is useful if you want to repeat your results or if<br />
you want to submit some of your photos to various astronomy magazines for possible publication!<br />
This technique is also used for photographing the Sun with the proper solar filter.<br />
Eyepiece Projection<br />
This form of celestial photography is designed for objects with small angular sizes, primarily the Moon and<br />
planets. Planets, although physically quite large, appear small in angular size because of their great<br />
distances. Moderate to high magnification is, therefore, required to make the image large enough to see<br />
any detail. Unfortunately, the camera/telescope combination alone does not provide enough magnification<br />
to produce a usable image size on film. In order to get the image large enough, you must attach your<br />
camera to the telescope with the eyepiece in place. To do so, you need two additional accessories; a<br />
deluxe tele-extender (#93643), which attaches to the visual back, and a T-ring for your particular camera<br />
make (i.e., Minolta, Nikon, Pentax, etc.).<br />
Because of the high magnifications during eyepiece projection, the field of view is quite small which makes it<br />
difficult to find and center objects. To make the job a little easier, align the finder as accurately as possible.<br />
This allows you to get the object in the telescope's field based on the finder's view alone.<br />
Another problem introduced by the high magnification is vibration. Simply tripping the shutter ⎯ even with a<br />
cable release ⎯ produces enough vibration to smear the image. To get around this, use the camera's selftimer<br />
if the exposure time is less than one second ⎯ a common occurrence when photographing the Moon.<br />
For exposures over one second, use the "hat trick." This technique incorporates a hand-held black card<br />
placed over the aperture of the telescope to act as a shutter. The card prevents light from entering the<br />
telescope while the shutter is released. Once the shutter has been released and the vibration has<br />
diminished (a few seconds), move the black card out of the way to expose the film. After the exposure is<br />
complete, place the card over the front of the telescope and close the shutter. Advance the film and you're<br />
44