CPC Peripherals Installation and Operation - Emerson Climate ...
CPC Peripherals Installation and Operation - Emerson Climate ...
CPC Peripherals Installation and Operation - Emerson Climate ...

You also want an ePaper? Increase the reach of your titles
YUMPU automatically turns print PDFs into web optimized ePapers that Google loves.
ECLIPSE<br />
SHIELD (BARE) WIRE<br />
(TO ODD #)<br />
RED (TO 5V)<br />
BLACK (TO ODD #) WHITE (TO EVEN #)<br />
INPUT CONNECTIONS<br />
��<br />
1 2 3 4 5 6 7 8<br />
ON<br />
16AI BOARD<br />
1 2 3 4 5 6 7 8<br />
ON<br />
POWER<br />
CONNECTIONS<br />
5V<br />
5V<br />
5V<br />
5V<br />
12V<br />
12V<br />
12V<br />
12V<br />
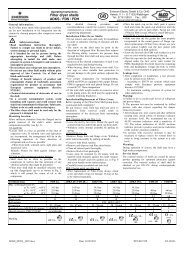
Figure 26-Typical Wiring Scheme for the Eclipse ® Pressure<br />
Transducer<br />
4. On switch S1 or S2 on the 16AI, set the rocker<br />
corresponding to the input number to the<br />
DOWN position.<br />
Software Requirements for<br />
Eclipse ® Pressure Transducers<br />
26507004<br />
<strong>CPC</strong> supplies Eclipse pressure transducers with all new<br />
refrigeration control orders. If using RMCC v. 2.10 or<br />
above, the controller will by default read Eclipse transducers;<br />
no additional setup is required.<br />
All versions of the RMC software after <strong>and</strong> including v.<br />
6.08 <strong>and</strong> all versions of the RMCC software may be configured<br />
to accept input from either a st<strong>and</strong>ard or Eclipse<br />
transducer. Users may set transducer types from the front<br />
panel in all versions EXCEPT RMCC 2.00, 2.01, 2.02,<br />
2.03, <strong>and</strong> 2.04 – these versions require UltraSite to set up<br />
Eclipse transducer compatibility.<br />
To choose Eclipse or St<strong>and</strong>ard transducer type from the<br />
front panel:<br />
1. Enter the transducer’s board <strong>and</strong> point address<br />
in the Input Definitions screen.<br />
2. From the main menu, choose the Configuration<br />
option, followed by the Xducer Types<br />
option. Your screen should appear similar to<br />
the following:<br />
3. Using the DOWN <strong>and</strong> UP arrow keys,<br />
scroll through the Pressure Transducer Type<br />
screens until the desired transducer is shown.<br />
��<br />
The Pressure Transducer Type screen is<br />
shown below.<br />
4. Press the RIGHT arrow key, <strong>and</strong> then use<br />
the arrow keys to move the cursor on to the<br />
transducer’s Type field.<br />
5. Select the desired type (either ECLIPSE or<br />
STANDRD).<br />
To choose Eclipse or St<strong>and</strong>ard transducers using Ultra-<br />
Site (v. 2.00 - 2.04), contact <strong>CPC</strong> for assistance. All other<br />
REFLECS controllers use st<strong>and</strong>ard pressure transducers.<br />
See “St<strong>and</strong>ard Pressure Transducers,” page 37.<br />
<strong>Peripherals</strong> Manual Eclipse Pressure Transducers • 35