CPC Peripherals Installation and Operation - Emerson Climate ...
CPC Peripherals Installation and Operation - Emerson Climate ...
CPC Peripherals Installation and Operation - Emerson Climate ...

Create successful ePaper yourself
Turn your PDF publications into a flip-book with our unique Google optimized e-Paper software.
Refrigerant Liquid Level Sensor (P/N 207-0100)<br />
Overview<br />
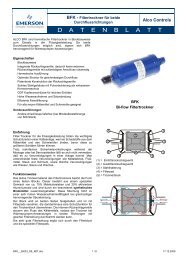
The LA100SD-U Refrigerant Liquid Level Sensor is<br />
designed to be used as a tank-mounted sensor. This sensor<br />
can be connected to a 16AI board to monitor tank levels.<br />
<strong>Installation</strong><br />
This installation procedure does not require the pumpdown<br />
of the tank or refrigeration evacuation.<br />
1. Remove existing float gauge LL-1 (two 6/32<br />
screws. Do not loosen or remove the four corner<br />
screws.<br />
2. Replace LL-1 with the LA100SD-U electronic<br />
sensor using the two 6/32 x 1/2” screws<br />
provided. The spacers <strong>and</strong> gasket supplied<br />
may be required if sensor readings are not<br />
within a reasonable range of the mechanical<br />
float gauge LL1.<br />
If you need to use the spacers <strong>and</strong> gaskets, do<br />
not overtighten screws. If spacers are not required,<br />
do not discard. Place the spacers in<br />
between the screw heads <strong>and</strong> the outside of<br />
the mounting bracket.<br />
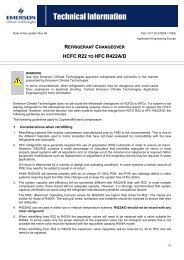
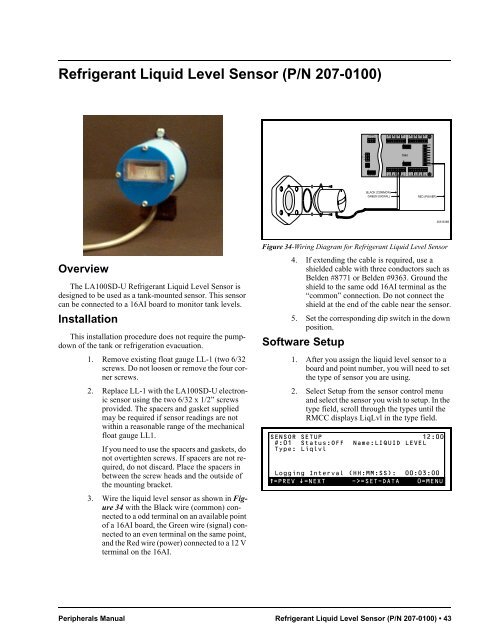
3. Wire the liquid level sensor as shown in Figure<br />
34 with the Black wire (common) connected<br />
to a odd terminal on an available point<br />
of a 16AI board, the Green wire (signal) connected<br />
to an even terminal on the same point,<br />
<strong>and</strong> the Red wire (power) connected to a 12 V<br />
terminal on the 16AI.<br />
Figure 34-Wiring Diagram for Refrigerant Liquid Level Sensor<br />
4. If extending the cable is required, use a<br />
shielded cable with three conductors such as<br />
Belden #8771 or Belden #9363. Ground the<br />
shield to the same odd 16AI terminal as the<br />
“common” connection. Do not connect the<br />
shield at the end of the cable near the sensor.<br />
5. Set the corresponding dip switch in the down<br />
position.<br />
Software Setup<br />
1. After you assign the liquid level sensor to a<br />
board <strong>and</strong> point number, you will need to set<br />
the type of sensor you are using.<br />
2. Select Setup from the sensor control menu<br />
<strong>and</strong> select the sensor you wish to setup. In the<br />
type field, scroll through the types until the<br />
RMCC displays LiqLvl in the type field.<br />
SENSOR SETUP 12:00<br />
#:01 Status:OFF Name:LIQUID LEVEL<br />
Type: Liqlvl<br />
Logging Interval (HH:MM:SS): 00:03:00<br />
=PREV =NEXT ->=SET-DATA 0=MENU<br />
<strong>Peripherals</strong> Manual Refrigerant Liquid Level Sensor (P/N 207-0100) • 43