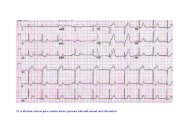
Non Invasive Blood Pressure - Living on the EDge
Non Invasive Blood Pressure - Living on the EDge
Non Invasive Blood Pressure - Living on the EDge

You also want an ePaper? Increase the reach of your titles
YUMPU automatically turns print PDFs into web optimized ePapers that Google loves.
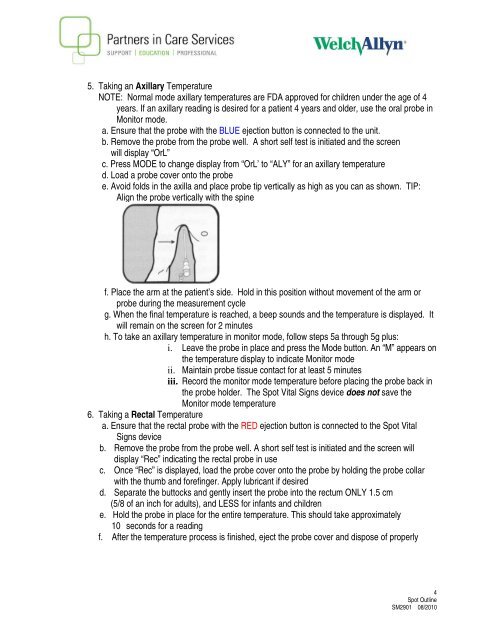
5. Taking an Axillary Temperature<br />
NOTE: Normal mode axillary temperatures are FDA approved for children under <strong>the</strong> age of 4<br />
years. If an axillary reading is desired for a patient 4 years and older, use <strong>the</strong> oral probe in<br />
M<strong>on</strong>itor mode.<br />
a. Ensure that <strong>the</strong> probe with <strong>the</strong> BLUE ejecti<strong>on</strong> butt<strong>on</strong> is c<strong>on</strong>nected to <strong>the</strong> unit.<br />
b. Remove <strong>the</strong> probe from <strong>the</strong> probe well. A short self test is initiated and <strong>the</strong> screen<br />
will display “OrL”<br />
c. Press MODE to change display from “OrL’ to “ALY” for an axillary temperature<br />
d. Load a probe cover <strong>on</strong>to <strong>the</strong> probe<br />
e. Avoid folds in <strong>the</strong> axilla and place probe tip vertically as high as you can as shown. TIP:<br />
Align <strong>the</strong> probe vertically with <strong>the</strong> spine<br />
f. Place <strong>the</strong> arm at <strong>the</strong> patient’s side. Hold in this positi<strong>on</strong> without movement of <strong>the</strong> arm or<br />
probe during <strong>the</strong> measurement cycle<br />
g. When <strong>the</strong> final temperature is reached, a beep sounds and <strong>the</strong> temperature is displayed. It<br />
will remain <strong>on</strong> <strong>the</strong> screen for 2 minutes<br />
h. To take an axillary temperature in m<strong>on</strong>itor mode, follow steps 5a through 5g plus:<br />
i. Leave <strong>the</strong> probe in place and press <strong>the</strong> Mode butt<strong>on</strong>. An “M” appears <strong>on</strong><br />
<strong>the</strong> temperature display to indicate M<strong>on</strong>itor mode<br />
ii. Maintain probe tissue c<strong>on</strong>tact for at least 5 minutes<br />
iii. Record <strong>the</strong> m<strong>on</strong>itor mode temperature before placing <strong>the</strong> probe back in<br />
<strong>the</strong> probe holder. The Spot Vital Signs device does not save <strong>the</strong><br />
M<strong>on</strong>itor mode temperature<br />
6. Taking a Rectal Temperature<br />
a. Ensure that <strong>the</strong> rectal probe with <strong>the</strong> RED ejecti<strong>on</strong> butt<strong>on</strong> is c<strong>on</strong>nected to <strong>the</strong> Spot Vital<br />
Signs device<br />
b. Remove <strong>the</strong> probe from <strong>the</strong> probe well. A short self test is initiated and <strong>the</strong> screen will<br />
display “Rec” indicating <strong>the</strong> rectal probe in use<br />
c. Once “Rec” is displayed, load <strong>the</strong> probe cover <strong>on</strong>to <strong>the</strong> probe by holding <strong>the</strong> probe collar<br />
with <strong>the</strong> thumb and forefinger. Apply lubricant if desired<br />
d. Separate <strong>the</strong> buttocks and gently insert <strong>the</strong> probe into <strong>the</strong> rectum ONLY 1.5 cm<br />
(5/8 of an inch for adults), and LESS for infants and children<br />
e. Hold <strong>the</strong> probe in place for <strong>the</strong> entire temperature. This should take approximately<br />
10 sec<strong>on</strong>ds for a reading<br />
f. After <strong>the</strong> temperature process is finished, eject <strong>the</strong> probe cover and dispose of properly<br />
4<br />
Spot Outline<br />
SM2901 08/2010