CEREC MC XL - MEDIPRO
CEREC MC XL - MEDIPRO
CEREC MC XL - MEDIPRO

You also want an ePaper? Increase the reach of your titles
YUMPU automatically turns print PDFs into web optimized ePapers that Google loves.
Sirona Dental Systems GmbH<br />
Operating Instructions <strong>CEREC</strong> <strong>MC</strong> <strong>XL</strong><br />
6 Operation<br />
Calibrating the unit<br />
6.2.1 Calibrating the milling unit<br />
NOTICE<br />
Calibrating the inLab+Cerec milling unit<br />
Unit calibrated ex works<br />
The unit is calibrated at the factory. No additional calibration is required<br />
during initial startup. Proceed as described below when performing a<br />
subsequent calibration.<br />
CAUTION<br />
Faulty milling result<br />
If the unit is not calibrated, the milling result may be faulty.<br />
✔<br />
Take the calibration pins and calibration phantom out of the drawer of the<br />
unit.<br />
1. In the menu line, select the command "Settings" / "Calibration" / "Milling<br />
unit".<br />
2. If several milling units are connected, a dialog box will appear. Select the<br />
milling unit you prefer and confirm your choice with "OK".<br />
A dialog box then opens where you can select the bur set to be<br />
calibrated or the two bur sets to be calibrated consecutively. The date<br />
of the last calibration is also displayed.<br />
3. Select the desired bur set and confirm with "Start".<br />
You can also select the desired bur set on the milling unit (up/down<br />
arrow) and then confirm your selection with "Start".<br />
The milling unit then moves into position to insert the calibration tools.<br />
A dialog box prompts you to insert the calibration pins and the<br />
calibration phantom and to close the milling chamber door again.<br />
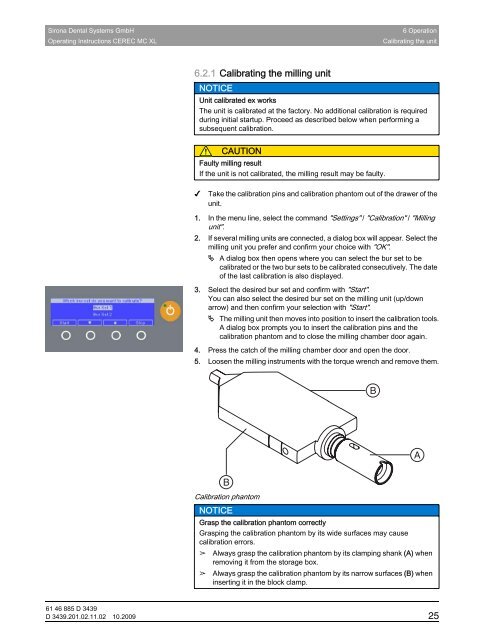
4. Press the catch of the milling chamber door and open the door.<br />
5. Loosen the milling instruments with the torque wrench and remove them.<br />
båÖäáëÜ<br />
B<br />
A<br />
B<br />
Calibration phantom<br />
NOTICE<br />
Grasp the calibration phantom correctly<br />
Grasping the calibration phantom by its wide surfaces may cause<br />
calibration errors.<br />
➢ Always grasp the calibration phantom by its clamping shank (A) when<br />
removing it from the storage box.<br />
➢ Always grasp the calibration phantom by its narrow surfaces (B) when<br />
inserting it in the block clamp.<br />
61 46 885 D 3439<br />
D 3439.201.02.11.02 10.2009 25