CEREC MC XL - MEDIPRO
CEREC MC XL - MEDIPRO
CEREC MC XL - MEDIPRO
You also want an ePaper? Increase the reach of your titles
YUMPU automatically turns print PDFs into web optimized ePapers that Google loves.
6 Operation Sirona Dental Systems GmbH<br />
Start the milling process<br />
Operating Instructions <strong>CEREC</strong> <strong>MC</strong> <strong>XL</strong><br />
10. Press the catch of the milling chamber door and open the door.<br />
11. Loosen the ball pressure screw.<br />
12. Pull off the model holder.<br />
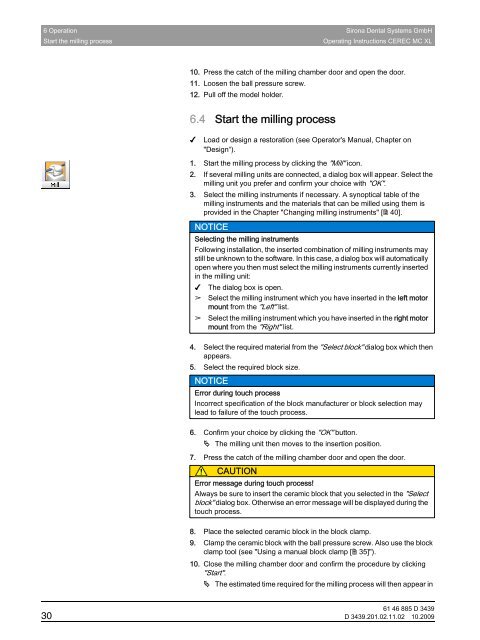
6.4 Start the milling process<br />
✔<br />
Load or design a restoration (see Operator's Manual, Chapter on<br />
"Design“).<br />
1. Start the milling process by clicking the "Mill" icon.<br />
2. If several milling units are connected, a dialog box will appear. Select the<br />
milling unit you prefer and confirm your choice with "OK".<br />
3. Select the milling instruments if necessary. A synoptical table of the<br />
milling instruments and the materials that can be milled using them is<br />
provided in the Chapter "Changing milling instruments" [ 40].<br />
NOTICE<br />
Selecting the milling instruments<br />
Following installation, the inserted combination of milling instruments may<br />
still be unknown to the software. In this case, a dialog box will automatically<br />
open where you then must select the milling instruments currently inserted<br />
in the milling unit:<br />
✔ The dialog box is open.<br />
➢ Select the milling instrument which you have inserted in the left motor<br />
mount from the "Left" list.<br />
➢ Select the milling instrument which you have inserted in the right motor<br />
mount from the "Right" list.<br />
4. Select the required material from the "Select block" dialog box which then<br />
appears.<br />
5. Select the required block size.<br />
NOTICE<br />
Error during touch process<br />
Incorrect specification of the block manufacturer or block selection may<br />
lead to failure of the touch process.<br />
6. Confirm your choice by clicking the "OK" button.<br />
The milling unit then moves to the insertion position.<br />
7. Press the catch of the milling chamber door and open the door.<br />
CAUTION<br />
Error message during touch process!<br />
Always be sure to insert the ceramic block that you selected in the "Select<br />
block" dialog box. Otherwise an error message will be displayed during the<br />
touch process.<br />
8. Place the selected ceramic block in the block clamp.<br />
9. Clamp the ceramic block with the ball pressure screw. Also use the block<br />
clamp tool (see "Using a manual block clamp [ 35]").<br />
10. Close the milling chamber door and confirm the procedure by clicking<br />
"Start".<br />
The estimated time required for the milling process will then appear in<br />
61 46 885 D 3439<br />
30 D 3439.201.02.11.02 10.2009


