Installation and Operation Manual For Hunter Ceiling ... - Hunter Fan
Installation and Operation Manual For Hunter Ceiling ... - Hunter Fan
Installation and Operation Manual For Hunter Ceiling ... - Hunter Fan

You also want an ePaper? Increase the reach of your titles
YUMPU automatically turns print PDFs into web optimized ePapers that Google loves.
®<br />
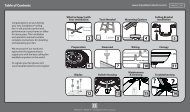
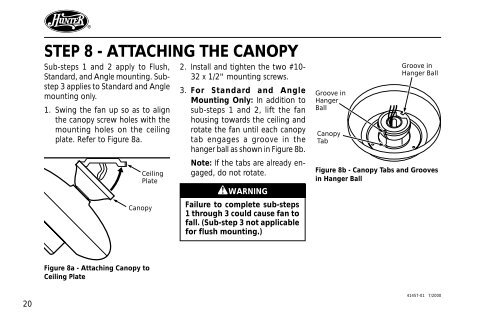
STEP 8 - ATTACHING THE CANOPY<br />
Sub-steps 1 <strong>and</strong> 2 apply to Flush,<br />
St<strong>and</strong>ard, <strong>and</strong> Angle mounting. Substep<br />
3 applies to St<strong>and</strong>ard <strong>and</strong> Angle<br />
mounting only.<br />
1. Swing the fan up so as to align<br />
the canopy screw holes with the<br />
mounting holes on the ceiling<br />
plate. Refer to Figure 8a.<br />
<strong>Ceiling</strong><br />
Plate<br />
Canopy<br />
2. Install <strong>and</strong> tighten the two #10-<br />
32 x 1/2" mounting screws.<br />
3. <strong>For</strong> St<strong>and</strong>ard <strong>and</strong> Angle<br />
Mounting Only: In addition to<br />
sub-steps 1 <strong>and</strong> 2, lift the fan<br />
housing towards the ceiling <strong>and</strong><br />
rotate the fan until each canopy<br />
tab engages a groove in the<br />
hanger ball as shown in Figure 8b.<br />
Note: If the tabs are already engaged,<br />
do not rotate.<br />
WARNING<br />
Failure to complete sub-steps<br />
1 through 3 could cause fan to<br />
fall. (Sub-step 3 not applicable<br />
for flush mounting.)<br />
Groove in<br />
Hanger<br />
Ball<br />
Canopy<br />
Tab<br />
Groove in<br />
Hanger Ball<br />
Figure 8b - Canopy Tabs <strong>and</strong> Grooves<br />
in Hanger Ball<br />
Figure 8a - Attaching Canopy to<br />
<strong>Ceiling</strong> Plate<br />
20<br />
41457-01 7/2000