Installation and Operation Manual For Hunter Ceiling ... - Hunter Fan
Installation and Operation Manual For Hunter Ceiling ... - Hunter Fan
Installation and Operation Manual For Hunter Ceiling ... - Hunter Fan

You also want an ePaper? Increase the reach of your titles
YUMPU automatically turns print PDFs into web optimized ePapers that Google loves.
®<br />
OPERATING YOUR HUNTER FAN<br />
WITH A REMOTE<br />
WARNING<br />
Once receiver is installed <strong>and</strong><br />
power is turned back on, DO<br />
NOT pull the fan or light chains<br />
while power is connected.<br />
Refer to steps 1, 3, <strong>and</strong> 4 in the OP-<br />
ERATING YOUR HUNTER FAN<br />
WITHOUT A REMOTE. Use the<br />
following steps to operate your<br />
remote.<br />
1. Turn ON the wall switch. The light<br />
will turn ON at maximum brightness.<br />
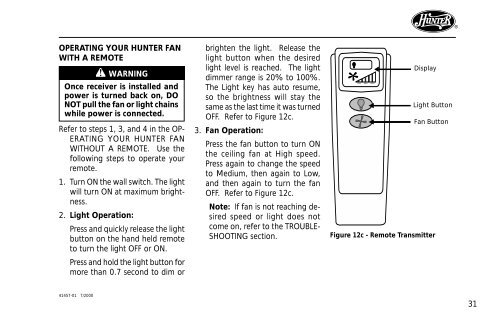
2. Light <strong>Operation</strong>:<br />
Press <strong>and</strong> quickly release the light<br />
button on the h<strong>and</strong> held remote<br />
to turn the light OFF or ON.<br />
Press <strong>and</strong> hold the light button for<br />
more than 0.7 second to dim or<br />
brighten the light. Release the<br />
light button when the desired<br />
light level is reached. The light<br />
dimmer range is 20% to 100%.<br />
The Light key has auto resume,<br />
so the brightness will stay the<br />
same as the last time it was turned<br />
OFF. Refer to Figure 12c.<br />
3. <strong>Fan</strong> <strong>Operation</strong>:<br />
Press the fan button to turn ON<br />
the ceiling fan at High speed.<br />
Press again to change the speed<br />
to Medium, then again to Low,<br />
<strong>and</strong> then again to turn the fan<br />
OFF. Refer to Figure 12c.<br />
Note: If fan is not reaching desired<br />
speed or light does not<br />
come on, refer to the TROUBLE-<br />
SHOOTING section.<br />
LOW MED HIGH<br />
Display<br />
Light Button<br />
<strong>Fan</strong> Button<br />
Figure 12c - Remote Transmitter<br />
41457-01 7/2000<br />
31