


Create successful ePaper yourself
Turn your PDF publications into a flip-book with our unique Google optimized e-Paper software.
WORKSHOP<br />
building the stqfion<br />
Ifyou're building this workstation, itt a sure<br />
bet you already have the most important<br />
thing - a pocket-hole jig.To make assembling<br />
the workstation quick and easy, you<br />
can use the jig itself to create the joinery.<br />
It's also used as an alignment tool when<br />
building the workstation.<br />
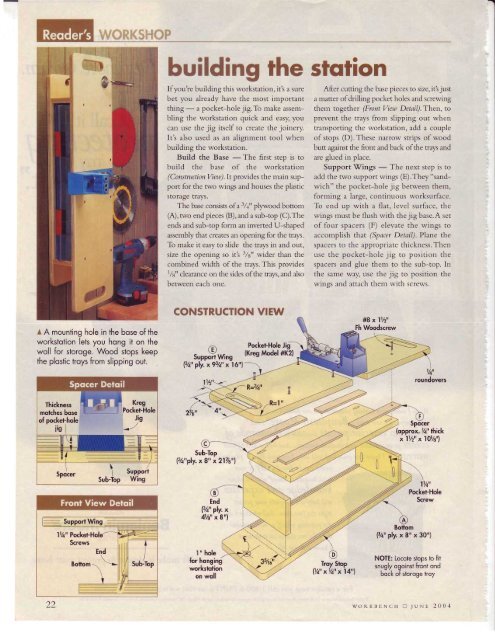
Build the Base - The first step is to<br />
build the base of the workstation<br />
(Construction View). It provides the main support<br />
for the two wings and houses the plastic<br />
storage ffays.<br />
The base consisb of a3/4" plywood boaom<br />
(A), t*o end pieces (B), and a sub-top (C).The<br />
ends and sub-top form an inverted U-shaped<br />
assembly that creates an opening for the trays.<br />
To make it easy to slide the trays in and out,<br />
size the opening so it's 3/s" wider than the<br />
combined width of the trays. This provides<br />
1/s" clearance on the sides of the traw, and also<br />
between each one.<br />
coNsTRucTroN vrEw<br />
After cutting the base pieces to size, itt just<br />
a matter of drilling pocket holes and screwing<br />
them together (Front View Detail).Then, to<br />
prevent the trays from slipping out when<br />
transporting the workstation, add a couple<br />
of stops (D).These narrow strips of wood<br />
butt agairst the front and back ofthe trala and<br />
are glued in place.<br />
Support'Wings - The next step is to<br />
add the two support wings (E).They"sandwich"<br />
the pocket-hole jig between them,<br />
forming a large, continuous worksuface.<br />
To end up with a flat, level surface, the<br />
wings must be flush with the jig base.A set<br />
of four spacers (F) elevate the wings to<br />
accomplish that (Spaeer Detail). Plane the<br />
spacers to the appropriate thickness.Then<br />
use the pocket-hole jig to position the<br />
spacers and glue them to the sub-top. In<br />
the same way, use the jig to position the<br />
wings and attach them with screws.<br />
A A mounfing hole in the bose of the<br />
workstotion lets you hong it on the<br />
woll for storoge. <strong>Wood</strong> stops keep<br />
the plostic troys from slipping ouf.<br />
PockeFHole Jig<br />
@ (Kreg Model#K2l<br />
SupportWing<br />
F/a" pV. x 9Bld'x l6"l<br />
U1.'<br />
roundovers<br />
Thickness<br />
mokhes bose<br />
Sub-Top<br />
(%"ph.x 8" x2l7/s"l<br />
Spd-cer<br />
(opprox. %" thick<br />
xllz" xl0Wl<br />
lr/a"<br />
PockeFHole<br />
Screw<br />
l " hole<br />
for hongin{<br />
worksiofion<br />
on woll<br />
l%'PV.x8"x30"f<br />
NOTE: Locote stops to fit<br />
,. 'f snugly ogoinst front ond<br />
bock of sioroge troy<br />
woRKBENcH ft luNr 2004


![Til]tl](https://img.yumpu.com/45878240/1/190x245/tiltl.jpg?quality=85)


