


Create successful ePaper yourself
Turn your PDF publications into a flip-book with our unique Google optimized e-Paper software.
skill<br />
Builder<br />
one side of the jig to keep it square.Then set the router<br />
sled on top of the jig so the bit is over the exposed<br />
edge of the workpiece. Now turn the router on, and<br />
slowly slide the sled down the jig, and then back up.<br />
Repeat this process across the entire width of the workpiece<br />
(see Frg. l).When you reach the opposite edge of<br />
the workpiece, the bit will actually cut into the side of<br />
the jig, but that's okay. You need to do this to completely<br />
clean up the edge.<br />
Finish the Cut - When you're finished, unclamp<br />
the workpiece, and slide it closer to the end of the jig<br />
(about half the distance).Then reclamp it, and repeat the<br />
process. The bit will cut deeper this tirne, creating a<br />
larger bevel (Fig. 2) For the final pass, move the workpiece<br />
all the way to the end of the jig (Fig 3).<br />
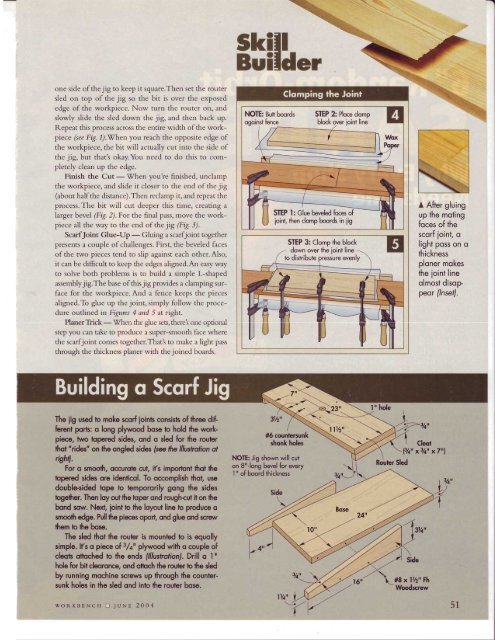
ScarfJoint Glue-Up - Gluing a scarfjoint together<br />
presents a couple ofchallenges. First, the beveled faces<br />
of the two pieces tend to slip against each other.Also,<br />
it can be difficult to keep the edges aligned.An easy way<br />
to solve both problems is to build a simple L-shaped<br />
assembly jig.The base of this jig provides a clamping surface<br />
for the workpiece. And a fence keeps the pieces<br />
aligned.To glue up the joint, simply follow the procedure<br />
outlined in Figures 4 and 5 at right.<br />
Planer Trick - When the glue ses, there's one optional<br />
step you can take to produce a super-smooth face where<br />
the scarfjoint comes together.That'.s to make a light pass<br />
through the thickness planer with the joined boards.<br />
A After gluing<br />
up the moting<br />
foces of the<br />
scorf ioint, o<br />
light poss on o<br />
thickness<br />
ploner mokes<br />
the ioint line<br />
olmost disop<br />
peor ilnsef/.<br />
The iig used to moke scorf ioints consisfs of three difbrenl<br />
porfs: o long plp'vood bose lo hold he wo*-<br />
piece, fwo bpered sides, ond o sled br he rouler<br />
lhot "rides" on the ongled sides fsee lhe lllusffiion ot<br />
rightl.<br />
For o smoolh, oc€urob cut, ifs imporlonl ftot fie<br />
bpered sides ore idenlicol. To occomplish thot, use<br />
doublesided iope to tempororily gong the sides<br />
bgefher. Then loy out the bper ond roughcut it on hE<br />
bond sow. Noc, loint b he loyout line lo produce o<br />
smocfh edge. Pull fie pics oporl, ond glue ond screw<br />
them b the bose.<br />
The sled hol the roufer is mounbd to is equolly<br />
simpfe. lfs o piece ol3/{ plywood with o couple of<br />
cfeots qttoched b he ends (llustrotionJ. Drill o I o<br />
hole br bit cleqronca, ond oftoch fie rouler ic the sled<br />
by running mqchine screws up through lhe countersunk<br />
holes in the sled ond into he roubr bose.<br />
woRKBENCH D JUNE 2004<br />
3V2"<br />
#6 counbrsunk<br />
shqnk holes<br />
NOTE: Jig shown will cut<br />
on 8"-long bevel br every<br />
1 " of boord thickness<br />
lo<br />
Side<br />
l" hole<br />
Cleqt<br />
pftt x?/ln x7rrl<br />
Roubr Sled<br />
I| 3/t"<br />
51


![Til]tl](https://img.yumpu.com/45878240/1/190x245/tiltl.jpg?quality=85)


