


You also want an ePaper? Increase the reach of your titles
YUMPU automatically turns print PDFs into web optimized ePapers that Google loves.
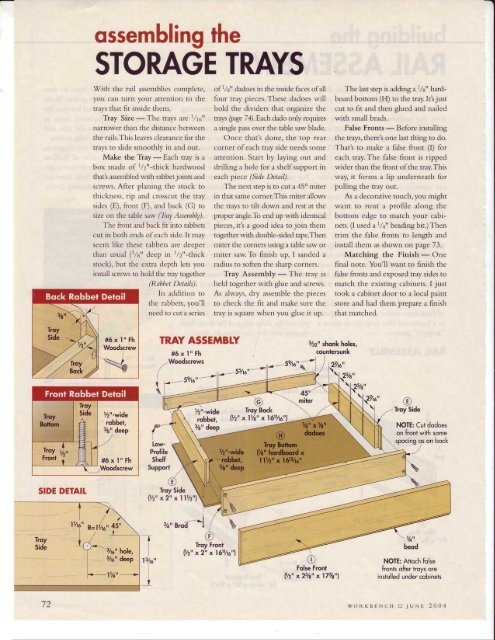
ossembling the<br />
STORAGE TRAYS<br />
With the rail assemblies complete,<br />
you can turn your attention to the<br />
trays that fit inside them.<br />
Tiay Size - The trays are l/16"<br />
narrower than the distance berween<br />
the rails.This leaves clearance for the<br />
trays to slide smoothly in and out.<br />
Make the Tiray - Each tray is a<br />
box made of 1/2"-thick hardwood<br />
that's assembied with rabbet joints and<br />
screws. After planing the stock to<br />
thickness, rip and crosscut the tray<br />
sides (E), front (F), and back (G) to<br />
size on the table saw (Tiay Assembly).<br />
The front and back fit into rabbets<br />
cut in both ends of each side. It rnay<br />
seem like these rabbets are deeper<br />
than usual (3/s" deep in l/2"-thick<br />
stock), but the extra depth lets you<br />
install screws to hold the tray together<br />
(Rabbet Detaik).<br />
In addition to<br />
the rabbets, you'Il<br />
need to cut a series<br />
of1ls" dadoes in the inside faces ofall<br />
four tray pieces. These dadoes will<br />
hold the dividers that organize the<br />
rays (page 74).Each dado only requires<br />
a single pass over the table saw blade.<br />
Once that's done, the top rear<br />
corner of each tray side needs some<br />
attention. Start by laying out and<br />
drilling a hole for a shelf support in<br />
each piece (Side Detail).<br />
The next step is to cut a 45o miter<br />
in that same corner.This miter allows<br />
the trays to tilt down and rest at the<br />
proper angle.To end up with identical<br />
pieces, it's a good idea to join them<br />
together with double-sided tape.Then<br />
miter the corners using a table saw or<br />
miter saw. To finish up, I sanded a<br />
radius to soften the sharp corners.<br />
Tray Assembly - The tray is<br />
held together with glue and screws.<br />
As always, dry assemble the pieces<br />
to check the fit and make sure the<br />
tray is square when you glue it up.<br />
The last step is adding al/eu hardboard<br />
bottom (H) to the tray. Itt just<br />
cut to fit and then glued and nailed<br />
with small brads.<br />
False Fronts _ Before ll5galling<br />
the trays, there's one last thing to do.<br />
That's to make a false front (l) for<br />
each tray. The false front is ripped<br />
wider than the front of the tray.This<br />
way, it forms a lip underneath for<br />
pulling the tray out.<br />
As a decorative touch, you might<br />
want to rout a profile along the<br />
bottom edge to match your cabinets.<br />
(l used a1/a" beadingbit.) Then<br />
trim the false fronts to length and<br />
install them as shown on page 73.<br />
Matching the Finish - One<br />
{inal note. You'll want to finish the<br />
false fronts and exposed tray sides to<br />
match the existing cabinets. I just<br />
took a cabinet door to a local paint<br />
store and had them prepare a finish<br />
that matched.<br />
TRAY ASSE'VIBIY<br />
#6xl"Fh<br />
-<strong>Wood</strong>screws<br />
7rz" shonk holes,<br />
countersunk<br />
59A0"-4 27Ac"<br />
(<br />
q<br />
low-<br />
Profile<br />
Shelf<br />
Support<br />
SeAe"<br />
@<br />
Troy Side<br />
NOTE: Cut dodoes<br />
'\....<br />
on front with some<br />
spocing os on bock<br />
%<br />
SIDE DETAII.<br />
Troy Side \<br />
(/z"x2xll7z"l<br />
3/" Bro{-1 v,<br />
Troy Front<br />
l/2" x2" x l6l%a"l<br />
Folse Fronl<br />
I/2" x25/a" x lV/s"l<br />
U4"<br />
beod<br />
NOTE: Attoch forse<br />
fronls ofter lroys ore<br />
instolled under cobinets<br />
72<br />
woRKBENcH E JUNE 2004


![Til]tl](https://img.yumpu.com/45878240/1/190x245/tiltl.jpg?quality=85)


