


Create successful ePaper yourself
Turn your PDF publications into a flip-book with our unique Google optimized e-Paper software.
I<br />
i<br />
I<br />
i<br />
t<br />
I<br />
t<br />
I<br />
t<br />
Then, when itt time to cut the tenons, you'll cut to the<br />
outsiile of the line, which should result in a snug fit.<br />
Stop Block - Another important consideration is the<br />
depth of rhe mortise.That's determined by a stop block thatt<br />
clamped to the fence. The depth of the mortise equals<br />
the width of the workpiece, so an easy way to set the stop<br />
block is to use one of the workpieces as a gauge (Fig. 2).<br />
Make the Mortise - With the fence and stop block<br />
in place, cut the mortise by holding the workpiece against<br />
the fence and running it through the blade until it contacts<br />
the stop block.Then, flip the workpiece over and<br />
make a second cut to establish both sides of the mortise<br />
(Fig 3). Flipping the workpiece between cuts this way<br />
ensures a oerfectlv centered mortise.<br />
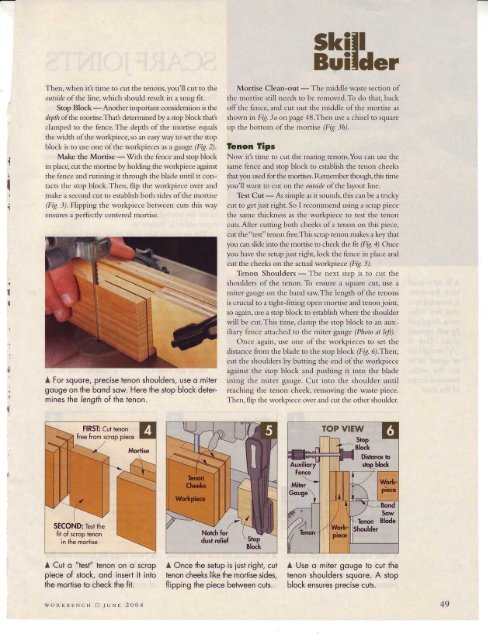
A For squore, precise tenon shoulders, use o miter<br />
gouge on the bond sow. Here the stop block determines<br />
the length of the fenon.<br />
FIRST Cut tenon<br />
free from scrop piece<br />
skill<br />
Builder<br />
Mortise Qlsan-qu3 - The middle waste section of<br />
the mortise still needs to be removed.To do that, back<br />
offthe fence. and cut out the middle of the mortise as<br />
shown in Fig. 3a on page 48.Then use a chisel to square<br />
up the bottom of the mortise (Fig. 3b).<br />
lenon llps<br />
Now itt time to cut the mating tenons.You can use the<br />
same fence and stop block to establish the tenon cheeks<br />
that you used for the mortises. Remember though, this time<br />
you'll want to cut on the outside of the layout line.<br />
Test Cut - fu simple as it sounds, this can be a tricky<br />
cut to get just right. So I recommend using a scrap piece<br />
the same thickness as the workpiece to test the tenon<br />
cuts.After cutting both cheeks of a tenon on this piece,<br />
cut the "test" tenon &ee.This scrap tenon makes a key that<br />
you can slide into the mortise to check the fit (Fig,4).Once<br />
you have the setupjust right, lock the fence in place and<br />
cut the cheeks on the actual workpiece (Fig. 5).<br />
Tenon Shoulders - The next step is to cut the<br />
shoulders of the tenon. To ensure a square cut, use a<br />
miter gauge on the band saw.The length of the tenons<br />
is crucial to a right-fitting open mortise and tenonjoint,<br />
so again, use a stop block to establish where the shoulder<br />
will be cut.This time, clamp the stop block to an auxiliary<br />
fence attached to the miter gauge (Photo at left).<br />
Once again, use one of the workpieces to set the<br />
distance from the blade to the stop block (Frg. 6).Then,<br />
cut the shoulders by butting the end of the workpiece<br />
against the stop block and pushing it into the blade<br />
using the miter gauge. Cut into the shoulder until<br />
reaching the tenon cheek, removing the waste piece.<br />
Then, flip the workpiece over and cut the other shoulder.<br />
V/-<br />
Norch foi<br />
dust relief<br />
'sbP<br />
A Cut o "tesl" tenon on o scrop<br />
piece of stock, ond insert it into<br />
the mortise to check the fit.<br />
A Once the setup is iust right, cut<br />
tenon cheeks like the mortise sides,<br />
flipping the piece between cuts.<br />
A Use o miter gouge to cut the<br />
tenon shoulders squore. A stop<br />
block ensures precise cuts.<br />
woRKBENCH Et.JuNn 2004<br />
49


![Til]tl](https://img.yumpu.com/45878240/1/190x245/tiltl.jpg?quality=85)


