


You also want an ePaper? Increase the reach of your titles
YUMPU automatically turns print PDFs into web optimized ePapers that Google loves.
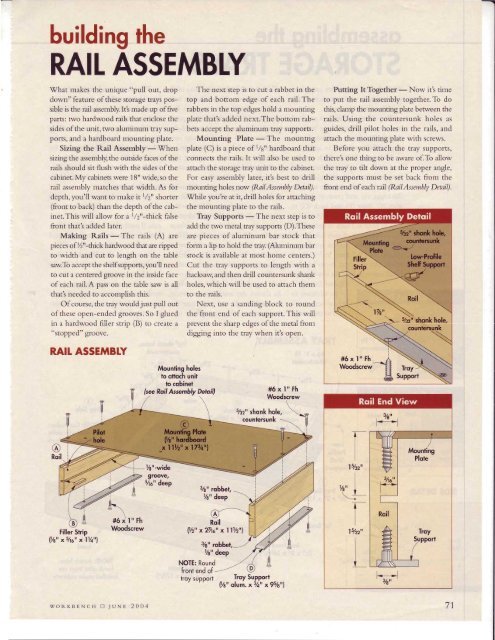
uilding the<br />
RAIL ASSEMBLY<br />
What makes the unique "pull out, drop<br />
down" feature of these storage trays possible<br />
is the rail assembly. It! made up of6ve<br />
parts: rwo hardwood rails that enclose the<br />
sides of the unit. rwo aluminum tray supports,<br />
and a hardboard mounting plate.<br />
Sizing the Rail Assembly - When<br />
sizing the assembly, the outside faces of the<br />
rails should sit flush with the sides of the<br />
cabinet. My cabinets were 18" wide, so the<br />
rail assembly matches that width. As for<br />
depth. you'll wanr ro make ir l/2" shorter<br />
(front to back) than the depth ofthe cabinet.This<br />
will allow for a l/2"-thick false<br />
front that's added later.<br />
Making Rails - The rails (A) are<br />
pieces of %"-thick haridwood that are ripped<br />
to width and cut to length on the table<br />
sawTo accept the shelfsupports,you'Il need<br />
to cut a centered groove in the inside face<br />
of each rail. A pass on the table saw is all<br />
that's needed to accomplish this.<br />
Of course, the tray would just pull out<br />
ofthese open-ended grooves. So I glued<br />
in a hardwood filler strip (B) to create a<br />
"stopped" groove.<br />
RAIL ASSEMBTY<br />
The next step is to cut a rabbet in the<br />
top and bottom edge of each rail. The<br />
rabbets in the top edges hold a mounting<br />
plate that's added next.The bottom rabbets<br />
accept the aluminum tray supports.<br />
Mounting Plate - The mountng<br />
plate (C) is a piece of 1/s" hardboard that<br />
connects the rails. It will also be used to<br />
attach the storage tray unit to the cabinet.<br />
For easy assembly later, it's best to drill<br />
mounting holes now (RailAssembly Detail).<br />
.lUhile you re at it, drill holes for attaching<br />
the mounting plate to the rails.<br />
Tiay Supports - The next step is to<br />
add the tvvo metal tray supports (D).These<br />
are pieces of aluminum bar stock that<br />
form a lip to hold the tray. (Aluminum bar<br />
stock is available at most home centers.)<br />
Cut the tray supports to length with a<br />
hacksaw, and then drill countersunk shank<br />
holes, which will be used to attach them<br />
to the rails.<br />
Next, use a sanding block to round<br />
the front end of each support. This will<br />
prevent the sharp edges of the metal from<br />
digging into the tray when ith open.<br />
Putting It Together - Now it's time<br />
to put the rail assembly together. To do<br />
this, clamp the mouncing plate benveen the<br />
rails. Using the countersunk holes as<br />
guides, drill pilot holes in the rails, and<br />
attach the mounting plate with screws.<br />
Before you attach the tray supports,<br />
there's one thing to be aware of.To allow<br />
the tray to tilt down at the proper angle,<br />
the supports must be set back from the<br />
front end of each ral, (RailAssembly Detail).<br />
t<br />
ftt'.<br />
#6il"Fh<br />
<strong>Wood</strong>screw<br />
Mounting holes<br />
to otloch unit<br />
to cobinet<br />
(see Roil Assembly Deraill<br />
7s"-wide<br />
9roove,<br />
5/o" deep<br />
Roil<br />
l/2" x27/16" x ll7z"l<br />
3/e" robbel,<br />
7e" deep<br />
#6x l" Fh<br />
<strong>Wood</strong>screw<br />
7s2" shonk hole, \<br />
counl,ersunk<br />
NOTE: Round<br />
front end of<br />
troy support Troy Support<br />
fl/g" ofum. x3/t" x95/s"l<br />
1-<br />
I<br />
l5/gz"<br />
Ye" I \.....-<br />
L<br />
lShz"<br />
L<br />
woRKBENcH Lt.yunr 2004 71


![Til]tl](https://img.yumpu.com/45878240/1/190x245/tiltl.jpg?quality=85)


