


You also want an ePaper? Increase the reach of your titles
YUMPU automatically turns print PDFs into web optimized ePapers that Google loves.
ahead and rip the cladding pieces to To shed water, the mid-caps are<br />
width (47s" in my case) and crosscut beveled on their upper face. Cutting<br />
rhem to Ierrglh (341/2"). Next, cut the these bevels is easiesto do if the midcap<br />
is completely assembled. The<br />
locking rabbetjoints, as explained on<br />
page 47.Then, make each of the two problem is the nvo L-shaped secrions<br />
L-shaped halves by gluing rwo pieces of the mid-cap have to fit around the<br />
ofcladding together.<br />
post, so you can't actually assemble<br />
At this point, you're ready to it until vou're at the iob site.<br />
transport the cladding to thejob site The solution is to glue two pieces<br />
and install it.This is a simple, threestep<br />
process (Claddinga Post,page 42). and then temporarily join<br />
together to form the L-sections,<br />
Just a note here. To ensure that the two L-sections<br />
the porch railings wili align with each with screws. (Frg.<br />
other once they're installed, the face 1, below). Be sure<br />
of the post to which you attach the to keep the screws<br />
first L-shaped section ofcladding is out ofthe path ofthe<br />
important. This face is. in a sense. saw blade. But iust in case, iti<br />
your "true north." The idea is to best to use brass screws.That way,<br />
attach that first L-shaped section to the blade won't get damaged if it<br />
that same relative face on each oost. accidentally nicks one of the screws.<br />
Now you can go ahead and make<br />
Add the tlld-Gcpc<br />
the bevel cuts on the table saw (Fig.<br />
To create a visual "break" between 2). Of course, you'll need to disassen-rble<br />
the mid-caps before installing<br />
the upper and lower cladding, I added<br />
thick mid-caps to the posts. Each them on the posts (Fig.3).After fluing<br />
rrrid-cap is a frame nrade of 1 l/2"- the halves together, simply toenail<br />
thick cedar (Mid- Cap Assembly). Llke thenr to the post (Photo,page 40).<br />
the cladding, the idea is to make rlvo-<br />
L-shaped sections, and then assemble Inctcll Upper Glcddlng<br />
them around the post.<br />
The final stage ofconverring a porch<br />
Once again, making mid-caps that post to a column is to install the<br />
would withstand the weather was upper cladding above the mid-cap.<br />
high on my prioriry list. So this time, It's almost identical to the lower<br />
I used open morrise and tenon joints cladding: 3/+"-thick cedar, locking<br />
to assemble the mid-caps (see page 48 rabbet joints, and L-shaped sections<br />
and detail at right),<br />
that wrap the posts.The only diflerence<br />
is that here, I routed a decorative<br />
chamfer on all four edges.This detail<br />
isn't added to the lower claddings<br />
because trim pieces will cover those<br />
corners once the railings are installed.<br />
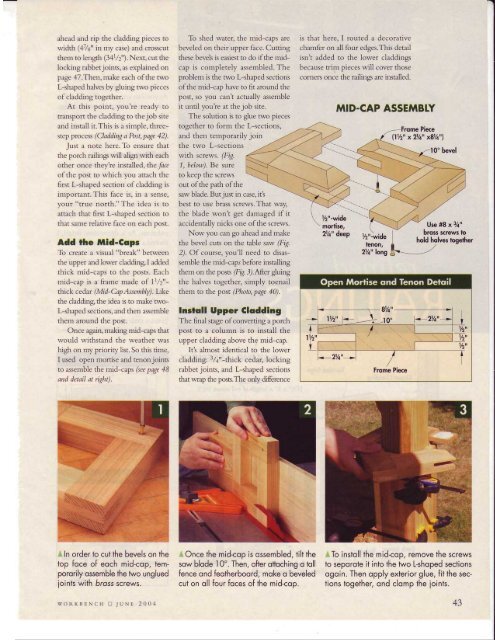
MID.CAP ASSEMBLY<br />
72"-wide<br />
morlise,<br />
2Vt" deep<br />
frii;, !<br />
Piece<br />
llth" x2Y4" x81/4"1<br />
ziii,,'iongL------./<br />
Use #8 x 3/a"<br />
bross screws f,o<br />
hold holves logether<br />
In order to cut the bevels on the<br />
top foce of eoch mid-cop, tempororily<br />
ossemble the two unglued<br />
ioints with bross screws.<br />
Once the midcop is ossembled, tilt the<br />
sow blode l0o. Then, ofter ottoching o toll<br />
fence ond feotherboord, moke o beveled<br />
cut on oll four foces of the mid-coo.<br />
To instoll the mid-cop, remove the screws<br />
to seporote it into the two L-shoped sections<br />
ogoin. Then opply exterior glue, fit the sections<br />
together, ond clomp the ioints.<br />
43<br />
lgonKBENCH tr tuNr 2004


![Til]tl](https://img.yumpu.com/45878240/1/190x245/tiltl.jpg?quality=85)


