


You also want an ePaper? Increase the reach of your titles
YUMPU automatically turns print PDFs into web optimized ePapers that Google loves.
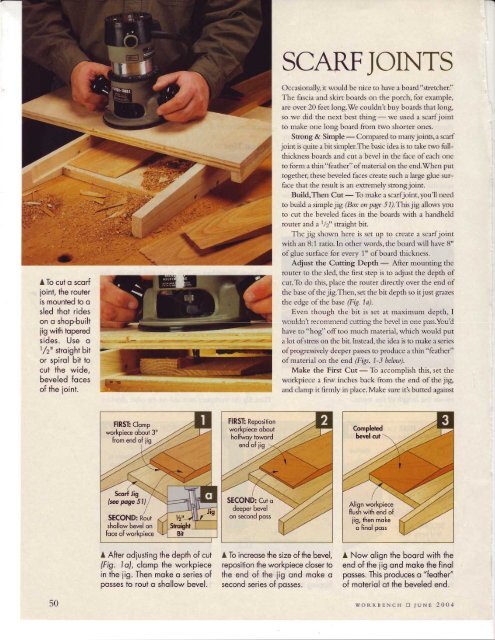
ATo cuf o scorf<br />
ioinf, the router<br />
is mounted to o<br />
sled thot rides<br />
on o shop-built<br />
iig with bpered<br />
sides. Use o &,o"<br />
l/2" skoight bit<br />
or spirol bit to<br />
cut the wide,<br />
beveled foces<br />
of fte ioint.<br />
SCARFJOINTS<br />
Occasionally, it would be nice to have a board "stretcher."<br />
The fascia and skirt boards on the porch, for example,<br />
are over 20 feet long.We couldnt buy boards that long,<br />
so we did the next best thing - we used a scarfjoint<br />
to make one long board from two shorter ones.<br />
Strong & Simple - Compared to many joins, a scarf<br />
joint is quite a bit simpler.The basic idea is to take two fullthickness<br />
boards and cut a bevel in the face of each one<br />
to form a thin "feather" of material on the end.When put<br />
together, these beveled faces create such a large glue surface<br />
that the result is an extremely strongjoint.<br />
Build,Then Cut - To make a scarfjoint, you'll need<br />
to build a simple jig (Box on page 5|.This jig allows you<br />
to cut the beveled faces in the boards with a handheld<br />
router and 2 l/2" 5g6ight bit.<br />
The jig shown here is set up to create a scarfjoint<br />
with an 8:1 ratio. In other words, the board will have 8"<br />
ofglue suface for every 1" ofboard thickness.<br />
Adjust the Cutting Depth - After mounting the<br />
router to the sled, the first step is to adjust the depth of<br />
cut.To do this, place the router directly over the end of<br />
the base of the jig.Then, set the bit depth so it just grazes<br />
the edge of the base (Fig 1a).<br />
Even though the bit is set at maximum depth, I<br />
wouldnt recommend cutting the bevel in one pass.You'd<br />
have to "hog" offtoo much material, which would put<br />
a lot of stress on the bit. Instead, the idea is to make a series<br />
ofprogressively deeper passes to produce a thin "feather"<br />
of material on the end (Figs. l-j below).<br />
Make the First Cut - fb accomplish this, set the<br />
workpiece a few inches back from the end of the jig,<br />
and clamp it firmly in place. Make sure it's butted against<br />
FIRSI Clomp<br />
wo_rkpiece obout 3"<br />
FIRSt Reposition<br />
workpiece obout<br />
holfwoy toword<br />
end of iig 2<br />
shollow bevel on<br />
foce of workpiece<br />
SECOND: Cut o<br />
deeper bevel<br />
on second poss<br />
Align workpiece<br />
flush with end of<br />
iig, then moke<br />
o finol poss<br />
A After odiusting the depth of cut<br />
(Fig. Ia), clomp the workpiece<br />
in the iig. Then moke o series of<br />
posses io rout o shollow bevel.<br />
A Tc increose the size of the bevel,<br />
reposition the workpiece closer to<br />
the end of the iig ond moke o<br />
second series of posses.<br />
A Now olign the boord with the<br />
end of the iig ond moke the finol<br />
posses. This produces o "feother"<br />
of moteriol ot the beveled end.<br />
50<br />
woRKBENCH tr JUNE 2004


![Til]tl](https://img.yumpu.com/45878240/1/190x245/tiltl.jpg?quality=85)


