


You also want an ePaper? Increase the reach of your titles
YUMPU automatically turns print PDFs into web optimized ePapers that Google loves.
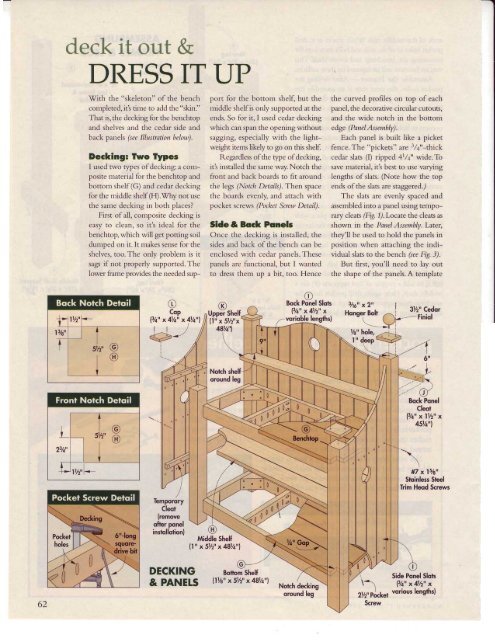
deck it out &<br />
DRESS IT UP<br />
With the "skeleton" of the bench<br />
conrpleted, it'.s tine to add thc "skin."<br />
That is, the decking for the benchtop<br />
and shelves and the cedar side and<br />
back panels (see Illustration bclou).<br />
Decking: f\ro $pes<br />
I used two types of decking: a conrposite<br />
nrrterial for tl're benchtop and<br />
bottorn shelf (G) arrd cedrr decking<br />
for the nriddle shelf (H).Why not Lrse<br />
the sanre decking in botlr places?<br />
First of all, coniposite decking is<br />
easy to clerrr, so it's icle:rl for the<br />
benchtop, which will get potting soil<br />
dunrped on it. It nrakes sense for the<br />
shelves, too.The only problenr is it<br />
sags if not properly supportecl. J'hc<br />
lower fi"lnre provicles the nceclecl support<br />
for the bottorn shelf, but the<br />
nriddle shclf is only sr"rpported at the<br />
ends. So for it, I used cedar decking<br />
which can span the opening without<br />
seggine. espcci:rlly with thc lightweight<br />
itenrs likely to go on this shelf.<br />
l{ep;.rrc'liess of the type of decking,<br />
iti installed the sarne way. Notch the<br />
front and back boards to fit around<br />
the legs (Notclt Dctails). Tl.ren space<br />
tl're boards evenly, and attach with<br />
pocket screws (1)orfrcl Srruu l)ctail).<br />
Side& Bock Panels<br />
Once the dcckins is installccl, the<br />
sides and back of the bcnch can be<br />
enclosecl with ceclar panels. These<br />
panels lrc functional, br,rt I wantecl<br />
to clress thcnr up a bit, too. Hence<br />
the curved profiles on top of each<br />
panel, the decorative circular cutouts,<br />
and the wide notch in the botton.r<br />
edge (Panel Assembly).<br />
Each panel is built like a picket<br />
lence. The "pickets" are 3/+"-thick<br />
ccdar slats (l) ripped 4114" wide.To<br />
srve nrrterirl, itls best to use vrrying<br />
lengths of slats. (Note how the top<br />
ends of the slats are staggered./<br />
Thc slats arc evenly spacc'd and<br />
assenrbled into a pancl using temporary<br />
cleats (Fiq.1).Locate the cleaLs as<br />
shown in the Pancl Asscmbly. Later,<br />
they'll be used to hold the panels in<br />
position when attaching the individr-ral<br />
sl:rts to the bench (sr:c Fig. 3).<br />
llut flrst, vou'll need to lay out<br />
tl're shape of the panels. A tenrplate<br />
c coP<br />
l3/t" x4Vt" x4th"l<br />
uppPsur<br />
(1" x 572"x<br />
4)t $t/r"l<br />
A<br />
\<br />
Notch shelf<br />
oround leg<br />
so.t P9*t stot,<br />
l3/l'x{Vz" x<br />
-vorioble lengths)<br />
3y6', x2',<br />
/-<br />
-"f<br />
6u<br />
- I-<br />
.:1( )<br />
Y<br />
Bock Ponel<br />
Cleot<br />
l3/4tt xllztt x<br />
45h"1<br />
Temporory<br />
Cleot<br />
(remove<br />
ofier ponel<br />
inslollotion)<br />
#7 x ls/s"<br />
Stoinless Scel<br />
Trim Heod Screws<br />
62<br />
DECKING<br />
& PANELS<br />
V<br />
Bonom Shelf<br />
llVg" x5Y2" x48Vt"l<br />
Side Ponel Slots<br />
(3h" x 4th" x<br />
vorious lengthsf<br />
2Vz" Pockel<br />
Screw


![Til]tl](https://img.yumpu.com/45878240/1/190x245/tiltl.jpg?quality=85)


