

Elegant Entry Divider - Wood Tools
Elegant Entry Divider - Wood Tools
Elegant Entry Divider - Wood Tools

Create successful ePaper yourself
Turn your PDF publications into a flip-book with our unique Google optimized e-Paper software.
uildi<br />
the stqtion<br />
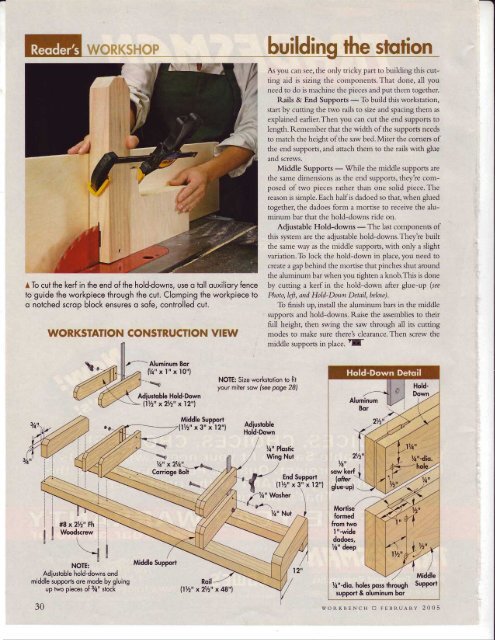
A To cut the kerf in the end of the holddowns, use o toll ouxiliory fence<br />
to guide the workpiece through the cut. Clomping the workpiece to<br />
o notched scrop block ensures o sofe, controlled cut.<br />
WORKSTATION CONSTRUCTION VIEW<br />
As you can see, the only tricky part to building this cutting<br />
aid is sizing the components. That done, all you<br />
need to do is machine the pieces and put them together.<br />
Rails & End Supports - To build this workstation,<br />
start by cutting the rwo rails to size and spacing thern as<br />
explained earlier.Then you can cut the end supports to<br />
length. Remember that the width of the supports needs<br />
to match the height of the saw bed. Miter the corners of<br />
the end supports, and attach them to the rails with glrre<br />
and screws.<br />
Middle Supports -<br />
While the middle supports are<br />
the same dimensions as the end supports, they're composed<br />
of two pieces rather than one solid piece. The<br />
reason is simple. Each half is dadoed so that, when glued<br />
together, the dadoes form a mortise to receive the aluminum<br />
bar that the hold-downs ride on.<br />
Adjustable Hold-downs - The last components of<br />
this system are the adjustable hold-downs.They re built<br />
the same way as the middle supports, with only a slight<br />
variation.To lock the hold-down in place, you need to<br />
create a gap behind the mortise that pinches shut around<br />
the aluminum bar when you tighten a knob.This is done<br />
by cutting a kerf in the hold-down<br />
Photo,left, and Hold-Down Detail, below).<br />
after glue-up (sae<br />
To finish up, install the aluminum bars in the middle<br />
supports and hold-downs. Raise the assemblies to their<br />
full height, then swing the saw through all its cutting<br />
modes to make sure there's clearance. Then screw the<br />
middle supports in place. ffi<br />
z--Aluminum Bor<br />
f/a"xl"x10")<br />
.'-\{<br />
Adiusioble Hold-Down<br />
llYz" x2Vz" x12"1<br />
NOTE: Size worksiotion to fir<br />
your miter sow {see poge 28)<br />
Middle Support<br />
(l7z"x3"xl2"l<br />
.\v<br />
.\0<br />
%" Ploslic<br />
Wing Nut<br />
lU{<br />
%"-dio.<br />
.11.'Jr'"'f;r'-qc<br />
_F<br />
q<br />
EndSupport<br />
(172" x 3" x l2"l<br />
I<br />
7th"wosh., \<br />
"f-- -a \<br />
#8x2Vz" Fh 1<br />
<strong>Wood</strong>screw<br />
\l<br />
)<br />
NOTE:<br />
Middle Support<br />
Adiustoble hold-downs ond<br />
middle supports ore mode by gluing<br />
up two pieces of 3/4rr<br />
Roil<br />
stock<br />
llVz" x2Vz" x 48"1<br />
30<br />
h"-dio. holes poss through Support<br />
supporl & oluminum bor<br />
woRKBENcH ft FEBRUAnv 2005


![Til]tl](https://img.yumpu.com/45878240/1/190x245/tiltl.jpg?quality=85)


