

Elegant Entry Divider - Wood Tools
Elegant Entry Divider - Wood Tools
Elegant Entry Divider - Wood Tools

Create successful ePaper yourself
Turn your PDF publications into a flip-book with our unique Google optimized e-Paper software.
!<br />
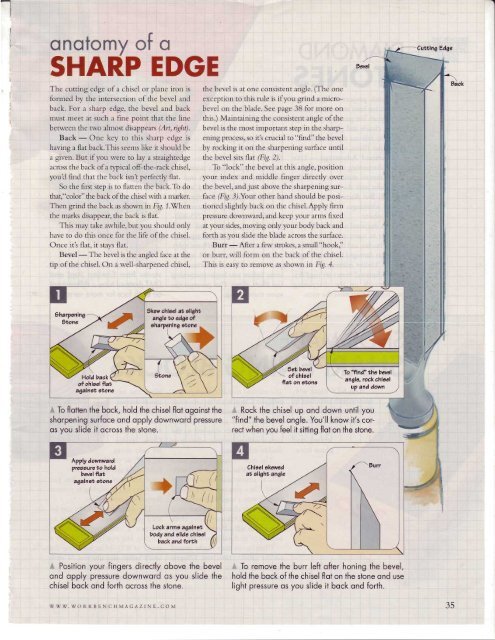
onotomy of o<br />
SHARP EDGE<br />
The cutting edge of a chisel or plane iron is<br />
formed by the intersection of the bevel and<br />
back. For a sharp edge, the bevel and back<br />
must meet at such a fine point that the line<br />
berrveen the rwo almost disappears (Art, ri.qltt).<br />
Back - One key to this sharp edge rs<br />
having a flat back.This seems like it should be<br />
a given. But if you were to lay a straightedge<br />
across the brck ofa rypica1 off-the-rack chisel,<br />
you d find that the back isn't perfectly flat.<br />
So the first step is to flatter-r the back.To do<br />
that,"color"the back ofthe chisel with a nrarker.<br />
Then grind the back as shown in Fig. .l.When<br />
the rrarks disappear, the back is flat.<br />
This may take awhile, but you should only<br />
have to do this once for the life of the chisel.<br />
Orrce it\ flrrt. it stays flar.<br />
Bevel - The bevel is the angled face at the<br />
tip of the chisel. On a well-sharpened chisel,<br />
the bevel is at one consistent angle. (The one<br />
exception to this rule is if you grind a microbevel<br />
on the blade. See page 38 for more on<br />
this.) Maintaining the consistent angle of the<br />
bevel is the most important step in the sharpening<br />
process, so iti crucial to "find" the bevel<br />
by rocking it on the sharpening suface until<br />
the bevel sits flat (Fig 2).<br />
To "lock" tl.re bevel at this angle, position<br />
your index and middle finger directly over<br />
the bevel, andjust above the sharpening surface<br />
(Fiq. J).Your other hand should be positioned<br />
slightly back on the chisel.Apply firrn<br />
pressure downrvard, and kecp yor"rr an-ns fixed<br />
at your sicles, moving only yor,rr body back and<br />
forth as you slide the blade across the surface.<br />
Burr - After r few strokes, a snrall "hook."<br />
or burr. will fon'n on the back of the chisel.<br />
This is easy to renrove :rs shown in Fi,g. 1.<br />
CuttlngEdge<br />
9kew ahleel atallghi<br />
angleto edge ol<br />
aharpenlng,tone .<br />
I<br />
Holdbaak<br />
To"frnd'thebatel<br />
'' angle, rock ahlael<br />
up and down<br />
To flotten the bock, hold the chisel flot ogoinsthe Rock the chisel up ond down until you<br />
shorpening surfoce ond opply downword pressure "find" the bevel ongle. You'll know it's correct<br />
when you feel it sitting flot on the os you slide it ocross the stone.<br />
stone.<br />
Loak arme aqalnll<br />
body and allde ahleel<br />
baok and forth<br />
Posiiion your fingers directly obove the bevel<br />
ond opply pressure downword os you slide the<br />
chisel bock ond forth ocross the stone.<br />
To remove the burr left ofter honing the bever,<br />
hold the bock of the chisel floi on the stone ond use<br />
light pressure os you slide it bock ond forth.<br />
35


![Til]tl](https://img.yumpu.com/45878240/1/190x245/tiltl.jpg?quality=85)


