

Elegant Entry Divider - Wood Tools
Elegant Entry Divider - Wood Tools
Elegant Entry Divider - Wood Tools

Create successful ePaper yourself
Turn your PDF publications into a flip-book with our unique Google optimized e-Paper software.
)<br />
\\<br />
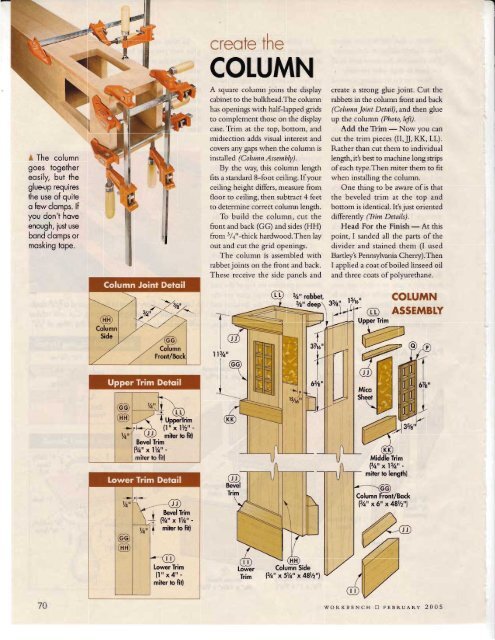
A The column<br />
goes together<br />
eosily, but the<br />
glueup requires<br />
the use of quite<br />
o few clomps. lf<br />
you don't hove<br />
enough, iust use<br />
bond clomps or<br />
mosking tope.<br />
\<br />
creote the<br />
COLUMN<br />
A square column joins the display<br />
cabinet to the bulkhead.The coiumn<br />
has openings with half-lapped grids<br />
to complement those on the display<br />
case. Tiim at the top, bottom, and<br />
midsection adds visual interest and<br />
covers any gaps when the column is<br />
installed (Column Assembly).<br />
By the way, this column length<br />
fits a standard 8-foot ceiling. Ifyour<br />
ceiling height differs, measure from<br />
floor to ceiling, then subtract 4 feet<br />
to determine correct column length.<br />
To build the column, cut the<br />
front and back (GG) and sides (HH)<br />
from 3/a"-rhick hardwood.Then lay<br />
out and cut the grid openings.<br />
The column is assembled with<br />
rabbetjoints on the front and back.<br />
These receive the side oaneis and<br />
create a strong glue joint. Cut the<br />
rabbets in the column front and back<br />
(ColumnJoint Detail), and then glue<br />
up the column (Photo, le;ft).<br />
Add the Tiim - Now you can<br />
cut the trim pieces (II,lJ, KK, LL).<br />
Rather than cut them to individual<br />
length, itb best to machine long strips<br />
of each rype.Then miter them to fit<br />
when instailing the column.<br />
One thing to be aware of is that<br />
the beveled trim at the top and<br />
bottom is identical. It's just oriented<br />
di{ferently (Tiim Detaik).<br />
Head For the Finish - At this<br />
point, I sanded all the parts of the<br />
divider and stained them (l used<br />
Bartley's Pennsylvania Cherry).Then<br />
I applied a coat ofboiled linseed oil<br />
and three coats ofpolyurethane.<br />
,2*'<br />
coruMN<br />
ASSE'VIBtY<br />
ll3/a"<br />
j Bevel Trim<br />
j Ph" xlth -<br />
('D<br />
Bevel<br />
Trim<br />
1314rt x 13h,, -<br />
miter to lengthl<br />
Column Front/Bock<br />
1t14tt x6n x 481/z"l<br />
Lower Trim<br />
(1"x4"-<br />
miter to fitl<br />
lower<br />
Trim<br />
l3/l'x5rA" x48Vz"l<br />
70<br />
woRKBENcH ft FEBRUAnv 2005


![Til]tl](https://img.yumpu.com/45878240/1/190x245/tiltl.jpg?quality=85)


