

Elegant Entry Divider - Wood Tools
Elegant Entry Divider - Wood Tools
Elegant Entry Divider - Wood Tools

You also want an ePaper? Increase the reach of your titles
YUMPU automatically turns print PDFs into web optimized ePapers that Google loves.
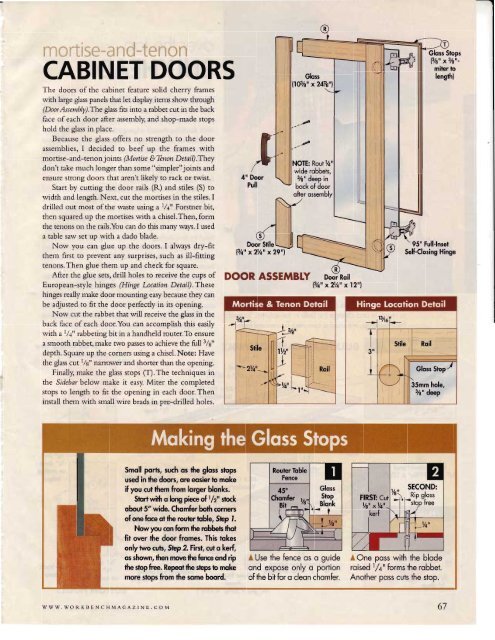
CABINET DOORS<br />
The doors of the cabinet feature solid cherry frames<br />
with large glass panels that let display items show through<br />
(DoorAssembly).The glass 6ts into a rabbet cut in the back<br />
face of each door after assembly, and shop-made stops<br />
hold the glass in place.<br />
Because the glass offers no strength to the door<br />
assemblies, I decided to beef up the frames with<br />
mortise-and-tenon joints (Mortke ETbnon Detail).They<br />
don't take much longer than some "simpler"joints and<br />
ensure strong doors that aren't likely to rack or rvvist.<br />
Start by cutting the door rails (R) and stiles (S) to<br />
width and length. Next, cut the mortises in the stiles. I<br />
drilled out most of the waste using a 1/4" Forstner bit,<br />
then squared up the mortises with a chisel.Then, form<br />
the tenons on the rails.You can do this many ways. I used<br />
a table saw set up with a dado blade.<br />
Now you can glue up the doors. I always dry-fit<br />
them first to prevent any surprises, such as ill-fitting<br />
tenons.Then glue them up and check for square.<br />
After the glue sets, dri1l holes to receive the cups of<br />
European-style hinges (Hinge Location Detail).These<br />
hinges really make door mounting easy because they can<br />
be adjusted to fit the door perfectly in its opening.<br />
Now cut the rabbet that will receive the glass in the<br />
back face of each door.You can accomplish this easily<br />
with a 1/4" rabbeting bit in a handheld router.To ensure<br />
a smooth rabbet, make rwo passes to achieve the fuIl 3/8"<br />
depth. Square up the corners using a chisel. Note: Have<br />
the glass cutl/8tt narrower and shorter than the opening.<br />
Finally, make the glass stops (T).The techniques in<br />
the Sidebar below make it easy. Miter the completed<br />
stops to length to fit the opening in each door. Then<br />
install them with small wire brads in pre-drilled holes.<br />
r t<br />
4" Door<br />
Pull<br />
Door Sfile t--<br />
1110,, a)\ft,, x29nl<br />
DOOR<br />
Ctloss<br />
(ldla" x<br />
NOTE: Rout %<br />
wide robbets,<br />
3/s" deep in<br />
bock of door<br />
ofter ossembly<br />
l3A" x2t/q" xl2"l<br />
95" Full-lnset<br />
Self-Closing Hinge<br />
Smoll ports, such os the gloss sbps<br />
used in lhe doors, ore eosier b mqke<br />
if you cut fiem from lorger blonks.<br />
Sfortwith o long piece of r/zu sbck<br />
obout 5" wide. Chqmfer both corners<br />
of one hce otthe roubr bble, Sfep l.<br />
Nowyou con form the robbas thot<br />
fit over the door fromes. Ihis tokes<br />
onfy two culs, Step 2.tirsl, cut q ke{<br />
os shown, lhen move the funce ond rip<br />
the stop free. Repeot fie sbps b moke<br />
more sfops from the some boord.<br />
I Use the fence os o guide<br />
ond expose only o portion<br />
of the bit for o cleon chomfer.<br />
-<br />
I FIRSI: Cu<br />
h" xl/l" .<br />
kerf<br />
I<br />
2<br />
SECOND:<br />
78\<br />
Rip qloss<br />
>ll


![Til]tl](https://img.yumpu.com/45878240/1/190x245/tiltl.jpg?quality=85)


