

Elegant Entry Divider - Wood Tools
Elegant Entry Divider - Wood Tools
Elegant Entry Divider - Wood Tools

Create successful ePaper yourself
Turn your PDF publications into a flip-book with our unique Google optimized e-Paper software.
-l<br />
Notice that the bottom panels<br />
(X), sides (Y), access panel (Z), and<br />
light-fixture panel (AA).<br />
Here again, you'11 need to bore<br />
holes in the bottom panels for puck<br />
lights and cut the opening that will<br />
later receive the light fixture panel<br />
(Bottom Panels, page 68).Also cut the<br />
decorative kerfs in the bottom, side,<br />
and :rccess par-rels.<br />
Now notch the corners of each<br />
divider (Notdr Detail, pagt 68).Also<br />
cut a notch for the wiring to pxss<br />
through. Thcn rabbct thc licht-flxture<br />
opening arrd panel, and notch<br />
one corner (Fixtrrrc Pattcl Dctnil).<br />
Add Edging - The br-rlkhead<br />
side and end edging (BB, CC) start<br />
out as extra-long bl:rr-rks. The<br />
Bulklrcad Edging Dctail shows that<br />
e:rcl.r piece liets two different size<br />
rabbets. One rllows the edging to fit<br />
over the top (or bottonr).The other<br />
receives the siclc pancls.Cut the rabbets<br />
as showrr in the P/roro, nqfit.<br />
In addition, each piece of side<br />
have slighrly different dirrrcnsions. edging gets rwo dadoes sized to hold<br />
This aliows the decorative ker* in all the dividers (Dado Detail, page 58).<br />
the p:rrr: to rlign rfter rssenrbly. Before moving on to assembly,<br />
Now cut the remaining pll.wood cut four bulkhead end edging pieces<br />
pieces for the bulkhead: the dividers (DD) to size as well.<br />
Access and Assembly - At the<br />
colunm end of thc bulklcad, a frarttc<br />
replaces the divider. Build the frame<br />
by curting rhe end [r;rrrrc rails (EE)<br />
and sdles (FF) to size. Glue and screw<br />
the frame together, and you're ready<br />
to assemble the bulkhead.<br />
Assembly begins with gluing the<br />
rop .rnd bot[orrr prnel edging irr<br />
place. I found it easiesto first miter<br />
the side edging to length (making<br />
sure to not cut offthe dadoed ends).<br />
Thcn nriter the end cdgirrg ro fit.<br />
ancl glue up the bulkhead top and<br />
bottonr assen-rblies.<br />
Once the glue dries, set the bulkherd<br />
top assembly on your bench<br />
with the inside face up. Glue the<br />
dividers in place.Then glue the end<br />
lranre in position on top of the end<br />
edging. Now spread glue on the<br />
exposed edges of the dividers and<br />
access fi'rne, position the bulkhead<br />
bottor.r-r asser-nbly, and clamp it tight.<br />
To wrap up bulkhead assembly,<br />
glue two pieces of bulkhead end<br />
edging to the access panel.Glue the<br />
other two to the exposed edges of<br />
the divider at the opposite end of<br />
rhe bulkhead. Mounr magnetic<br />
catches to the end frame, and screw<br />
their strike plates to the access panel.<br />
Note:You'll mount the side panels<br />
1ater, after instaliing the bulkhead.<br />
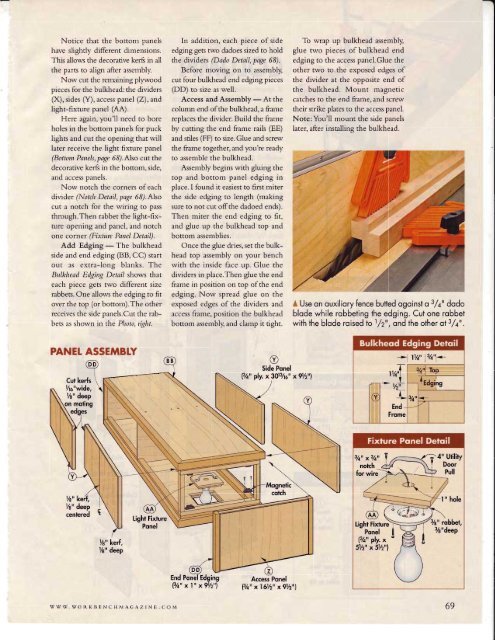
A Use on ouxiliory fence butted ogoinst o s/0" dodo<br />
blode while robbeting the edging. Cut one robbet<br />
with the blode roised Io 1/2" , ond the other ot3/a," .<br />
PANET ASSEMBTY<br />
c<br />
Side Ponel<br />
l3/a" ply. x 3013/e " x9Vz"l<br />
*l lU4u 3/4"J*<br />
l{'ker|,<br />
76" deep<br />
W WW. WOI\K I] E NCH M AGAZINE. COM 69


![Til]tl](https://img.yumpu.com/45878240/1/190x245/tiltl.jpg?quality=85)


