

Elegant Entry Divider - Wood Tools
Elegant Entry Divider - Wood Tools
Elegant Entry Divider - Wood Tools

You also want an ePaper? Increase the reach of your titles
YUMPU automatically turns print PDFs into web optimized ePapers that Google loves.
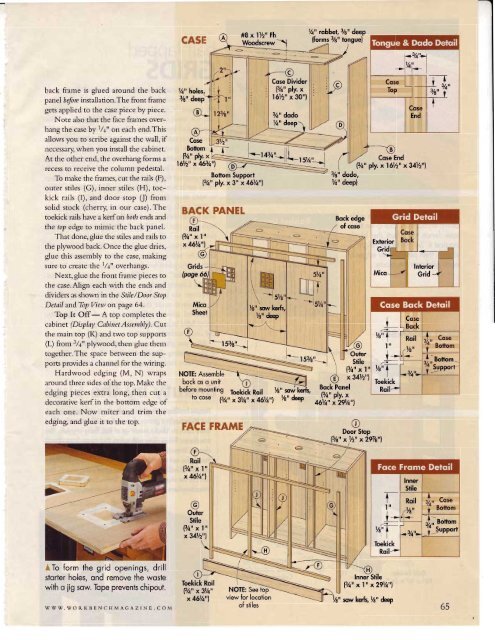
CASE<br />
#8 x l7z" Fh<br />
<strong>Wood</strong>screwJ<br />
back frame is glued around the back<br />
panel beJore installation.The front frame<br />
gets applied to the case piece by piece.<br />
Note also that the face frames overhang<br />
the case by t/q" on each end.This<br />
allows you to sclibe against the wall, if<br />
necessary, when you install the cabinet.<br />
At the other end, the overhang forms a<br />
recess to receive the column pedestal.<br />
To nrake tl.re franres, cut the rails (F),<br />
outer stiles (Ci), inner stiles (H), toekick<br />
r:rils (l), and door stop (J) from<br />
solid stock (cl.rerry, in oul case). The<br />
toekick rails have a kerf on borlr ends and<br />
the top edge to ntiniic the back pane1.<br />
That dorre, glue thc stiles and rails to<br />
the p11'wood back. Or-rce the glue dries,<br />
glue this asser-nbly to the case, ntaking<br />
sllre to create the I/.+" overhangs.<br />
Next, glue the fi'ont fi'anre pieces to<br />
the case.Alien each with the ends and<br />
dividers as shown in the Sti/c,/Door Stop<br />
l)ctail and7bp Vicrl on pase 64.<br />
Top It Off-<br />
A rop conrpletes the<br />
cabirret (Display Cabirtet Assanbly). Cur<br />
thc nrain top (K) and two top slrpports<br />
(L) fi'onr 3/a" plywood, then slue then'r<br />
tosether. Thc space between the supports<br />
provides a channel for tl.re wiring.<br />
Hardwoocl ec'lging (M, N) wraps<br />
arouncl three sides of the top. Make the<br />
edging pieccs exrra long. rherr cut r<br />
decorative kerfin the bottorn edge of<br />
each one. Now nriter and trim the<br />
edging, and elue it to the top.<br />
holes,<br />
deep<br />
Cose<br />
Boilbm<br />
P/a" ply, x<br />
l6Vz" x 46h"1<br />
Bottrom Support<br />
(3/a" ply. x 3" x 46VN'l<br />
BACK PANET<br />
(F)-t.-..--<br />
\<br />
R;I<br />
(32" x Iu<br />
x 46Vl'l<br />
Grids<br />
Po:1<br />
NOTE: Assemble<br />
bock os o unit<br />
before mounting foekfl noil<br />
To cose (3A,' x 3r/q', x 46ll'l<br />
FACE FRAME<br />
Cose <strong>Divider</strong><br />
l3/q" ply. x<br />
1672" x 30"|<br />
32" dodo<br />
7a" deep<br />
"]r -*lF+--<br />
7e" sow ke<br />
7e" &ep<br />
Sy4"<br />
[-llr<br />
-lctz,,<br />
nl<br />
Cose End<br />
(3A" ply. x l6Vz" x34Vz"l<br />
3/e" dodo,<br />
%" deep)<br />
Bock edge<br />
of cose<br />
l3/t" ply.x<br />
46Vt" x29Vq"l<br />
Outer<br />
Srile<br />
l3/l' x I<br />
x<br />
t_<br />
l/e'I<br />
e<br />
Door Sfrop<br />
l3/s" xY2" x297/s"l<br />
lu<br />
l+<br />
l(4'+<br />
Toekick<br />
Roil'<br />
Roil<br />
l3h" x 1"<br />
x461A"1<br />
@<br />
Outer<br />
Stile<br />
13/4t'x I tr<br />
x34Vz"l<br />
T<br />
lu<br />
)=<br />
vs"<br />
I<br />
Ioekick<br />
Roil+<br />
Jisotiot<br />
i" Support<br />
*To form the grid openings, drill<br />
storter holes, ond remove the woste<br />
with o iig sow. Tope prevents chipout.<br />
WWW. )VORKBENCHMAGAZINE. COM<br />
Toekick Roil<br />
l3h x3t/n"<br />
x46h"l<br />
NOTE: See too--<br />
7e" sow ker6,7e" deep<br />
65


![Til]tl](https://img.yumpu.com/45878240/1/190x245/tiltl.jpg?quality=85)


