


You also want an ePaper? Increase the reach of your titles
YUMPU automatically turns print PDFs into web optimized ePapers that Google loves.
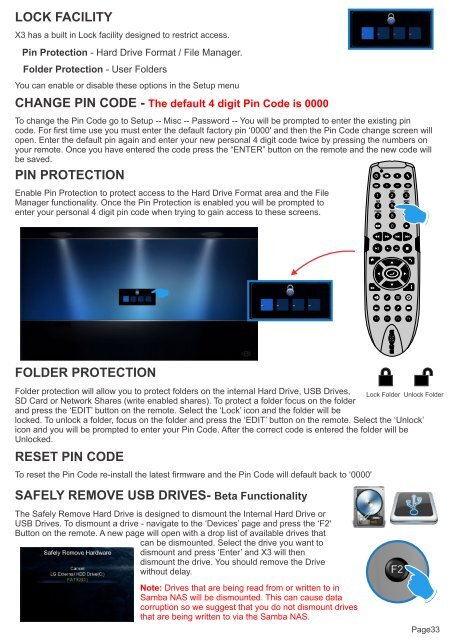
LOCK FACILITY<br />
X3 has a built in Lock facility designed to restrict access.<br />
Pin Protection - Hard Drive Format / File Manager.<br />
Folder Protection - <strong>User</strong> Folders<br />
You can enable or disable these options in the Setup menu<br />
CHANGE PIN CODE - The default 4 digit Pin Code is 0000<br />
To change the Pin Code go to Setup -- Misc -- Password -- You will be prompted to enter the existing pin<br />
code. For first time use you must enter the default factory pin ‘0000' and then the Pin Code change screen will<br />
open. Enter the default pin again and enter your new personal 4 digit code twice by pressing the numbers on<br />
your remote. Once you have entered the code press the “ENTER” button on the remote and the new code will<br />
be saved.<br />
PIN PROTECTION<br />
Enable Pin Protection to protect access to the Hard Drive Format area and the File<br />
Manager functionality. Once the Pin Protection is enabled you will be prompted to<br />
enter your personal 4 digit pin code when trying to gain access to these screens.<br />
θ<br />
FOLDER PROTECTION<br />
Folder protection will allow you to protect folders on the internal Hard Drive, USB Drives, Lock Folder Unlock Folder<br />
SD Card or Network Shares (write enabled shares). To protect a folder focus on the folder<br />
and press the ‘EDIT’ button on the remote. Select the ‘Lock’ icon and the folder will be<br />
locked. To unlock a folder, focus on the folder and press the ‘EDIT’ button on the remote. Select the ‘Unlock’<br />
icon and you will be prompted to enter your Pin Code. After the correct code is entered the folder will be<br />
Unlocked.<br />
RESET PIN CODE<br />
To reset the Pin Code re-install the latest firmware and the Pin Code will default back to ‘0000'<br />
SAFELY REMOVE USB DRIVES- Beta Functionality<br />
The Safely Remove Hard Drive is designed to dismount the Internal Hard Drive or<br />
USB Drives. To dismount a drive - navigate to the ‘Devices’ page and press the ‘F2'<br />
Button on the remote. A new page will open with a drop list of available drives that<br />
can be dismounted. Select the drive you want to<br />
dismount and press ‘Enter’ and X3 will then<br />
dismount the drive. You should remove the Drive<br />
without delay.<br />
Note: Drives that are being read from or written to in<br />
Samba NAS will be dismounted. This can cause data<br />
corruption so we suggest that you do not dismount drives<br />
that are being written to via the Samba NAS.<br />
Page33


![Review [Media Center]: Mede8er MED500X (+ video)](https://img.yumpu.com/3934389/1/184x260/review-media-center-mede8er-med500x-video.jpg?quality=85)