Manual for TUTA B2
Manual for TUTA B2
Manual for TUTA B2

Create successful ePaper yourself
Turn your PDF publications into a flip-book with our unique Google optimized e-Paper software.
<strong>TUTA</strong> Series<br />
GSM REMOTE CAMERA<br />
User <strong>Manual</strong><br />
<strong>Manual</strong> version 2.4
<strong>TUTA</strong>-<strong>B2</strong> GSM REMOTE CAMERA USER MANUAL<br />
<strong>TUTA</strong> Series GSM Remote Camera<br />
Thank you <strong>for</strong> purchasing the <strong>TUTA</strong> camera. This camera is a remote controlled<br />
image-capturing device consisting of a microphone, infrared lights and a high quality<br />
300,000-pixel camera lens. The <strong>TUTA</strong> camera can capture images according to a preprogrammed<br />
remote command and then send it to your multimedia messaging<br />
(MMS) enabled mobile phone with color display, or to an e-mail address. You can<br />
control and change the camera settings via SMS command.<br />
The MMS sent by the <strong>TUTA</strong> camera can be viewed by using your mobile phone. You<br />
also can opt to view a slide of consecutive photos taken by the GSM Remote<br />
camera.<br />
The built-in high-light infrared LED’s allows the camera to capture clear images, even<br />
in dark environment.<br />
The <strong>TUTA</strong> camera is compatible with standard 433MHz wireless sensors such as<br />
PIR-, door magnet- and smoking sensors.<br />
As soon as the wireless sensor triggers the camera alarm, you or your families<br />
and/or your guards can thus receive the alarm message via SMS, MMS or standard<br />
calls, according to the pre-programmed.<br />
However, the camera can per<strong>for</strong>m its duty well without any wireless sensor too. The<br />
<strong>TUTA</strong> has a motion detective function and an integrated infrared body detector. It will<br />
there<strong>for</strong>e detect any unauthorized entry into your house and notify you via SMS,<br />
MMS, standard calls or E-mail.<br />
All services and functions need to be supported by the GSM network and a SIM<br />
card.<br />
This brochure suits <strong>for</strong> <strong>TUTA</strong>-<strong>B2</strong> model.<br />
Details of the functioning and advanced operation of this camera are described in<br />
this instruction manual.<br />
2
<strong>TUTA</strong>-<strong>B2</strong> GSM REMOTE CAMERA USER MANUAL<br />
CONTENTS<br />
For your safety ..........................................................................................................................................6<br />
Exception clause ........................................................................................................................................6<br />
Chapter 1 Features and accessories ...................................................................................................................7<br />
1.1 Main function ......................................................................................................................................7<br />
1.2 Package contents .................................................................................................................................8<br />
1.3 Products features .................................................................................................................................8<br />
<strong>TUTA</strong>-<strong>B2</strong> mounting bracket ............................................................................................................................9<br />
1.4 Remote control Instruction ..................................................................................................................9<br />
1.5 Light indicator ..................................................................................................................................10<br />
Chapter 2 Installation ......................................................................................................................................11<br />
2.1 Install the SIM card ...........................................................................................................................11<br />
2.2 Install the host mounting bracket ......................................................................................................11<br />
2.3 Connecting to power adapter ............................................................................................................12<br />
2.4 Mount the <strong>TUTA</strong> camera ..................................................................................................................12<br />
2.5 Power on/ off .....................................................................................................................................12<br />
Chapter 3 Define the user ................................................................................................................................13<br />
3.1 User authorization level ....................................................................................................................13<br />
3.2 Define Master user to start the camera .............................................................................................14<br />
3.2.1 Add a master number to the camera .......................................................................................14<br />
3.2.2 Change the master number .....................................................................................................15<br />
3.2.3 Change password ...................................................................................................................15<br />
3.3 Define family user .............................................................................................................................16<br />
3.3.1 Add a family number .............................................................................................................16<br />
3.3.2 Check family user’s number ..................................................................................................16<br />
3.3.3 Delete family number ............................................................................................................16<br />
3.4 Define Guest user ..............................................................................................................................17<br />
3.5 Define emergency number ................................................................................................................17<br />
3.5.1 Add emergency number .........................................................................................................17<br />
3.5.2 Delete emergency number .....................................................................................................18<br />
3.5.3 Check emergency number ......................................................................................................18<br />
Chapter 4 Basic use and settings .....................................................................................................................18<br />
4.1 Network parameter settings ..............................................................................................................18<br />
4.2 Capture images ..................................................................................................................................19<br />
4.2.1 Capture one image and send to the user mobile ....................................................................20<br />
4.2.2 Capture images and send to the user’s mobile .......................................................................20<br />
4.2.3 Capture images and send to user’s E-mail address ................................................................21<br />
4.2.4 Capture images and send to an appointed mobile or E-mail address ....................................21<br />
4.3 E-mail settings ...................................................................................................................................22<br />
4.3.1 Add/ modify an E-mail address ........................................................................................... 22<br />
4.3.2 Delete all E-mail address(es) .................................................................................................23<br />
3
<strong>TUTA</strong>-<strong>B2</strong> GSM REMOTE CAMERA USER MANUAL<br />
4.4 Timing send images to mobile ..........................................................................................................23<br />
4.4.1 Enable timing sends MMS images ........................................................................................23<br />
4.4.2 Set time period to send MMS images ....................................................................................23<br />
4.4.3 Disable timing send MMS image ..........................................................................................24<br />
4.5 Remote control ..................................................................................................................................25<br />
4.5.1 Add remote control(s) to the camera ......................................................................................25<br />
4.5.2 Remote control instruction .....................................................................................................25<br />
4.5.3 Arming or disarming SMS notification ................................................................................. 26<br />
4.5.4 Remove remote control from the camera .............................................................................. 26<br />
4.6 Emergency Alarms ............................................................................................................................27<br />
4.7 Listen in live voice ............................................................................................................................27<br />
4.7.1 Call the camera to listen in .....................................................................................................27<br />
4.7.2 Listening in upon emergency alarm .......................................................................................28<br />
4.7.3 Listening in upon automatically alarm ..................................................................................28<br />
4.8 Infrared body detector .......................................................................................................................28<br />
4.9 Motion detection ...............................................................................................................................29<br />
4.9.1 Activate/Deactivate motion detection ....................................................................................30<br />
4.9.2 Send five Images upon motion detection alarm .................................................................... 30<br />
4.10 Wireless sensor(s) ............................................................................................................................30<br />
4.10.1 Add a wireless sensor and set corresponding alarm mode .................................................. 31<br />
4.10.2 Remove wireless sensor .......................................................................................................32<br />
4.11 Arming or disarming <strong>TUTA</strong> camera manually ............................................................................... 33<br />
4.11.1 Arming <strong>TUTA</strong> camera manually ..........................................................................................33<br />
4.11.2 Default arming mode ............................................................................................................33<br />
4.11.3 Disarming <strong>TUTA</strong> camera manually .....................................................................................34<br />
4.12 Timed arming the camera ................................................................................................................34<br />
4.12.1 Enable timing arms the camera ............................................................................................34<br />
4.12.2 Set time period to arm the camera .......................................................................................35<br />
4.12.3 Disable timing arm the camera ............................................................................................35<br />
4.13 Auto-disarming the camera .............................................................................................................36<br />
4.13.1 Activate auto-disarming the camera .................................................................................... 36<br />
4.13.2 Disable the function of auto-disarming <strong>TUTA</strong> camera (default).........................................36<br />
4.14 Camera language setting .................................................................................................................37<br />
4.15 Check status ....................................................................................................................................37<br />
4.16 Getting help .....................................................................................................................................38<br />
4.17 Resetting the camera .......................................................................................................................38<br />
Chapter 5 Advanced settings ...........................................................................................................................39<br />
5.1 Image settings ....................................................................................................................................39<br />
5.1.1 Image size ...............................................................................................................................39<br />
5.1.2 Image quantity ........................................................................................................................39<br />
5.1.3 Image interval ........................................................................................................................40<br />
5.2 Automatic alarm settings ...................................................................................................................40<br />
5.2.1 Warning tone upon alarm triggering ......................................................................................40<br />
5.2.2 No warning tone upon alarm (Default)..................................................................................41<br />
5.2.3 No SMS notification upon alarm ...........................................................................................41<br />
4
<strong>TUTA</strong>-<strong>B2</strong> GSM REMOTE CAMERA USER MANUAL<br />
5.2.4 SMS notification upon alarm (Default).................................................................................41<br />
5.2.5 No MMS notification upon alarm ........................................................................................41<br />
5.2.6 MMS notification upon alarm (Default) ..............................................................................41<br />
5.2.7 No call notification upon alarm (Default)............................................................................. 42<br />
5.2.8 Call notification upon alarm ...............................................................................................42<br />
5.2.9 No MMS notification to pre-set E-mail address (Default)....................................................42<br />
5.2.10 MMS notification to pre-set E-mail address ........................................................................42<br />
5.3 Turn on/off LED indicator on the camera .........................................................................................43<br />
5.4 SMS notification upon the power supply changing .........................................................................43<br />
Chapter 6 Maintenance ...................................................................................................................................43<br />
Chapter 7 General Troubleshooting ................................................................................................................45<br />
Chapter 8 Main technical parameters ..............................................................................................................45<br />
Appendix: SMS commands list .......................................................................................................................46<br />
5
<strong>TUTA</strong>-<strong>B2</strong> GSM REMOTE CAMERA USER MANUAL<br />
1. Purchase a GSM SIM card (mobile phone card) from GSM network<br />
service and install it in the camera. This SIM card number is referred<br />
as <strong>TUTA</strong> camera number on this brochure.<br />
2. The user needs to activate the MMS function and Caller ID Presentation<br />
function of SIM card, and deactivate PIN code of the SIM. Contact with<br />
GSM network service <strong>for</strong> support.<br />
3. Change the original password at the beginning use. Be sure to keep the<br />
password and SIM card number secret. Do not disclose this in<strong>for</strong>mation<br />
to anyone other than the authorized users in order to ensure your<br />
safety.<br />
For your safety<br />
λ<br />
λ<br />
λ<br />
λ<br />
λ<br />
This product is a wireless signal transmission device. Keep it away from<br />
electronic equipment likely to interfere with the wireless signals, in order to<br />
avoid signals interference.<br />
Switch off your <strong>TUTA</strong> and mobile phone when entering areas marked<br />
"Explosive", "Might explode", "Closed wireless transceiver devices" etc.<br />
Do not cast this product in a fire, as this may cause the battery to explode.<br />
This product should only be operated from power approved by the product<br />
manufacturer. The use of any other types of power may damage the product.<br />
Keep the product and its accessories out of the children reach.<br />
Exception clause<br />
1. We operate on a policy of continuous development. We reserve the right to<br />
make changes and improvements to any of the products described in this<br />
document without prior notice.<br />
2. For the latest product in<strong>for</strong>mation, please visit: http://www.i-tuta.com. We don’t<br />
guarantee <strong>for</strong> the document veracity, reliability or any content except regulate in<br />
proper laws. Including no guarantee <strong>for</strong> product suitable market or suitable area<br />
promise.<br />
3. Use only this product according to the law. Respect one another’s privacy.<br />
Neither monitor another’s home nor private. We hold no responsibility <strong>for</strong> the<br />
6
<strong>TUTA</strong>-<strong>B2</strong> GSM REMOTE CAMERA USER MANUAL<br />
illegal use of this product.<br />
4. We hold no responsibility <strong>for</strong> any loss of data or income; or any special,<br />
incidental, consequential or indirect damages howsoever caused.<br />
5. The contents of this document are provided “as is”. Except as required by<br />
applicable law, no warranties of any kind, either expressed or implied, including,<br />
but not limited to the accuracy, reliability or contents of this document. We<br />
reserve the right to revise this document or withdraw it at any time without prior<br />
notice.<br />
Chapter 1 Features and accessories<br />
1.1 Main function<br />
λ This product uses a GSM SIM card. It can send multimedia messaging<br />
(MMS) images to MMS enabled mobile phones with color display or to an E-<br />
mail address.<br />
λ Remote control: Control and configure the camera with short messages<br />
(SMS) commands from a mobile phone.<br />
λ Real time audio: call the camera number (SIM card) to listen in live voice.<br />
λ Motion detection: Detect and notify authorized users of any motion in the<br />
monitoring area(s).<br />
λ Integrated infrared body detector.<br />
λ Sensor detection: Allowed to load up to 15 sensors such as door magnet<br />
sensors, infrared body sensors, smoke sensors, gas sensors etc. Any<br />
activated sensor will notify the authorized users via SMS.<br />
λ Infrared light: The built-in high-light infrared LED’s allows the camera to<br />
capture clear images, even in dark environments or areas with insufficient<br />
lighting.<br />
λ High quality camera: 300,000 pixel CMOS camera in order to obtain a clear<br />
image via MMS.<br />
λ Send images to mobile: The camera will send MMS images to your mobile.<br />
There<strong>for</strong>e you can check on the monitored areas at any time and anywhere<br />
GSM/GPRS network coverage and MMS service coverage.<br />
λ Send images to E-mail: The camera can send images to preset available E-<br />
mail address.<br />
λ Multi-mode alarm: The camera can send alarm messages via SMS, MMS, E-<br />
mail or standard phone call.<br />
7
<strong>TUTA</strong>-<strong>B2</strong> GSM REMOTE CAMERA USER MANUAL<br />
λ<br />
λ<br />
λ<br />
λ<br />
λ<br />
Fixed time monitor: The monitoring schedule can be set with multiple time<br />
intervals.<br />
Easy installation: Wireless connection. The camera can be installed at any<br />
place required by the authorized user.<br />
Accessories: Includes 2 remote controls each consisting of a panic button as<br />
well as buttons to arm or disarm the camera.<br />
Built-in lithium battery: Rechargeable battery ensures operation of <strong>TUTA</strong><br />
camera amid external power failures.<br />
Downloadable user manual: This manual can be downloaded at any time via<br />
SMS command.<br />
1.2 Package contents<br />
1. Remote camera 1 unit<br />
2. Power adapter(5.5V/2A) 1 unit<br />
3. Remote control 2 units<br />
4. User manual 1 unit<br />
5. Mounting bracket 1 set<br />
1.3 Products features<br />
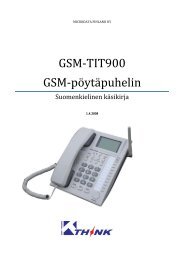
Figure 1: <strong>TUTA</strong> camera instructions<br />
1. Power switch 8. Set key<br />
2. Infrared body detector 9. Mini USB(rubber cover)<br />
3. Indicator 10. Hanging hole 1<br />
8
<strong>TUTA</strong>-<strong>B2</strong> GSM REMOTE CAMERA USER MANUAL<br />
4.Camera<br />
11. Power Interface<br />
5. Infrared lights(12 pcs) 12. Back board (SIM card slot inside)<br />
6. Mirror and Microphone 13. Hanging hole 2<br />
7. Reset key<br />
Tip: Keep the camera lens clean to insure best imaging quality.<br />
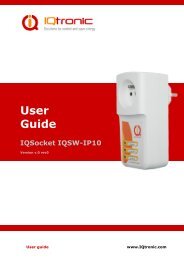
<strong>TUTA</strong>-<strong>B2</strong> mounting bracket<br />
1.4 Remote control Instruction<br />
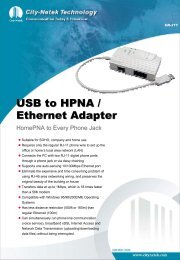
Figure 2: Remote control Instruction<br />
1. Disarm the camera button 3. Arm the camera button<br />
9
<strong>TUTA</strong>-<strong>B2</strong> GSM REMOTE CAMERA USER MANUAL<br />
2. Remote control indicator 4. Emergency button<br />
Battery: There is battery holder on the rear of the remote control. It needs one 3.0Voltage<br />
CR2032 battery. When this battery is running out of power, <strong>TUTA</strong> camera will emit “Beep, beep”<br />
warning tone and then send a SMS notification message to Master user.<br />
1.5 Light indicator<br />
Color Action Status<br />
Red Flash slowly Searching the network.<br />
Flash quickly<br />
Constant Light<br />
Sensor alarm, motion detection alarm, infrared body<br />
detector alarm.<br />
Not installed SIM card, or the remote camera damaged.<br />
Green Constant Light Armed status.<br />
Flash slowly Disarmed status.<br />
Flash quickly Processing data.<br />
Light 2 seconds Successfully reset factory setting, or loading sensor.<br />
Orange Flash Loading remote control status.<br />
Red and Two color lights Loading sensor<br />
Green alternately<br />
Note: Slow flash 1 time per second, quick flash 2 times per second.<br />
10
<strong>TUTA</strong>-<strong>B2</strong> GSM REMOTE CAMERA USER MANUAL<br />
Chapter 2 Installation<br />
2.1 Install the SIM card<br />
• Remove the back board from the rare of <strong>TUTA</strong> camera.<br />
• Insert the SIM card into the slot.<br />
• Get back the back board of <strong>TUTA</strong> camera.<br />
2.2 Install the host mounting bracket<br />
11
<strong>TUTA</strong>-<strong>B2</strong> GSM REMOTE CAMERA USER MANUAL<br />
2.3 Connecting to power adapter<br />
• Connect the adapter to an AC power, and connect the plug to the power<br />
interface of the <strong>TUTA</strong> camera .(See Figure 1 <strong>TUTA</strong> camera Instruction)<br />
• This camera has a built-in rechargeable Lithium battery.<br />
• The camera will notify the user when the power changes. For example, if the<br />
power adapter is disconnected or failure of the AC power occurs, <strong>TUTA</strong><br />
camera will notify the user “External power cut. The device is operating on<br />
battery.”<br />
• If <strong>TUTA</strong> camera is again connected to the external power, or the AC power is<br />
available again, the notification will be sent to the user, i.e.” The device is now<br />
resuming the use of external power source.”<br />
• Low battery: The configure setting can not be saved when <strong>TUTA</strong> camera is<br />
operating on low battery.<br />
2.4 Mount the <strong>TUTA</strong> camera<br />
<strong>TUTA</strong> camera can be mounted on a wall (vertically with the screws) or put down on<br />
any suitable horizontal surface.<br />
How to choose the Installing place:<br />
λ In order to capture better image quality, avoid any areas where bright light<br />
will be irradiated directly into the lens of the camera on the camera.<br />
λ In order to avoid backlighting photography, it is suggested that the camera is<br />
located at the place where can look down the monitoring place with the<br />
minimum angel 30°.<br />
λ The GSM network’s signal strength may affect the image, live voice quality<br />
and MMS transmission speed. There<strong>for</strong>e, upon installation, the user should<br />
ensure that <strong>TUTA</strong> camera is located in an area with a strong network signal.<br />
λ After installation, the user should per<strong>for</strong>m a test-run by taking several images<br />
and sending it to the user’s mobile phone. This allows the user to check the<br />
image quality of the camera. The position of <strong>TUTA</strong> camera can then be<br />
adjusted until a satisfactory image quality level is reached.<br />
2.5 Power on/ off<br />
Power on:<br />
Operation Indicator light Status<br />
Turn the power Red light is on <strong>for</strong> 3-5 seconds.<br />
12
switch to “On”<br />
position.<br />
Power off:<br />
<strong>TUTA</strong>-<strong>B2</strong> GSM REMOTE CAMERA USER MANUAL<br />
Red light flashing slowly <strong>for</strong><br />
about 35 seconds.<br />
A “Beep…” tone will be heard.<br />
Green light flash slowly, or<br />
green light be on constantly.<br />
Turn the power switch to downside “Off” position.<br />
<strong>TUTA</strong> camera is<br />
disarmed, or armed.<br />
Chapter 3 Define the user<br />
3.1 User authorization level<br />
There are three levels, each with a different authorization level, namely Master,<br />
Families and Guest.<br />
Table 3.1 the difference in authority <strong>for</strong> Master, Families and Guests users:<br />
User Type Master Families Guests<br />
Functions<br />
Change authority, password YES NO NO<br />
Automatic<br />
Alarm<br />
Receive SMS YES NO NO<br />
Receive MMS YES NO NO<br />
Receive alarm calling YES YES NO<br />
Get images by E-mail YES NO NO<br />
Emergency<br />
alarm<br />
Receive SMS YES NO NO<br />
Receive MMS YES NO NO<br />
Receive emergency calling YES YES (Only emergency number)<br />
Call the camera to listen in live voice YES YES NO<br />
Get work status, images, help and<br />
instruction by sending SMS command<br />
YES YES YES(Password)<br />
Get images by E-mail YES YES NO<br />
Set remote camera by SMS command YES YES NO<br />
Add, modify or delete sensor YES YES NO<br />
Camera language setting YES NO NO<br />
Set infrared body detect function YES YES NO<br />
<br />
Note<br />
13
<strong>TUTA</strong>-<strong>B2</strong> GSM REMOTE CAMERA USER MANUAL<br />
• Any MMS enabled mobile phone can receive the images captured by <strong>TUTA</strong><br />
camera by sending SMS command with password.<br />
• Any SMS enabled mobile phone can control <strong>TUTA</strong> camera with the password<br />
command.<br />
All the settings of <strong>TUTA</strong> camera can be set or adjusted via a SMS command.<br />
About the SMS Command:<br />
1) Master and families users’ SMS command <strong>for</strong>mat: #code#content#.<br />
2) Guest users’ SMS command <strong>for</strong>mat: #code#password#content#.<br />
3) The password must be a four-digit number.<br />
4) The original password is 1234.<br />
5) The maximum digits that are allows <strong>for</strong> the phone number is sixteen.<br />
6) <strong>TUTA</strong> camera will reply to the user after it receives the SMS command.<br />
<br />
Note<br />
• The “#” symbol must not be ignored when typing an SMS command.<br />
• No allow any space within the commands.<br />
3.2 Define Master user to start the camera<br />
In order to enable all the functions on the camera, the Master user must store his/<br />
her mobile number in the camera’s memory. Only one Master’s mobile number<br />
(Master number) is allowed <strong>for</strong> a camera.<br />
3.2.1 Add a master number to the camera<br />
Authority: Master user.<br />
<br />
Description<br />
If <strong>TUTA</strong> camera is being used <strong>for</strong> the first time, or <strong>TUTA</strong> camera has been reset,<br />
the master user’s number must be programmed into the camera, in order to<br />
ensure activation. The following methods can be used:<br />
Method<br />
The user must edit and send the following SMS to camera via his/her mobile<br />
phone (the phone number will be the Master number) in order to:<br />
Add a master number to the camera: #00# (1)<br />
14
<strong>TUTA</strong>-<strong>B2</strong> GSM REMOTE CAMERA USER MANUAL<br />
Successful SMS reply<br />
Welcome to the GSM Remote Camera. Your password is 1234.<br />
<br />
Failed SMS reply<br />
If a user tries to activate <strong>TUTA</strong> camera again, by using method 1, <strong>TUTA</strong> camera<br />
will hung up the call. No notification message (via SMS) will be sent to the user.<br />
By using method 2, <strong>TUTA</strong> camera will send a notification via SMS stating<br />
“Master user already exists.”<br />
3.2.2 Change the master number<br />
Authority: Master user<br />
Method<br />
The user sends following SMS message in order to:<br />
Change the master user’s number: #14#NewMasterNumber# (2)<br />
Successful SMS reply<br />
New master number is *********.<br />
Then the old master user’s number will not be able to control <strong>TUTA</strong> camera<br />
anymore.<br />
3.2.3 Change password<br />
Authority: Master user.<br />
<br />
Description<br />
In order to ensure your privacy and safety during the use of this camera, change<br />
the password once <strong>TUTA</strong> camera is being used.<br />
Method<br />
The user sends following SMS message in order to:<br />
Change the password: #04#oldpassword#newpassword# (3)<br />
• The password is a four digit number.<br />
• The original password is 1234.<br />
Successful SMS reply<br />
The password has been successfully changed to ****.<br />
15
<strong>TUTA</strong>-<strong>B2</strong> GSM REMOTE CAMERA USER MANUAL<br />
<br />
Failed SMS reply<br />
If a user, other than the master user, attempts to change the password, a<br />
notification message will be sent via SMS: “Sorry, you are not authorized to use<br />
this command.”<br />
3.3 Define family user<br />
Family users have the authority to listen in on the camera, receive images, load the<br />
sensors and remote controls to the camera, and receive notification when motion<br />
detection activated. The family user’s mobile numbers are set by the Master user.<br />
The family users should remember and safeguard the camera’s SIM number.<br />
3.3.1 Add a family number<br />
Authority: Master user.<br />
Method<br />
The user sends following SMS message in order to:<br />
Add a family number: #06#FamilyNumber# (4)<br />
Add several family numbers: #06#FamilyNumber#...#FamilyNumber# (5)<br />
• Up to 10 family users’ number can be stored on one camera.<br />
Successful SMS reply<br />
The family number has been added successfully.<br />
3.3.2 Check family user’s number<br />
Refer to Chapter 4.15 Check status.<br />
3.3.3 Delete family number<br />
Authority: Master user.<br />
Method<br />
The user sends following SMS message in order to:<br />
Delete a family number: #113#FamilyNumber# (6)<br />
Delete several family numbers simultaneously: (7)<br />
#113#FamilyNumber#…#FamilyNumber#<br />
16
<strong>TUTA</strong>-<strong>B2</strong> GSM REMOTE CAMERA USER MANUAL<br />
Delete all family numbers: #113# (8)<br />
Successful SMS reply<br />
Family number deleted successfully.<br />
<br />
Failed SMS reply<br />
Failed to delete family number.<br />
3.4 Define Guest user<br />
Any selected person can operate in the Guest category if they know the password<br />
and the SIM number. The Guest user(s) can then use their mobile phones to send a<br />
SMS command including password to <strong>TUTA</strong> camera in order to obtain an MMS<br />
image.<br />
3.5 Define emergency number<br />
The Emergency Number is the phone numbers which <strong>TUTA</strong> camera will dial when<br />
the emergency button of the remote control is pressed. Emergency numbers could<br />
be the telephone numbers of guards, family numbers, police etc.<br />
3.5.1 Add emergency number<br />
Authority: Master user.<br />
<br />
Description<br />
• The master user’s number default to be emergency number.<br />
• When the Emergency button is pressed, <strong>TUTA</strong> camera will automatically dial<br />
the Master user’s number, followed by the other pre-set emergency numbers<br />
(the default mode is dial phone mode).<br />
• Each camera can have up to 9 emergency numbers. (Not including the<br />
Master user’s number).<br />
Method<br />
The user sends following SMS message in order to:<br />
Add single emergency number on the camera: (9)<br />
#106#EmergencyNumber#<br />
Add several emergency numbers on the camera: (10)<br />
#106#EmergencyNumber#…#EmergencyNumber#<br />
17
<strong>TUTA</strong>-<strong>B2</strong> GSM REMOTE CAMERA USER MANUAL<br />
• The EmergencyNumber is the phone numbers.<br />
• Up to 9 emergency numbers can be stored on one camera.<br />
Successful SMS reply<br />
Added emergency number successfully.<br />
<br />
Failed SMS reply<br />
• If 9 emergency numbers (the maximum amount per camera) are used on<br />
<strong>TUTA</strong> camera and the master user attempts to add another one, the following<br />
notification message will be sent via SMS: “The Emergency numbers are full.<br />
Please delete old numbers.”<br />
• If an existing number is being added again, the following notification message<br />
will be sent via SMS: “Emergency number already exist.”<br />
3.5.2 Delete emergency number<br />
Authority: Master user.<br />
Method<br />
The user sends following SMS message in order to:<br />
Delete an emergency number: (11)<br />
#107#EmergencyNumber#<br />
Delete several emergency numbers: (12)<br />
#107#EmergencyNumber#…#EmergencyNumber#<br />
Delete all emergency numbers: #107# (13)<br />
Successful SMS reply<br />
Emergency number successfully deleted.<br />
3.5.3 Check emergency number<br />
Refer to Chapter 4.15 Check status.<br />
Chapter 4 Basic use and settings<br />
4.1 Network parameter settings<br />
Authority: Master user.<br />
18
<strong>TUTA</strong>-<strong>B2</strong> GSM REMOTE CAMERA USER MANUAL<br />
<br />
Note<br />
In general, the user does not need to set the network parameter be<strong>for</strong>e use. The<br />
correct parameters have been set by the manufacturers according to every<br />
country’s respective GSM provider.<br />
<br />
Description<br />
If <strong>TUTA</strong> camera is unable to send MMS messages continually, The GSM<br />
provider’s MMS parameter must be added onto the camera. After successful<br />
settings, the camera will automatically choose WAP or HTTP to send MMS<br />
message.<br />
Method<br />
The user sends following SMS message in order to:<br />
Set MMS center: #124#MMScenter# (14)<br />
• The MMScenter should be the MMS center address of GSM provider. For<br />
example: #124#http://mmsc.monternet.com#<br />
Set APN parameters: (15)<br />
#125#GatewayIP#WAPGatewayPort#<br />
HTTPGatewayPort#APN#APNusername#APNpassword#<br />
For example: #125#10.0.0.172#9201#80#cmwap#wap#wap#<br />
After the settings of command 14 and 15, if <strong>TUTA</strong> camera is unable to send MMS<br />
messages continually, it means the MMS parameters on command 14 or 15 is<br />
incorrect. Command 16 can be used to remove the operative network parameters<br />
and then <strong>TUTA</strong> camera can auto-choose available parameters from its memory.<br />
Command 17 can be used to check the operative network parameter settings.<br />
Remove the operative network parameters and then auto-choose new<br />
parameters from memory: #54# (16)<br />
Check the operative network parameter settings: #55# (17)<br />
Successful SMS reply<br />
PAR:*********************.<br />
4.2 Capture images<br />
Authority:<br />
Master/ family / guest send SMS to the camera to get the MMS image or send the<br />
image(s) to an appointed mobile or E-mail address.<br />
19
<strong>TUTA</strong>-<strong>B2</strong> GSM REMOTE CAMERA USER MANUAL<br />
Master/ family member call the camera to get the images.<br />
Master/ family send SMS command to the camera to send MMS image to an E-mail<br />
address (Need to pre-set E-mail address).<br />
4.2.1 Capture one image and send to the user mobile<br />
Authority: Master, family and guest users.<br />
Method<br />
Method 1:<br />
• Master or family user calls the camera and hand up upon hearing the ringing<br />
tone (within 5 seconds).<br />
• <strong>TUTA</strong> camera will reply SMS notification: “Image capturing request received.<br />
The camera is busy sending the MMS messages.”<br />
• The user will then receive the MMS message momentarily.<br />
• The guest users are unable to capture an image by using method 1. If the<br />
guest users call the camera, it will neither send a notification message nor an<br />
MMS message.<br />
Method 2:<br />
The user sends following SMS message in order to:<br />
Capture one image and send to the user mobile:<br />
For master and family users: #03# (18)<br />
For guest users: #03#password# (19)<br />
4.2.2 Capture images and send to the user’s mobile<br />
Authority: Master, family and guest users.<br />
Method<br />
The user sends following SMS message in order to:<br />
Capture images and send to the user mobile:<br />
For master and family users: #03#ImageQuantity# (20)<br />
For guest users: #03#Password#ImageQuantity# (21)<br />
• Image quantity should be in the range of 1-8 when the image size is set at<br />
160×128 or 320×240 (See 5.1.1 image size.) The default image size is<br />
320×240(QVGA).<br />
• Image quantity should be in the range of 1-2 when the image size is set at<br />
640×480.<br />
20
<strong>TUTA</strong>-<strong>B2</strong> GSM REMOTE CAMERA USER MANUAL<br />
Successful SMS reply<br />
Your request received, <strong>TUTA</strong> is sending the MMS image.<br />
• The user will then receive the MMS message momentarily.<br />
• The file <strong>for</strong>mat of the sent MMS images is: “Model-Time.jpg”. For example, a<br />
file with name of <strong>TUTA</strong>-094843.jpg means the image is captured with a <strong>TUTA</strong><br />
camera at 9:48:43AM.<br />
• If a sent MMS file has several sequential pictures, the size of the pictures is<br />
pre-set by user (See 5.1.1 image size.). The interval between the pictures is<br />
default 0.5s and can be pre-set by user (See 5.1.3 image Interval).<br />
4.2.3 Capture images and send to user’s E-mail address<br />
Authority: Master and family users.<br />
<br />
Description<br />
If the master or family user wishes to send the images to his/her E-mail address,<br />
the E-mail address must be set at first. See chapter 4.3 E-mail settings <strong>for</strong> more<br />
in<strong>for</strong>mation regarding this function.<br />
Method<br />
The user sends following SMS message in order to:<br />
Capture image(s) and send to pre-set E-mail: (22)<br />
#03#ImageQuantity#1#<br />
• Image quantity should be in the range of 1-8 when the image size is set at<br />
160×128 or 320×240.<br />
• Image quantity should be in the range of 1-2 when the image size is set at<br />
640×480.<br />
Successful SMS reply<br />
Your request received, <strong>TUTA</strong> is sending the MMS image.<br />
4.2.4 Capture images and send to an appointed mobile or<br />
E-mail address<br />
Authority: Master, family and guest users.<br />
21
<strong>TUTA</strong>-<strong>B2</strong> GSM REMOTE CAMERA USER MANUAL<br />
Method<br />
The user sends the following SMS message in order to:<br />
Capture image(s) and send to appointed mobile or E-mail address:<br />
For Master and family user: #30#NumberOrEmail#ImageQuantity# (23)<br />
For Guest user: #30#Password#NumberOrEmail#ImageQuantity# (24)<br />
• NumberOrEmail should be the mobile phone number or E-mail address<br />
which the user appointed to send image.<br />
• Image quantity should be in the range of 1-8 when the image size is set at<br />
160×128 or 320×240(The default image size). See 5.1.1 image size.<br />
• Image quantity should be in the range of 1-2 when the image size is set at<br />
640×480.<br />
Successful SMS reply<br />
Sending to **** with * pictures.<br />
• The file <strong>for</strong>mat of the sent MMS images is: “Model-Time.jpg”. For example, a<br />
file with name of <strong>TUTA</strong>-094843.jpg means the image is captured with a <strong>TUTA</strong><br />
camera at 9:48:43AM.<br />
• If a sent MMS file has several sequential pictures, the size of the pictures is<br />
pre-set by user (See 5.1.1 image size). The interval between the pictures is<br />
default 0.5s and can be pre-set by user (See 5.1.3 image intervals).<br />
4.3 E-mail settings<br />
<br />
Note<br />
This function should be supported by the local network provider. Please contact<br />
your local network provider <strong>for</strong> the details concerning this function.<br />
4.3.1 Add/ modify an E-mail address<br />
Authority: Master and family users.<br />
<br />
Description<br />
• Each user number can be set only one E-mail address. If more than one E-<br />
mail address is set onto one user number, <strong>TUTA</strong> camera will only recognize<br />
the E-mail address put in the last.<br />
• If the user wishes capturing an image and sending to his/her E-mail address,<br />
see 4.2.3 capture images and send to user’s E-mail address.<br />
22
<strong>TUTA</strong>-<strong>B2</strong> GSM REMOTE CAMERA USER MANUAL<br />
• If the user wishes <strong>TUTA</strong> camera sending the alarm image to his/her E-mail<br />
address, see 5.2.10 MMS notification to pre-set E-mail address.<br />
Method<br />
The user sends following SMS message in order to:<br />
Add/modify an E-mail address: #108#EmailAddress# (25)<br />
Successful SMS reply<br />
Email address: *****<br />
4.3.2 Delete all E-mail address(es)<br />
Authority: Master user.<br />
Method<br />
The user sends following SMS message in order to:<br />
Delete all E-mail address: #109# (26)<br />
Successful SMS reply<br />
E-mail addresses deleted successfully.<br />
4.4 Timing send images to mobile<br />
Authority: Master user.<br />
4.4.1 Enable timing sends MMS images<br />
Method<br />
The user sends following SMS message in order to:<br />
Enable timing sends MMS images: #115#1# (27)<br />
Successful SMS reply<br />
Set timing to send MMS activated.<br />
4.4.2 Set time period to send MMS images<br />
Method<br />
The user sends following SMS message in order to:<br />
23
<strong>TUTA</strong>-<strong>B2</strong> GSM REMOTE CAMERA USER MANUAL<br />
Set time period to auto-send MMS image: (28)<br />
#116#WorkDay#StartTime1#EndTime1#IntervelTime1#...#StartTime3#EndTi<br />
me3#IntervelTime3#<br />
• Max allow 3 periods per workday. Each period time should set by start time,<br />
end time and interval.<br />
• WorkDay: one digit, the values lie in the range of “0” to “8”.<br />
The following table contains the descriptions of each value:<br />
Value<br />
Corresponding day<br />
0 Everyday<br />
1 Monday<br />
2 Tuesday<br />
3 Wednesday<br />
4 Thursday<br />
5 Friday<br />
6 Saturday<br />
7 Sunday<br />
8 Monday to Friday<br />
• StartTime and EndTime: Be consists of 4 digits (hh:mm) and works on a 24<br />
hour clock. For example: 0000 means time 00:00(hh:mm), 2359 means time<br />
23:59(hh:mm). The StartTime and EndTime should be in the same day, and<br />
the EndTime must be later than StartTime.<br />
• IntervalTime: This consists of 2 or 3 digits and has values in the range of “10”<br />
to “480” minutes.<br />
Successful SMS reply<br />
Set timing to send MMS parameter is:******<br />
4.4.3 Disable timing send MMS image<br />
Method<br />
The user sends following SMS message in order to:<br />
Disable timing send MMS image: #115#0# (29)<br />
Successful SMS reply<br />
Set timing to send MMS de-activated.<br />
24
4.5 Remote control<br />
<strong>TUTA</strong>-<strong>B2</strong> GSM REMOTE CAMERA USER MANUAL<br />
4.5.1 Add remote control(s) to the camera<br />
<br />
Description<br />
When a remote control is added to a camera, it can control the camera. A<br />
camera can be added up to 5 remote controls.<br />
Method<br />
Indicator Operations Status<br />
Green, flashing or<br />
constantly light.<br />
1. Press and hold the Set key<br />
<strong>for</strong> 2 seconds<br />
Indicator light turns to orange<br />
(Learning mode)<br />
Orange, flashing 2. Press any button on the<br />
remote control (with battery<br />
inside) to send a signal to<br />
<strong>TUTA</strong> will emit a “Beep” tone<br />
and indicator will turn green <strong>for</strong><br />
2S. (Added successfully.)<br />
<strong>TUTA</strong>.<br />
Orange, flashing 3. Repeat step2 to load<br />
Orange, flashing<br />
<br />
Note<br />
another new remote control.<br />
4. Press the Set key to exit<br />
the learning mode or waiting<br />
<strong>for</strong> 15 seconds to auto-exit.<br />
Indicator light turns green,<br />
flashing or constantly light. (Exit<br />
learning mode)<br />
During the process of learning new remote control, if the battery of remote control<br />
runs out, <strong>TUTA</strong> camera will emit three “Beep…” tones and exit learning mode.<br />
You need to replace the battery and try learning process again.<br />
4.5.2 Remote control instruction<br />
There are three buttons on the remote control:<br />
A. Arm <strong>TUTA</strong> camera<br />
• When is pressed, the indicator light on <strong>TUTA</strong> camera will turn green. This<br />
indicates that <strong>TUTA</strong> camera is in armed mode.<br />
• Any motion detected by <strong>TUTA</strong> camera as well as any activation of added<br />
wireless detector will trigger the camera alarm and a SMS/MMS or phone<br />
calling notification will be sent to the preset numbers.<br />
B. Disarm <strong>TUTA</strong> camera<br />
25
<strong>TUTA</strong>-<strong>B2</strong> GSM REMOTE CAMERA USER MANUAL<br />
• When is pressed, the indicator light on <strong>TUTA</strong> camera will slowly flash<br />
green. This indicates that <strong>TUTA</strong> camera is in disarmed mode.<br />
• <strong>TUTA</strong> camera will not detect any motion or receive sensor alarm signal.<br />
C. Emergency button<br />
• When is pressed, the indicator light on <strong>TUTA</strong> camera will rapidly flash<br />
green. Then <strong>TUTA</strong> camera will dial the master user’s number. Live audio<br />
stream can be heard upon answering the emergency call.<br />
• If the master user does not answer the call, <strong>TUTA</strong> camera will then dial the<br />
other emergency numbers as preset order, until someone answers the call.<br />
• The master user’s number as well as the emergency numbers will be called a<br />
maximum three times. If it is still no one answers the call, <strong>TUTA</strong> camera will<br />
then exit dialing mode automatically.<br />
• When is pressed, <strong>TUTA</strong> camera could send a notification via SMS and<br />
MMS instead of making phone calls. This all depends on the setting. Refer to<br />
4.6 Emergency alarms.<br />
4.5.3 Arming or disarming SMS notification<br />
Authority: Master and family users.<br />
Method<br />
The user sends following SMS message in order to set:<br />
No SMS notification message upon arming or disarming <strong>TUTA</strong> camera via<br />
remote control: #137#0# (30)<br />
Send SMS notification message upon arming or disarming <strong>TUTA</strong> camera via<br />
remote control: #137#1# (31)<br />
4.5.4 Remove remote control from the camera<br />
Authority: Master and family users.<br />
Method<br />
The user sends following SMS message in order to:<br />
Remove all remote controls from the camera: #111# (32)<br />
Successful SMS reply<br />
26
<strong>TUTA</strong>-<strong>B2</strong> GSM REMOTE CAMERA USER MANUAL<br />
All remote control deleted successfully.<br />
4.6 Emergency Alarms<br />
Authority: Master and family users.<br />
<br />
Description<br />
When the emergency button (panic button) on the remote camera is pressed,<br />
<strong>TUTA</strong> camera will go into emergency mode to alarm. There are two modes of<br />
the emergency alarm could be set on the camera:<br />
Emergency Mode1 (Default): To dial the master user’s number as well as the preset<br />
emergency numbers. When the emergency button is pressed on the remote<br />
control, <strong>TUTA</strong> camera will dial the master user’s number as well as the pre-set<br />
emergency numbers. <strong>TUTA</strong> camera will repeat this process 3 times, until<br />
someone answers. If, after 3 attempts, there is no answer, <strong>TUTA</strong> camera will<br />
automatically stop dialing and revert to its preset mode. In the case of someone<br />
answers, he/she will be able to listen in the live audio.<br />
Emergency Mode2: To send a notification via SMS and MMS to the master user as<br />
well as the pre-set emergency numbers. When the emergency button is<br />
pressed on the remote control, <strong>TUTA</strong> camera will send the notification via SMS<br />
and MMS to the master user as well as the pre-set emergency numbers.<br />
Method<br />
The user sends following SMS message in order to set:<br />
Emergency Mode1 (To dial the master user’s number as well as the pre-set<br />
emergency numbers): #39#0# (33)<br />
Emergency Mode2 (To send a notification via SMS and MMS to the master user as<br />
well as the pre-set emergency numbers): #39#1# (34)<br />
Successful SMS reply<br />
Alarm by dialing emergency number has been set successfully.<br />
Alarm by sending SMS and MMS has been set successfully.<br />
4.7 Listen in live voice<br />
4.7.1 Call the camera to listen in<br />
Authority: Master and family users.<br />
27
<strong>TUTA</strong>-<strong>B2</strong> GSM REMOTE CAMERA USER MANUAL<br />
Method<br />
The user calls <strong>TUTA</strong> camera after which it will answer automatically. The user<br />
can then listen in the live audio in the monitoring area. Only one line can be<br />
connected to <strong>TUTA</strong> camera at a time.<br />
4.7.2 Listening in upon emergency alarm<br />
<br />
Description<br />
• When <strong>TUTA</strong> camera is in arm or disarm status, it will automatically dial the<br />
Master user’s phone number if the emergency button is pressed. The Master<br />
user can listen in by answering the call.<br />
• If the Master user does not answer the call, <strong>TUTA</strong> camera will automatically<br />
dial the other emergency numbers sequentially. This notification process will<br />
repeat three times and if still unanswered, <strong>TUTA</strong> camera will automatically exit<br />
the dialing mode.<br />
4.7.3 Listening in upon automatically alarm<br />
<br />
Description<br />
• When <strong>TUTA</strong> camera is in armed status and if the user preset the auto-alarm<br />
way as calling the user (Refer to chapter 5.2.8 Call notification upon alarm <strong>for</strong><br />
the details of preset alarm) a call will automatically go through to the Master<br />
user’s preset numbers when the camera alarms. The user can listen in the<br />
monitoring area by answering the call.<br />
• If the Master user does not answer the call, <strong>TUTA</strong> camera will dial the other<br />
pre-set Family number until the call is answered. This notification process will<br />
be repeated three times and if still unanswered, <strong>TUTA</strong> camera will<br />
automatically exit the dialing mode.<br />
4.8 Infrared body detector<br />
Authority: Master and family users.<br />
<br />
Description<br />
When <strong>TUTA</strong> camera is working under arming mode, if someone approaches to<br />
the detecting area, the built-in infrared body detector will trigger the camera<br />
28
<strong>TUTA</strong>-<strong>B2</strong> GSM REMOTE CAMERA USER MANUAL<br />
alarm.<br />
Method<br />
The user sends following SMS message in order to:<br />
Activate infrared body detector (default): #118#1# (35)<br />
Deactivate infrared body detector: #118#0# (36)<br />
Successful SMS reply<br />
Infrared body detector activated.<br />
Infrared body detector deactivated.<br />
• When the infrared body detection alarms, the notification pictures will be sent<br />
on one message via MMS. The default quality of individual picture is 5 and the<br />
size is 320×240 pixels. In order to change the setting, see chapter 5.1.1<br />
Image size and chapter 5.1.2 Image quantity when alarm.<br />
<br />
Note<br />
When the camera is operating on low battery, the infrared body detector will be<br />
deactivated and the configure setting can not be saved.<br />
4.9 Motion detection<br />
<br />
Description<br />
• The motion detection feature is based on image frame compare technology.<br />
The firmware will compare front and after images which capture from camera<br />
and there<strong>for</strong>e detect motion.<br />
• The motion detection feature only functions when <strong>TUTA</strong> camera is armed. i.e.,<br />
arming <strong>TUTA</strong> camera enables the motion.<br />
• The motion detection feature is also functional when <strong>TUTA</strong> camera is in its<br />
default setting.<br />
• When the motion detection alarms, the notification pictures will be sent on one<br />
message via MMS. The default quality of individual picture is 5 and the size is<br />
320×240 pixels. In order to change the setting, see chapter 5.1.1 Image size<br />
and chapter 5.1.2 Image quantity when alarm.<br />
<br />
Note<br />
• If <strong>TUTA</strong> camera faces an object that moves constantly, such as a tree shaking<br />
in the wind, it will send alarm message constantly. Recommend to use the<br />
camera in a still place.<br />
29
<strong>TUTA</strong>-<strong>B2</strong> GSM REMOTE CAMERA USER MANUAL<br />
• Low battery: The motion detection function will be deactivated and the<br />
configure setting can not be saved when <strong>TUTA</strong> camera is operating in low<br />
battery.<br />
4.9.1 Activate/Deactivate motion detection<br />
Authority: Master and family users.<br />
Method<br />
The user sends following SMS message in order to:<br />
Deactivate motion detection(default setting): #22#0# (37)<br />
Activate motion detection: #22#1# (38)<br />
Successful SMS reply<br />
Motion detection de-activated.<br />
Motion detection activated.<br />
4.9.2 Send five Images upon motion detection alarm<br />
Authority: Master and family users.<br />
<br />
Description<br />
<strong>TUTA</strong> camera will send out 5 images with fixed size of 160×128 pixels when<br />
motion is detected.<br />
Method<br />
The user sends following SMS message:<br />
Send five images upon motion detection alarm: #142#1# (39)<br />
Cancel send five images of motion detection alarm: #142#0# (40)<br />
4.10 Wireless sensor(s)<br />
Authority: Master and family users.<br />
<br />
Description<br />
Any 433MHz wireless sensor, such as infrared body sensor, wireless door<br />
magnet, wireless smoke detector etc. can be set as an alarm sensor of the<br />
camera.<br />
30
<strong>TUTA</strong>-<strong>B2</strong> GSM REMOTE CAMERA USER MANUAL<br />
4.10.1 Add a wireless sensor and set corresponding alarm<br />
mode<br />
Authority: Master and family users.<br />
<br />
Description<br />
• Up to 15 wireless sensors can be loaded onto one <strong>TUTA</strong> camera.<br />
Method<br />
1. Power on the wireless sensor.<br />
2. The user sends following SMS message to:<br />
Make <strong>TUTA</strong> camera enter loading mode and set corresponding alarm mode:<br />
#05#SensorDescription# (41)<br />
• Sensor description is used <strong>for</strong> identify different sensors affiliated with each<br />
camera. It can be numbers and letters.<br />
• Sensor description could be empty. If SMS command is only #05#, <strong>TUTA</strong><br />
camera will recognize the sensors in number order been added to the<br />
camera. For example, if <strong>TUTA</strong> camera has been added 2 wireless sensors, it<br />
can recognize a new sensor with a sensor description of 3 automatically.<br />
When the sensor triggers <strong>TUTA</strong> camera alarm, <strong>TUTA</strong> camera will send out<br />
SMS alarm message only.<br />
• Up to 15 characters can be typed in sensor description.<br />
Set the sensor alarm mode:<br />
• If you add * at front of sensor description, <strong>TUTA</strong> camera will send out MMS<br />
and SMS alarm message.<br />
E.g. #05#*door2# when “door2” sensor triggers <strong>TUTA</strong> camera alarm,<br />
<strong>TUTA</strong> camera will send out SMS and MMS alarm messages.<br />
• Otherwise, if the first character of sensor description without *, <strong>TUTA</strong><br />
camera will send via SMS only.<br />
E.g. #05#door1# when “door1” sensor triggers <strong>TUTA</strong> camera alarm, <strong>TUTA</strong><br />
camera will send out SMS alarm message only.<br />
• If the sensor is set “send alarm via SMS only when it alarm” by this command<br />
successfully, the user can not use command 81, 82, 83 and 84 to change<br />
alarm way of the sensor.<br />
3. When <strong>TUTA</strong> camera has received the SMS command, it will emit a “Beep…”<br />
tone and the indicator will flash red and green alternately. <strong>TUTA</strong> camera will<br />
31
<strong>TUTA</strong>-<strong>B2</strong> GSM REMOTE CAMERA USER MANUAL<br />
then send a notification message via SMS to the user(s) stating “Waiting to<br />
load wireless sensor, make the sensor work immediately.”<br />
4. The user needs to make the sensor work and transmit signal to be studied by<br />
<strong>TUTA</strong> camera.<br />
E.g. For a wireless door magnet, open and close the door once to send the<br />
signal to the camera.<br />
5. When <strong>TUTA</strong> camera receives the sensor signal, it will emit a “Beep…” tone<br />
and send a notification message via SMS to the user(s) stating “*** has been<br />
successfully loaded”<br />
6. To exit the loading mode manually, press the set key of the camera, <strong>TUTA</strong><br />
camera will emit a “Beep…” tone and exit the loading mode.<br />
<br />
Failed SMS reply<br />
• If <strong>TUTA</strong> camera failed to load the sensor, the indicator light on <strong>TUTA</strong> camera<br />
will flash red and green alternately <strong>for</strong> approximately 60 seconds, <strong>TUTA</strong><br />
camera will revert back to the preset armed/disarmed mode.<br />
• When the maximum amount of sensors is already loaded, if a user attempts to<br />
load one more sensor onto the camera, <strong>TUTA</strong> camera will send a SMS<br />
message “Sensor list is full. Please delete old sensor at first.”<br />
• <strong>TUTA</strong> camera will emit “Beep, Beep…” tone if the user want to load an existed<br />
sensor which has been loaded onto <strong>TUTA</strong> camera.<br />
4.10.2 Remove wireless sensor<br />
Authority: Master and family users.<br />
Method<br />
The user sends following SMS message in order to:<br />
Remove a wireless sensor: (42)<br />
#112#SensorDescription#...#SensorDescription#<br />
• Sensor description should be the existing sensor which the user wants to<br />
remove.<br />
Remove all wireless sensors: #112# (43)<br />
<br />
Successful SMS reply<br />
Sensor deleted successfully ****<br />
32
<strong>TUTA</strong>-<strong>B2</strong> GSM REMOTE CAMERA USER MANUAL<br />
4.11 Arming or disarming <strong>TUTA</strong> camera manually<br />
4.11.1 Arming <strong>TUTA</strong> camera manually<br />
Authority: Master and family users.<br />
<br />
Description<br />
• When <strong>TUTA</strong> camera is arming, all loaded sensors, infrared body detector and<br />
motion detector are in work status. <strong>TUTA</strong> camera will automatically send<br />
alarm message or making a phone call once it is triggered.<br />
• When the indicator light on the camera slowly flashes green, it shows that the<br />
camera is disarmed. Use following methods to arm the camera:<br />
Method<br />
Method 1:<br />
The user sends following SMS message in order to:<br />
Arming <strong>TUTA</strong> camera manually: #01# (44)<br />
Method 2:<br />
Press<br />
on the remote control, whilst pointing it in the direction of <strong>TUTA</strong><br />
camera. <strong>TUTA</strong> camera will emit a “Beep” tone, to indicate that arming <strong>TUTA</strong><br />
camera is successfully.<br />
Method 3:<br />
The user calls <strong>TUTA</strong> camera and hangs up within 5-20 seconds upon hearing the<br />
ring tone in the phone. The camera will be armed or disarmed.<br />
Successful SMS reply<br />
Defense mode activated.<br />
And the indicator light will turn green (no flashing).<br />
4.11.2 Default arming mode<br />
• In this mode, the infrared light will be on.<br />
• When motion is detected, a notification will be sent via SMS to preset user<br />
numbers. Five notification pictures will be sent on one message via MMS.<br />
MMS image quality is 320×240(QVGA).<br />
• When the integrated infrared body detector and loaded wireless sensor<br />
alarms <strong>TUTA</strong> camera, a notification will be sent via SMS to preset user<br />
33
<strong>TUTA</strong>-<strong>B2</strong> GSM REMOTE CAMERA USER MANUAL<br />
numbers. Five notification pictures will be sent on one message via MMS.<br />
MMS image size is 320×240(QVGA).<br />
4.11.3 Disarming <strong>TUTA</strong> camera manually<br />
Authority: Master and family users.<br />
<br />
Description<br />
When <strong>TUTA</strong> camera is working under disarmed mode, all loaded wireless sensor,<br />
integrated infrared body detector and motion detection function could not work.<br />
But it will send an SMS/MMS notification or make phone calls only when<br />
button on remote control is pressed.<br />
Method<br />
Method 1:<br />
The user sends following SMS message in order to:<br />
Disarming <strong>TUTA</strong> camera manually: #02# (45)<br />
Method 2:<br />
• Press the button on the remote control, whilst pointing it in the direction<br />
of the camera.<br />
Method 3:<br />
The user calls <strong>TUTA</strong> camera and hangs up within 5-20 seconds upon hearing the<br />
ring tone in the phone. The camera will be armed or disarmed.<br />
Successful SMS reply<br />
Defense mode de-activated.<br />
<strong>TUTA</strong> camera will emit a “Beep...” tone, and the indicator light will flash green.<br />
4.12 Timed arming the camera<br />
Authority: Master and family users.<br />
4.12.1 Enable timing arms the camera<br />
Method<br />
The user sends following SMS message in order to:<br />
Enable timing arms the camera: #128#1# (46)<br />
34
<strong>TUTA</strong>-<strong>B2</strong> GSM REMOTE CAMERA USER MANUAL<br />
Successful SMS reply<br />
Timing defense activated.<br />
Then <strong>TUTA</strong> camera will arming automatically according to the settings.<br />
4.12.2 Set time period to arm the camera<br />
Method<br />
The user sends following SMS message in order to:<br />
Set time period to arm the camera: (47)<br />
#129#WorkDay#ArmTime1#DisarmTime1#...#ArmTime3#DisarmTime3#<br />
• Up to 3 periods be allowed per workday. Each period time should set by<br />
ArmTime, DisarmTime.<br />
• WorkDay: one digit, the values lie in the range of “0” to “8”.<br />
The following table contains the descriptions of each value:<br />
Value<br />
Corresponding day<br />
0 Everyday<br />
1 Monday<br />
2 Tuesday<br />
3 Wednesday<br />
4 Thursday<br />
5 Friday<br />
6 Saturday<br />
7 Sunday<br />
8 Monday to Friday<br />
• ArmTime and DisarmTime: Be consists of 4 digits (hh:mm) and works on a<br />
24 hour clock. For example: 0000 means time 00:00(hh:mm), 2359 means<br />
time 23:59(hh:mm). The ArmTime and DisarmTime should be in the same day,<br />
and the DisarmTime must be later than ArmTime during the same period.<br />
Successful SMS reply<br />
Set timing defense successfully, the parameter is:*****<br />
4.12.3 Disable timing arm the camera<br />
Method<br />
The user sends following SMS message in order to:<br />
Disable timing arm the camera: #128#0# (48)<br />
Successful SMS reply<br />
35
<strong>TUTA</strong>-<strong>B2</strong> GSM REMOTE CAMERA USER MANUAL<br />
Timing defense de-activated.<br />
4.13 Auto-disarming the camera<br />
<br />
Description<br />
In order to avoid <strong>TUTA</strong> camera sending out alarm message all the time and out<br />
of Master’s attention, <strong>TUTA</strong> camera can be set auto-disarm when it has been<br />
sent out alarms certain times (At least one alarm message should be sent via<br />
MMS). After the user set this function successfully, any alarm of <strong>TUTA</strong> camera<br />
will be counted in alarm times. When the user arms/disarms <strong>TUTA</strong> camera<br />
manually, the counted alarm time will be cleared to 0.<br />
4.13.1 Activate auto-disarming the camera<br />
Authority: Master and family users.<br />
Method<br />
The user sends following SMS message in order to:<br />
Activate auto-disarming the camera: #138#1# (49)<br />
Set the value of alarm times when <strong>TUTA</strong> camera is auto-disarming: (50)<br />
#139#times#<br />
• The times should be numbers.<br />
Successful SMS reply<br />
• Cancel defense after warn some times activate.<br />
• Cancel defense after warn ** times.<br />
• When the alarm times reach to the times value setting, <strong>TUTA</strong> camera will be<br />
auto-disarmed and send SMS message” The device has been autodisarmed.”<br />
4.13.2 Disable the function of auto-disarming <strong>TUTA</strong> camera<br />
(default)<br />
Authority: Master and family users.<br />
Method<br />
The user sends following SMS message in order to:<br />
Disable the function of auto-disarming the camera: #138#0# (51)<br />
36
<strong>TUTA</strong>-<strong>B2</strong> GSM REMOTE CAMERA USER MANUAL<br />
Successful SMS reply<br />
Cancel defense after warn some times deactive.<br />
4.14 Camera language setting<br />
Authority: Master user.<br />
<br />
Description<br />
<strong>TUTA</strong> camera supports both English and Spanish (or the user’s first language)<br />
display.<br />
Method<br />
The user sends following SMS message in order to set:<br />
The user’s first language (or Spanish) version: #127#0# (52)<br />
English version: #127#1# (53)<br />
Successful SMS reply<br />
Set *** version successfully.<br />
4.15 Check status<br />
Authority: Master, family and guest users.<br />
Method<br />
The user sends following SMS message in order to:<br />
Check the present settings and work status of <strong>TUTA</strong> camera:<br />
• For master and family users: #07# (54)<br />
• For guest users: #07#password# (55)<br />
Successful SMS reply<br />
• <strong>TUTA</strong> camera will reply via MMS, depending on which status is currently set<br />
on. Such as:<br />
Device (dis)armed. (No) SMS notification when alarm is triggered. (No) MMS notification<br />
when alarm is triggered. Motion detection (de)activated. Timing send MMS (de)activated.<br />
Image size 160x128/ 320x240/ 640x480. Send image quantity when alarm. Master<br />
number. Master email. Family email. Wireless sensor. Emergency number. Language<br />
version.<br />
37
4.16 Getting help<br />
<strong>TUTA</strong>-<strong>B2</strong> GSM REMOTE CAMERA USER MANUAL<br />
Authority: Master, family and guest user.<br />
<br />
Description<br />
The user can send SMS to <strong>TUTA</strong> camera in order to get the SMS command list<br />
which the command description as well as the codes will be supplied or get the<br />
MMS named “<strong>TUTA</strong> user manual” on which all the command descriptions as<br />
well as the codes will be supplied. The list and the manual’s contents can be<br />
view via the user’s mobile phone.<br />
Method<br />
The user sends following SMS message in order to:<br />
Getting normal command list via SMS:<br />
• For master and family users: #09# (56)<br />
• For guest users: #09#password# (57)<br />
Getting detailed instruction via MMS:<br />
• For master and family users: #09#1# (58)<br />
• For guest users: #09#password#1# (59)<br />
4.17 Resetting the camera<br />
Authority: Master user.<br />
<br />
Description<br />
• This function resets all programmed settings to their original values.<br />
• After <strong>TUTA</strong> camera is reset, it will need to be restarted. The remote control as<br />
well as the wireless sensor will also need to be reloaded. Refer to chapter 3.2<br />
Define Master user to start the camera.<br />
• After resetting the camera. However, if the MMS function does not work, the<br />
MMS parameter will need to be reset. Refer to chapter 4.1 Network parameter<br />
settings.<br />
<br />
Note<br />
This function needs to be used carefully as it also erases the values <strong>for</strong> the<br />
master number, the remote control as well as the wireless sensor(s).<br />
Method<br />
38
<strong>TUTA</strong>-<strong>B2</strong> GSM REMOTE CAMERA USER MANUAL<br />
Method 1: Reset via the camera<br />
• Switch <strong>TUTA</strong> camera off. It must remain off <strong>for</strong> a minimum of 20 seconds.<br />
• Press and hold the Reset button and then switch <strong>TUTA</strong> camera back on.<br />
• The indicator light will be green <strong>for</strong> 2-4 seconds after which it will flash red.<br />
• If the resetting of <strong>TUTA</strong> camera is successful, a “Beep …” tone will be emitted.<br />
Method 2: Reset via SMS command<br />
The user sends following SMS message to <strong>TUTA</strong> camera in order to:<br />
Reset the camera: #08#password# (60)<br />
Successful SMS reply<br />
The GSM camera has successfully reset to its default settings.<br />
Chapter 5 Advanced settings<br />
5.1 Image settings<br />
The user sends the following edit message via SMS to <strong>TUTA</strong> camera in order to<br />
configure the following settings:<br />
5.1.1 Image size<br />
• For master and family users: #32#value# (61)<br />
• If the value is 1, the image size is 160 ×128(pixels). It’s <strong>for</strong> a standard small<br />
screen mobile phone. The size of one MMS image file is 4K.<br />
• If the value is 2, the image size is 320×240(QVGA default). The size of one<br />
MMS image file is 9K.<br />
• If the value is 3, the image size is 640 × 480 (VGA). The size of one MMS<br />
image file is 33K.<br />
Successful SMS reply<br />
The image size has been reset successfully.<br />
5.1.2 Image quantity<br />
• For master and family users: #33#quantity# (62)<br />
• The default quantity value is 3, with the default image size 320×240 and the<br />
Image capturing interval time 0.5s.<br />
39
<strong>TUTA</strong>-<strong>B2</strong> GSM REMOTE CAMERA USER MANUAL<br />
• The quantity value should be in the range of 2-8.<br />
• If the image size is 640×480, up to 2 image quantity can be used.<br />
• The image size and image capturing interval time can be changed, see<br />
chapter 5.1.1 and 5.1.3.<br />
Successful SMS reply<br />
Alarm image quantity has been set successfully.<br />
MMS file name:<br />
• For wireless sensor alarm: Model-Time (Sensor name), such as <strong>TUTA</strong>-<br />
171154(Sensor 1).<br />
• For motion detection alarm: Model-Time (Motion detection), such as <strong>TUTA</strong>-<br />
171154 (motion detection).<br />
5.1.3 Image interval<br />
• For master and family users: #103#time# (63)<br />
• The Interval time values should be in the range from 3-10.<br />
• Each unit constitutes 100ms.<br />
• The default value is 5, i.e. 0.5 seconds.<br />
Successful SMS reply<br />
Capture image interval time has been set successfully: *<br />
5.2 Automatic alarm settings<br />
<br />
Description<br />
<strong>TUTA</strong> camera will enter auto-alarm mode and send notification messages (SMS<br />
and/or MMS) to the previously set numbers or e-mail addresses in one of the<br />
following two circumstances:<br />
• When motion is detected or<br />
• when the wireless sensors are triggered.<br />
The user sends the following edit message via SMS to <strong>TUTA</strong> camera in order to<br />
activate the following functions:<br />
5.2.1 Warning tone upon alarm triggering<br />
• For master and family users: #130#1# (64)<br />
40
<strong>TUTA</strong>-<strong>B2</strong> GSM REMOTE CAMERA USER MANUAL<br />
Successful SMS reply<br />
Warn sound mode activated.<br />
<strong>TUTA</strong> camera will emit a “Beep …” tone upon alarm activation.<br />
5.2.2 No warning tone upon alarm (Default)<br />
• For master and family users: #130#0# (65)<br />
Successful SMS reply<br />
Warn sound mode de-activated.<br />
<strong>TUTA</strong> camera will not emit any tone upon alarm activation.<br />
5.2.3 No SMS notification upon alarm<br />
• For master and family users: #11#0# (66)<br />
Successful SMS reply<br />
No send SMS when alarm<br />
5.2.4 SMS notification upon alarm (Default)<br />
• For master and family users: #11#1# (67)<br />
Successful SMS reply<br />
Set alarm with SMS successfully<br />
5.2.5 No MMS notification upon alarm<br />
• For master and family users: #12#0# (68)<br />
Successful SMS reply<br />
Set alarm without MMS successfully, alarm with SMS only<br />
5.2.6 MMS notification upon alarm (Default)<br />
• For master and family users: #12#1# (69)<br />
Successful SMS reply<br />
Set alarm with MMS successfully.<br />
41
<strong>TUTA</strong>-<strong>B2</strong> GSM REMOTE CAMERA USER MANUAL<br />
5.2.7 No call notification upon alarm (Default)<br />
• For master and family users: #13#0# (70)<br />
Successful SMS reply<br />
Didn't auto dial calls when alarm.<br />
5.2.8 Call notification upon alarm<br />
• For master and family users: #13#1# (71)<br />
Successful SMS reply<br />
Auto dial calls when alarm.<br />
• If <strong>TUTA</strong> camera alarm automatically, it will dial the master user’s number. Live<br />
audio stream can be heard upon answering the call.<br />
• If the master user does not answer the call, <strong>TUTA</strong> camera will then dial the<br />
family user’s numbers in the preset order, until someone answers the call.<br />
• The master user’s and the family user’s numbers will be called a maximum<br />
three times. If it is still no one answers the call, <strong>TUTA</strong> camera will then exit<br />
dialing mode automatically.<br />
• If SMS, MMS and calling notification are all activated, when <strong>TUTA</strong> camera<br />
alarm automatically, it will firstly send an SMS, secondly an MMS and thirdly a<br />
calling notification to preset users.<br />
5.2.9 No MMS notification to pre-set E-mail address<br />
(Default)<br />
• For master and family users: #110#0# (72)<br />
Successful SMS reply<br />
Alarm didn't send MMS images to email<br />
5.2.10 MMS notification to pre-set E-mail address<br />
• For master and family users: #110#1# (73)<br />
Successful SMS reply<br />
Alarm set with MMS notification to an E-mail address successfully.<br />
42
<strong>TUTA</strong>-<strong>B2</strong> GSM REMOTE CAMERA USER MANUAL<br />
• If the MMS notifications is set to be send to both a mobile phone number as<br />
well as to an e-mail address, the MMS image will firstly be sent to the mobile<br />
phone number and then to the E-mail address.<br />
5.3 Turn on/off LED indicator on the camera<br />
Authority: Master, family user.<br />
<br />
Description<br />
If the LED indicator is on, it will display in different ways to show the working<br />
status. If it turns off, it can make <strong>TUTA</strong> camera private and avoid to be found<br />
easily.<br />
Method<br />
The user sends following SMS message in order to:<br />
Turn off indicator: #143#0# (74)<br />
Turn on indicator: #143#1# (75)<br />
Successful SMS reply<br />
Status LED close.<br />
Status LED open.<br />
5.4 SMS notification upon the power supply changing<br />
Authority: Master and family user.<br />
Method<br />
The user sends following SMS message in order to set:<br />
SMS notification upon the power supply changing (Default): #144#1# (76)<br />
No SMS notification upon the power supply changing: #144#0# (77)<br />
Successful SMS reply<br />
(Not) Send SMS notification when power supply changed.<br />
Chapter 6 Maintenance<br />
• Store and use the remote camera in suitable temperature. Too high or too low<br />
temperature will likely to damage the camera.<br />
43
<strong>TUTA</strong>-<strong>B2</strong> GSM REMOTE CAMERA USER MANUAL<br />
• Try to keep the <strong>TUTA</strong> camera and all its accessories dry. Do not store and use<br />
it in the bathroom, or other place with high humidity. Do not allow pour water<br />
or other liquids into the camera, otherwise, it might cause malfunctions.<br />
• Do not store and use the camera in dusty.<br />
• Do not use alcohol, acetone and other similar solvents to clean it. Wipe it with<br />
soft-wet cloth.<br />
• Do not attempt to open it except as instructed. If the camera does not work<br />
normally, try to resolve it as the guide of the "general troubleshooting", if to the<br />
problem can not be solved, contact with the dealer immediately.<br />
• To prolong the life-span of the battery, connect the <strong>TUTA</strong> camera to the power<br />
supply to charge the built-in Lithium battery <strong>for</strong> 4 hours every 3 months if the<br />
camera does not use <strong>for</strong> long time. Charge the battery at least 12 hours at the<br />
first time use to achieve the full per<strong>for</strong>mance of the battery.<br />
44
<strong>TUTA</strong>-<strong>B2</strong> GSM REMOTE CAMERA USER MANUAL<br />
Chapter 7 General Troubleshooting<br />
No. General Trouble Possible Reason Solution<br />
1 Can’t start camera<br />
(Indicator is working)<br />
Other master is already set in the<br />
camera.<br />
Recover to factory default<br />
setting.<br />
2 All functions disable<br />
(Indicator is working)<br />
3 Indicator constant light<br />
in red color.<br />
4 Camera didn’t<br />
response of any<br />
operation.<br />
5 After starting the<br />
camera, indicator<br />
flashed in red color<br />
and can not turn to<br />
green.<br />
Caller ID presentation or MMS<br />
functions of the SIM card do not<br />
active, insufficient fee of the SIM<br />
card.<br />
Can’t find or identify the SIM card.<br />
<strong>TUTA</strong> camera work abnormally.<br />
Network signal weak or network<br />
busy.<br />
SIM card PIN code actives.<br />
Contact network provider to<br />
active SIM card function. Pay<br />
<strong>for</strong> the card.<br />
SIM card no install properly:<br />
Power off the camera and<br />
check it again.<br />
Switch off the power, check<br />
SIM card, or reset factory<br />
setting.<br />
Place the camera at other<br />
place with strong signal and<br />
try again.<br />
Close the PIN code.<br />
6 Remote control can’t<br />
work. Or action slowly.<br />
Or control distance<br />
range shortened.<br />
SIM card invalid.<br />
Camera low power.<br />
Remote control low power.<br />
Two remote control work<br />
simultaneously.<br />
Contact with local operator to<br />
check of it.<br />
Connect external power to<br />
recharge the battery.<br />
Change remote control<br />
battery.<br />
Try only one remote control.<br />
7 Can’t add new remote The remote control or sensor Exit the loading status.<br />
control or wireless<br />
sensor<br />
already studies successfully.<br />
The sensor quantity is already<br />
reaches its max number.<br />
Delete old sensors be<strong>for</strong>e add<br />
new sensor.<br />
Didn’t set master user number Set master number be<strong>for</strong>e<br />
add sensor.<br />
8 Can’t start the camera<br />
after long time supply<br />
with the battery.<br />
Battery runs out of power.<br />
Connect the camera to<br />
external AC power and<br />
charge <strong>for</strong> at least one hour,<br />
then, restart camera.<br />
Note: If the problem can’t be solved with above guidelines, contact to your local<br />
distributor or after service center.<br />
Chapter 8 Main technical parameters<br />
Power adaptor<br />
Operating temperature<br />
Store temperature<br />
Relative humidity<br />
Working band<br />
Communication protocols<br />
Input: 100V~240V/50Hz Output: 5.5V DC<br />
-10℃~+45℃<br />
-20℃~+60℃<br />
10-90%,without condensation<br />
EGSM900,DCS1800 (GSM850,PCS1900 Optional)<br />
GSM PHASE 2/2+ (including data operation)<br />
45
<strong>TUTA</strong>-<strong>B2</strong> GSM REMOTE CAMERA USER MANUAL<br />
Wireless sensor receiving code ASK<br />
Wireless sensor receiving band 433MHz<br />
Max. wireless sensors<br />
15 units<br />
Remote control receiving band 433MHz<br />
Effective distant of the remote control 10 meters (wide area)<br />
Image <strong>for</strong>mat<br />
JPEG<br />
Image resolution<br />
160×128,QVGA320×240,VGA640×480<br />
Camera pixel<br />
300K pixel<br />
Camera Shooting angel 68 degree<br />
Best shooting distance at night ≤8 meters<br />
Detect distance of build-in PIR sensor ≤9 meters<br />
Listen in distance<br />
≤6 meters<br />
Lithium battery (Inner) 800mAh<br />
Battery standby time<br />
12 hours(Affected by network)<br />
Appendix: SMS commands list<br />
Category Function Command User<br />
Define the<br />
user<br />
Network<br />
parameter<br />
settings<br />
Add a master number to the (1) #00# Master<br />
camera<br />
Change the master user’s (2) #14#NewMasterNumber# Master<br />
number<br />
Change the password (3) #04#oldpassword#newpassword# Master<br />
Add a family number (4) #06#FamilyNumber# Master<br />
Add several family numbers (5) #06#FamilyNumber#...#FamilyNumber# Master<br />
Delete a family number (6) #113#FamilyNumber# Master<br />
Delete several family (7) #113#FamilyNumber#…#FamilyNumber# Master<br />
numbers simultaneously<br />
Delete all family numbers (8) #113# Master<br />
Add single emergency (9) #106#EmergencyNumber# Master<br />
number on the camera<br />
Add several emergency (10)#106#EmergencyNumber#…<br />
Master<br />
numbers on the camera #EmergencyNumber#<br />
Delete an emergency (11) #107#EmergencyNumber# Master<br />
number<br />
Delete several emergency (12)#107#EmergencyNumber#…<br />
Master<br />
numbers<br />
#EmergencyNumber#<br />
Delete all emergency<br />
numbers<br />
(13) #107# Master<br />
Set MMS center (14) #124#MMScenter# Master<br />
Set APN parameters (15)#125#GatewayIP#WAPGatewayPort#HTT Master<br />
PGatewayPort#APN#APNusername#APNpass<br />
word#<br />
Remove the operative (16) #54# Master<br />
network parameters and<br />
then auto-choose new<br />
parameters from memory<br />
Check the operative network (17) #55# Master<br />
parameter settings<br />
46
<strong>TUTA</strong>-<strong>B2</strong> GSM REMOTE CAMERA USER MANUAL<br />
Category Function Command User<br />
capture<br />
images<br />
E-mail<br />
settings<br />
Timed<br />
imaging<br />
Remote<br />
control<br />
Emergency<br />
alarm<br />
infrared<br />
body<br />
detector<br />
Motion<br />
detection<br />
wireless<br />
sensor<br />
Arming or<br />
disarming<br />
<strong>TUTA</strong><br />
Capture one image and<br />
send to the user mobile<br />
Capture more than one<br />
image and send to the user<br />
mobile<br />
Capture image(s) and send<br />
back to user’s pre-set E-mail<br />
address<br />
Capture image(s) and send<br />
to appointed mobile or E-<br />
mail address<br />
(18) #03# Master<br />
Family<br />
(19) #03#password# Guest<br />
(20) #03#ImageQuantity# Master<br />
Family<br />
(21) #03#Password#ImageQuantity# Guest<br />
(22) #03#ImageQuantity#1# Master<br />
Family<br />
(23) #30#NumberOrEmail#ImageQuantity# Master<br />
Family<br />
(24)#30#Password#NumberOrEmail#ImageQu Guest<br />
antity#<br />
Add/modify an E-mail (25) #108#EmailAddress# Master<br />
address<br />
Family<br />
Delete all E-mail address (26) #109# Master<br />
Enable timing sends MMS (27) #115#1# Master<br />
images<br />
Set time period to auto-send (28)#116#WorkDay#StartTime1#EndTime1#Int Master<br />
MMS image<br />
ervelTime1#...#StartTime3#EndTime3#Intervel<br />
Time3#<br />
Disable timing send MMS (29) #115#0# Master<br />
image<br />
No SMS notification<br />
(30) #137#0# Master<br />
message upon arming or<br />
Family<br />
disarming <strong>TUTA</strong> camera via<br />
remote control<br />
Send SMS notification (31) #137#1# Master<br />
message upon arming or<br />
Family<br />
disarming <strong>TUTA</strong> camera via<br />
remote control<br />
Remove all remote controls (32) #111# Master<br />
from the camera<br />
Family<br />
Emergency Mode1( to dial) (33) #39#0# Master<br />
Family<br />
Emergency Mode2( to send (34) #39#1# Master<br />
SMS and MMS message)<br />
Family<br />
Activate infrared body (35) #118#1# Master<br />
detector (default)<br />
Family<br />
Deactivate infrared body (36) #118#0# Master<br />
detector<br />
Family<br />
Deactivate motion<br />
(37) #22#0# Master<br />
detection(default)<br />
Family<br />
Activate motion detection (38) #22#1# Master<br />
Family<br />
Send five images upon (39) #142#1# Master<br />
motion detection alarm<br />
Family<br />
Cancel send five images of (40) #142#0# Master<br />
motion detection alarm<br />
Family<br />
Make <strong>TUTA</strong> camera enter (41) #05#SensorDescription# Master<br />
loading mode and set<br />
Family<br />
corresponding alarm mode<br />
Remove a wireless sensor (42)#112#SensorDescription#...#SensorDescri<br />
ption#<br />
Master<br />
Family<br />
Remove all wireless sensors (43) #112# Master<br />
Family<br />
Arming <strong>TUTA</strong> camera (44) #01# Master<br />
manually<br />
Family<br />
Disarming <strong>TUTA</strong> camera (45) #02# Master<br />
47
<strong>TUTA</strong>-<strong>B2</strong> GSM REMOTE CAMERA USER MANUAL<br />
Category Function Command User<br />
camera manually Family<br />
Enable timing arms the<br />
camera<br />
(46) #128#1# Master<br />
Family<br />
Set time period to arm the<br />
camera<br />
(47)#129#WorkDay#ArmTime1#DisarmTime1#<br />
...#ArmTime3#DisarmTime3#<br />
Master<br />
Family<br />
Disable timing arm the<br />
camera<br />
(48) #128#0# Master<br />
Family<br />
Activate auto-disarming the<br />
camera<br />
(49) #138#1# Master<br />
Family<br />
Set the value of alarm times<br />
when <strong>TUTA</strong> camera is autodisarming<br />
(50) #139#times# Master<br />
Family<br />
Disable the function of auto-<br />
(51) #138#0# Master<br />
language<br />
setting<br />
Check<br />
status<br />
Getting help<br />
disarming the camera<br />
Family<br />
The user’s first language (or (52) #127#0# Master<br />
Spanish) version<br />
English version (53) #127#1# Master<br />
Check the present settings (54) #07# Master<br />
and work status of the<br />
Family<br />
camera<br />
(55) #07#password# Guest<br />
Getting normal command list<br />
via SMS<br />
(56) #09# Master<br />
Family<br />
(57) #09#password# Guest<br />
Getting detailed instruction<br />
via MMS<br />
(58) #09#1# Master<br />
Family<br />
(59) #09#password#1# Guest<br />
Reset Reset the camera (60) #08#password# Master<br />
Image<br />
settings<br />
Image size (61) #32#value# Master<br />
Family<br />
Image quantity (62) #33#quantity# Master<br />
Family<br />
Image interval (63) #103#time# Master<br />
Family<br />
Automatic<br />
alarm<br />
Warning tone upon alarm<br />
triggering<br />
(64) #130#1# Master<br />
Family<br />
settings No warning tone upon alarm<br />
(Default)<br />
(65) #130#0# Master<br />
Family<br />
No SMS notification upon<br />
alarm<br />
(66) #11#0# Master<br />
Family<br />
SMS notification upon alarm<br />
(Default)<br />
(67) #11#1# Master<br />
Family<br />
No MMS notification upon<br />
alarm<br />
(68) #12#0# Master<br />
Family<br />
MMS notification upon alarm<br />
(Default)<br />
(69) #12#1# Master<br />
Family<br />
No call notification upon<br />
alarm (Default)<br />
(70) #13#0# Master<br />
Family<br />
Call notification upon alarm (71) #13#1# Master<br />
Family<br />
No MMS notification to preset<br />
E-mail address (Default)<br />
(72) #110#0# Master<br />
Family<br />
MMS notification to pre-set<br />
E-mail address<br />
(73) #110#1# Master<br />
Family<br />
Lights Turn off indicator (74) #143#0# Master<br />
Family<br />
Turn on indicator (75) #143#1# Master<br />
Family<br />
SMS<br />
notification<br />
SMS notification upon the<br />
power supply changing<br />
(76) #144#1# Master<br />
Family<br />
48
<strong>TUTA</strong>-<strong>B2</strong> GSM REMOTE CAMERA USER MANUAL<br />
Category Function Command User<br />
and reply<br />
(Default)<br />
No SMS notification upon<br />
the power supply changing<br />
(77) #144#0# Master<br />
Family<br />
Xiamen Youthnet Co., Ltd.<br />
Add: 10F, No.56 Guanri road, Software park II, Xiamen, Fujian, China. 361009<br />
http://www.i-tuta.com.<br />
TEL: +86-592-6300656<br />
FAX: +86-592-6022220<br />
49