Owner's Manual for the vehicle. With a quick reference ... - E38.org
Owner's Manual for the vehicle. With a quick reference ... - E38.org
Owner's Manual for the vehicle. With a quick reference ... - E38.org

Create successful ePaper yourself
Turn your PDF publications into a flip-book with our unique Google optimized e-Paper software.
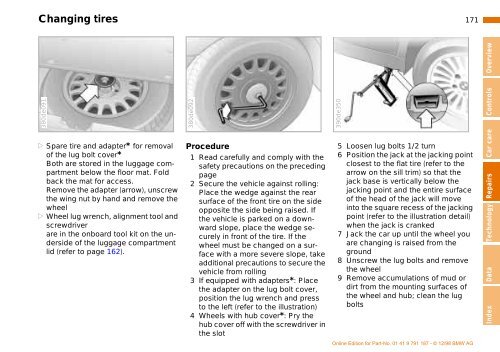
Changing tires<br />
171n<br />
380de091<br />
> Spare tire and adapter* <strong>for</strong> removal<br />
of <strong>the</strong> lug bolt cover*<br />
Both are stored in <strong>the</strong> luggage compartment<br />
below <strong>the</strong> floor mat. Fold<br />
back <strong>the</strong> mat <strong>for</strong> access.<br />
Remove <strong>the</strong> adapter (arrow), unscrew<br />
<strong>the</strong> wing nut by hand and remove <strong>the</strong><br />
wheel<br />
> Wheel lug wrench, alignment tool and<br />
screwdriver<br />
are in <strong>the</strong> onboard tool kit on <strong>the</strong> underside<br />
of <strong>the</strong> luggage compartment<br />
lid (refer to page 162).<br />
380de092<br />
Procedure<br />
1 Read carefully and comply with <strong>the</strong><br />
safety precautions on <strong>the</strong> preceding<br />
page<br />
2 Secure <strong>the</strong> <strong>vehicle</strong> against rolling:<br />
Place <strong>the</strong> wedge against <strong>the</strong> rear<br />
surface of <strong>the</strong> front tire on <strong>the</strong> side<br />
opposite <strong>the</strong> side being raised. If<br />
<strong>the</strong> <strong>vehicle</strong> is parked on a downward<br />
slope, place <strong>the</strong> wedge securely<br />
in front of <strong>the</strong> tire. If <strong>the</strong><br />
wheel must be changed on a surface<br />
with a more severe slope, take<br />
additional precautions to secure <strong>the</strong><br />
<strong>vehicle</strong> from rolling<br />
3 If equipped with adapters*: Place<br />
<strong>the</strong> adapter on <strong>the</strong> lug bolt cover,<br />
position <strong>the</strong> lug wrench and press<br />
to <strong>the</strong> left (refer to <strong>the</strong> illustration)<br />
4 Wheels with hub cover*: Pry <strong>the</strong><br />
hub cover off with <strong>the</strong> screwdriver in<br />
<strong>the</strong> slot<br />
390de350<br />
5 Loosen lug bolts 1/2 turn<br />
6 Position <strong>the</strong> jack at <strong>the</strong> jacking point<br />
closest to <strong>the</strong> flat tire (refer to <strong>the</strong><br />
arrow on <strong>the</strong> sill trim) so that <strong>the</strong><br />
jack base is vertically below <strong>the</strong><br />
jacking point and <strong>the</strong> entire surface<br />
of <strong>the</strong> head of <strong>the</strong> jack will move<br />
into <strong>the</strong> square recess of <strong>the</strong> jacking<br />
point (refer to <strong>the</strong> illustration detail)<br />
when <strong>the</strong> jack is cranked<br />
7 Jack <strong>the</strong> car up until <strong>the</strong> wheel you<br />
are changing is raised from <strong>the</strong><br />
ground<br />
8 Unscrew <strong>the</strong> lug bolts and remove<br />
<strong>the</strong> wheel<br />
9 Remove accumulations of mud or<br />
dirt from <strong>the</strong> mounting surfaces of<br />
<strong>the</strong> wheel and hub; clean <strong>the</strong> lug<br />
bolts<br />
Index Data Technology Repairs Car care Controls Overview