CTAS Reference Guide.doc - Office of the State Auditor
CTAS Reference Guide.doc - Office of the State Auditor
CTAS Reference Guide.doc - Office of the State Auditor
You also want an ePaper? Increase the reach of your titles
YUMPU automatically turns print PDFs into web optimized ePapers that Google loves.
<strong>CTAS</strong> REFERENCE GUIDE<br />
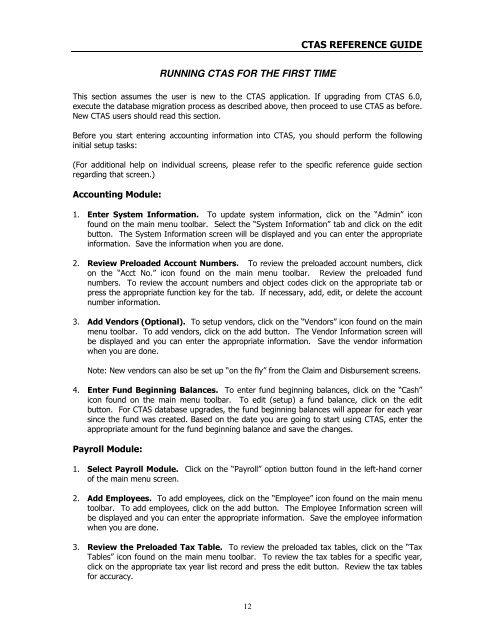
RUNNING <strong>CTAS</strong> FOR THE FIRST TIME<br />
This section assumes <strong>the</strong> user is new to <strong>the</strong> <strong>CTAS</strong> application. If upgrading from <strong>CTAS</strong> 6.0,<br />
execute <strong>the</strong> database migration process as described above, <strong>the</strong>n proceed to use <strong>CTAS</strong> as before.<br />
New <strong>CTAS</strong> users should read this section.<br />
Before you start entering accounting information into <strong>CTAS</strong>, you should perform <strong>the</strong> following<br />
initial setup tasks:<br />
(For additional help on individual screens, please refer to <strong>the</strong> specific reference guide section<br />
regarding that screen.)<br />
Accounting Module:<br />
1. Enter System Information. To update system information, click on <strong>the</strong> “Admin” icon<br />
found on <strong>the</strong> main menu toolbar. Select <strong>the</strong> “System Information” tab and click on <strong>the</strong> edit<br />
button. The System Information screen will be displayed and you can enter <strong>the</strong> appropriate<br />
information. Save <strong>the</strong> information when you are done.<br />
2. Review Preloaded Account Numbers. To review <strong>the</strong> preloaded account numbers, click<br />
on <strong>the</strong> “Acct No.” icon found on <strong>the</strong> main menu toolbar. Review <strong>the</strong> preloaded fund<br />
numbers. To review <strong>the</strong> account numbers and object codes click on <strong>the</strong> appropriate tab or<br />
press <strong>the</strong> appropriate function key for <strong>the</strong> tab. If necessary, add, edit, or delete <strong>the</strong> account<br />
number information.<br />
3. Add Vendors (Optional). To setup vendors, click on <strong>the</strong> “Vendors” icon found on <strong>the</strong> main<br />
menu toolbar. To add vendors, click on <strong>the</strong> add button. The Vendor Information screen will<br />
be displayed and you can enter <strong>the</strong> appropriate information. Save <strong>the</strong> vendor information<br />
when you are done.<br />
Note: New vendors can also be set up “on <strong>the</strong> fly” from <strong>the</strong> Claim and Disbursement screens.<br />
4. Enter Fund Beginning Balances. To enter fund beginning balances, click on <strong>the</strong> “Cash”<br />
icon found on <strong>the</strong> main menu toolbar. To edit (setup) a fund balance, click on <strong>the</strong> edit<br />
button. For <strong>CTAS</strong> database upgrades, <strong>the</strong> fund beginning balances will appear for each year<br />
since <strong>the</strong> fund was created. Based on <strong>the</strong> date you are going to start using <strong>CTAS</strong>, enter <strong>the</strong><br />
appropriate amount for <strong>the</strong> fund beginning balance and save <strong>the</strong> changes.<br />
Payroll Module:<br />
1. Select Payroll Module. Click on <strong>the</strong> “Payroll” option button found in <strong>the</strong> lefthand corner<br />
<strong>of</strong> <strong>the</strong> main menu screen.<br />
2. Add Employees. To add employees, click on <strong>the</strong> “Employee” icon found on <strong>the</strong> main menu<br />
toolbar. To add employees, click on <strong>the</strong> add button. The Employee Information screen will<br />
be displayed and you can enter <strong>the</strong> appropriate information. Save <strong>the</strong> employee information<br />
when you are done.<br />
3. Review <strong>the</strong> Preloaded Tax Table. To review <strong>the</strong> preloaded tax tables, click on <strong>the</strong> “Tax<br />
Tables” icon found on <strong>the</strong> main menu toolbar. To review <strong>the</strong> tax tables for a specific year,<br />
click on <strong>the</strong> appropriate tax year list record and press <strong>the</strong> edit button. Review <strong>the</strong> tax tables<br />
for accuracy.<br />
12


