CTAS Reference Guide.doc - Office of the State Auditor
CTAS Reference Guide.doc - Office of the State Auditor
CTAS Reference Guide.doc - Office of the State Auditor

Create successful ePaper yourself
Turn your PDF publications into a flip-book with our unique Google optimized e-Paper software.
<strong>CTAS</strong> REFERENCE GUIDE<br />
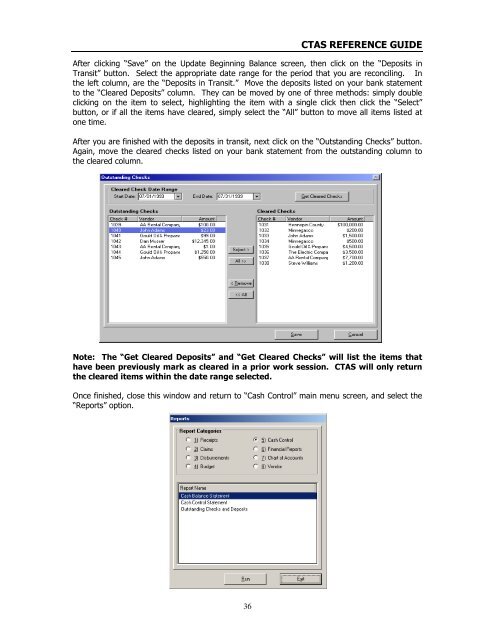
After clicking “Save” on <strong>the</strong> Update Beginning Balance screen, <strong>the</strong>n click on <strong>the</strong> “Deposits in<br />
Transit” button. Select <strong>the</strong> appropriate date range for <strong>the</strong> period that you are reconciling. In<br />
<strong>the</strong> left column, are <strong>the</strong> “Deposits in Transit.” Move <strong>the</strong> deposits listed on your bank statement<br />
to <strong>the</strong> “Cleared Deposits” column. They can be moved by one <strong>of</strong> three methods: simply double<br />
clicking on <strong>the</strong> item to select, highlighting <strong>the</strong> item with a single click <strong>the</strong>n click <strong>the</strong> “Select”<br />
button, or if all <strong>the</strong> items have cleared, simply select <strong>the</strong> “All” button to move all items listed at<br />
one time.<br />
After you are finished with <strong>the</strong> deposits in transit, next click on <strong>the</strong> “Outstanding Checks” button.<br />
Again, move <strong>the</strong> cleared checks listed on your bank statement from <strong>the</strong> outstanding column to<br />
<strong>the</strong> cleared column.<br />
Note: The “Get Cleared Deposits” and “Get Cleared Checks” will list <strong>the</strong> items that<br />
have been previously mark as cleared in a prior work session. <strong>CTAS</strong> will only return<br />
<strong>the</strong> cleared items within <strong>the</strong> date range selected.<br />
Once finished, close this window and return to “Cash Control” main menu screen, and select <strong>the</strong><br />
“Reports” option.<br />
36