Tapit EX Manual ver 4.1.6 - Trisys.com
Tapit EX Manual ver 4.1.6 - Trisys.com
Tapit EX Manual ver 4.1.6 - Trisys.com

You also want an ePaper? Increase the reach of your titles
YUMPU automatically turns print PDFs into web optimized ePapers that Google loves.
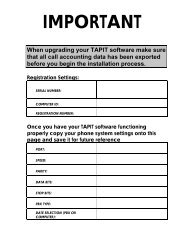
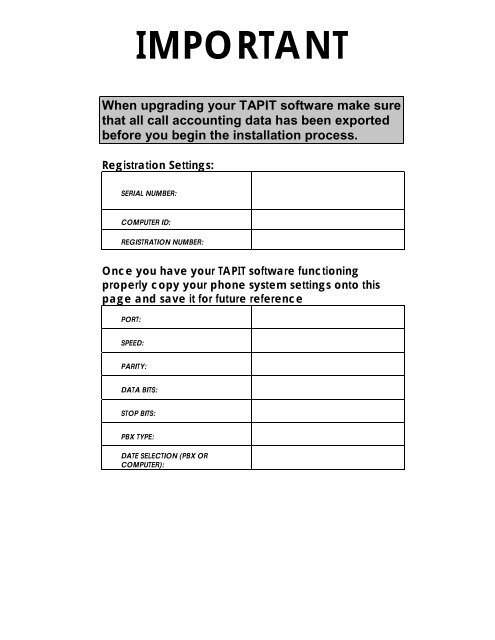
IMPORTANT<br />
When upgrading your TAPIT software make sure<br />
that all call accounting data has been exported<br />
before you begin the installation process.<br />
Registration Settings:<br />
SERIAL NUMBER:<br />
COMPUTER ID:<br />
REGISTRATION NUMBER:<br />
Once you have your TAPIT software functioning<br />
properly copy your phone system settings onto this<br />
page and save it for future reference<br />
PORT:<br />
SPEED:<br />
PARITY:<br />
DATA BITS:<br />
STOP BITS:<br />
PBX TYPE:<br />
DATE SELECTION (PBX OR<br />
COMPUTER):
Contents<br />
Introduction................................................................................ 1<br />
Introduction - O<strong>ver</strong>view .........................................................................1<br />
System Requirements.............................................................................1<br />
Installation .................................................................................. 2<br />
Getting Started .......................................................................................2<br />
Before installing your software ..............................................................2<br />
Installing <strong>Tapit</strong> Single User....................................................................4<br />
Setting up TAPIT Single User................................................................5<br />
Installing <strong>Tapit</strong> Multi-User.....................................................................8<br />
TAPIT Ser<strong>ver</strong> Installation........................................................8<br />
Setting up TAPIT Ser<strong>ver</strong>..........................................................9<br />
TAPIT Client Installation.........................................................9<br />
Setting up TAPIT Client ........................................................10<br />
NOTE FOR NOVELL NETWARE 3.11 USERS .................11<br />
Upgrading TAPIT <strong>EX</strong> using different serial number ...........................11<br />
Moving TAPIT <strong>EX</strong> to another <strong>com</strong>puter..............................................12<br />
Reinstalling TAPIT <strong>EX</strong>........................................................................12<br />
Upgrading TAPIT <strong>EX</strong> to TAPIT <strong>EX</strong>....................................................12<br />
Upgrading TAPIT 2000 to TAPIT <strong>EX</strong>.................................................12<br />
Upgrading TAPIT for Windows to TAPIT <strong>EX</strong>....................................14<br />
Upgrading TAPIT for DOS to TAPIT <strong>EX</strong> ...........................................18<br />
Registration ..........................................................................................20<br />
Main Menu ............................................................................... 21<br />
Main Menu - O<strong>ver</strong>view ........................................................................21<br />
Users/Departments .................................................................. 22<br />
O<strong>ver</strong>view..............................................................................................22<br />
Users.....................................................................................................22<br />
Departments .........................................................................................24<br />
Hierarchy Tree .....................................................................................27<br />
Clients....................................................................................... 29<br />
Managing Clients .................................................................................29<br />
<strong>Tapit</strong><br />
Introduction • i
Reports...................................................................................... 31<br />
Generating Reports...............................................................................31<br />
Statistics .................................................................................... 45<br />
Statistics Concepts................................................................................45<br />
To generate statistical graph ..................................................45<br />
System Maintenance............................................................... 47<br />
System Maintenance - O<strong>ver</strong>view..........................................................47<br />
System Parameters .................................................................. 48<br />
System Parameters Screen....................................................................48<br />
Communications...................................................................................49<br />
Call Costing..........................................................................................51<br />
Activity.................................................................................................53<br />
Trunks ..................................................................................................54<br />
Destination ...........................................................................................55<br />
DATA...................................................................................................57<br />
Call Editor ................................................................................. 58<br />
Working with Call Editor.....................................................................58<br />
TAPIT Pricing ............................................................................. 60<br />
Pricing Call Records.............................................................................60<br />
Reindex Database................................................................... 65<br />
Reindexing ...........................................................................................65<br />
Recosting.................................................................................. 66<br />
Recosting Call Records ........................................................................66<br />
Dialing Patterns ........................................................................ 69<br />
Working with Dialing Patterns.............................................................69<br />
Report Scheduler ..................................................................... 71<br />
Using Report Scheduler .......................................................................71<br />
Data Maintenance .................................................................. 73<br />
Data Maintenance Concepts.................................................................73<br />
Export...................................................................................................74<br />
Import...................................................................................................75<br />
Call Records Maintenance....................................................................76<br />
Export to Billing Software ...................................................................77<br />
Import <strong>Tapit</strong> DOS Data ........................................................................77<br />
ii • Introduction<br />
<strong>Tapit</strong>
Import V&H Data.................................................................................78<br />
Report Designer ....................................................................... 79<br />
Creating Custom Reports .....................................................................79<br />
Fraud Alert................................................................................ 83<br />
Fraud Alert Features.............................................................................83<br />
Parameters ............................................................................................83<br />
Delete Log File.....................................................................................85<br />
Test Alarms ..........................................................................................85<br />
Trunks ..................................................................................................86<br />
Extensions ............................................................................................87<br />
Dialed Numbers ...................................................................................88<br />
Database Repair Utility............................................................ 90<br />
Using Repair Utility .............................................................................90<br />
SMDR Monitor ........................................................................... 92<br />
Understanding SMDR Monitor............................................................92<br />
SMDR Monitor Menu Options: ...........................................................93<br />
Action.....................................................................................93<br />
Settings...................................................................................93<br />
PBX........................................................................................94<br />
Software License Agreement.................................................. 96<br />
Contents................................................................................................96<br />
Technical Support.................................................................... 99<br />
Technical Support from <strong>Trisys</strong>, Inc......................................................99<br />
Troubleshooting .....................................................................99<br />
TAPIT End of the Month Procedures ..................................101<br />
To Prevent Data Loss...........................................................102<br />
<strong>Tapit</strong><br />
SMDR ALARM.......................................................................... 103<br />
REQUIREMENTS.............................................................................103<br />
Hardware:.............................................................................103<br />
Supported Operating Systems:.............................................103<br />
Software Requirements:.......................................................103<br />
INSTALLATION...............................................................................104<br />
Before installing SMDR Alarm ...........................................104<br />
Installing SMDR Alarm.......................................................104<br />
USER INSTRUCTIONS....................................................................105<br />
Setting up the SMDR Alarm................................................105<br />
Setting up Phone Number tracking ......................................109<br />
Example of the Phone Number tracking ..............................110<br />
Understanding the TPSALARM.LOG file...........................111<br />
Introduction • iii
WEB REPORTS .......................................................................... 112<br />
REQUIREMENTS.............................................................................112<br />
Hardware:.............................................................................112<br />
Windows NT, Windows 2000 and Windwos XP Professional<br />
software requirements:.........................................................112<br />
INSTALLATION...............................................................................113<br />
Before installing <strong>Tapit</strong> Web Reports....................................113<br />
Installing <strong>Tapit</strong> Web Reports ...............................................113<br />
Changing IIS permissions ....................................................117<br />
UPGRADING TAPIT WEB REPORTS............................................122<br />
USER INSTRUCTIONS....................................................................123<br />
Logging in to the <strong>Tapit</strong> Web Reports...................................123<br />
CREATING/PRINTING REPORTS ...................................125<br />
DRILL DOWN REPORTS..................................................129<br />
GRAPH REPORTS .............................................................129<br />
TRUNK ANALYSIS REPORTS.........................................130<br />
PASSWORDS......................................................................135<br />
PERMISSIONS..................................................................................137<br />
Setting up Permissions for the first time. .............................138<br />
Using User List Screen ........................................................140<br />
Using User Profile Screen....................................................141<br />
Forgot Password?.................................................................145<br />
Glossary of terms .................................................................145<br />
TROUBLESHOOTING WEB REPORTS.........................................146<br />
Index....................................................................................... 148<br />
iv • Introduction<br />
<strong>Tapit</strong>
Introduction<br />
Introduction - O<strong>ver</strong>view<br />
• TAPIT is a call management and accounting software package designed to report on<br />
the phone activity of a business.<br />
• It is a tool to help identify and control expenses, provide statistical information, and<br />
assist in o<strong>ver</strong>all management of the business.<br />
• TAPIT collects all available information about in<strong>com</strong>ing and outgoing calls from<br />
your telephone equipment and stores it for later processing.<br />
• TAPIT is a real-time system, which means that all phone activity data is current to<br />
the minute.<br />
• TAPIT has an on-line help facility. Any time you need more information about a<br />
specific screen, just press F1 key and related help screen will be displayed.<br />
System Requirements<br />
System Requirements<br />
• Pentium II Based PC<br />
• 128 MB RAM<br />
• Microsoft Windows 98/NT/2000/XP Professional<br />
• 250 MB free disk space<br />
• One RS232 port connection to the PBX® SMDR port<br />
• Printer dri<strong>ver</strong> must be installed on your system<br />
• Power Management feature of your system must be disabled<br />
Assumptions<br />
This manual assumes that you are familiar with using a mouse, as well as with the<br />
<strong>com</strong>mon Microsoft Windows elements i.e. Scroll Bars, Selecting Menu Items etc. For<br />
detailed description on these elements please refer to Microsoft Windows User Guide.<br />
<strong>Tapit</strong> Introduction • 1
Installation<br />
Getting Started<br />
Before Installation<br />
If your PBX system sends data to the RS232 port, test the SMDR link by following<br />
instructions from page 2 (“Before installing your software”).<br />
Plain TAPIT Installation<br />
Install and setup TAPIT following the instructions on page 4 (“Installing <strong>Tapit</strong> Single-<br />
User”) or page 8 (“Installing <strong>Tapit</strong> Multi-User”).<br />
TAPIT Remote Manager Installation<br />
Install and setup TAPIT (see ”Plain TAPIT Installation above”).<br />
Install TAPIT Remote Manager (refer to the TAPIT Remote Manager manual located on<br />
the CD in Docs folder).<br />
If your system is collecting data from CDR systems like Altigen, 3COM,<br />
AVAYA IP Office, Cisco CCM etc.:<br />
Open and print readme and an appropriate startup file located on the <strong>Trisys</strong> Software CD<br />
in <strong>Tapit</strong> CDR Loader folder.<br />
Follow installation instructions for your telephone system.<br />
Note: the installation includes TAPIT Multi-User setup, TAPIT Remote Manager setup<br />
(if you purchased this option) and TAPIT CDR Loader setup.<br />
If you want to use Web based reports with your TAPIT software:<br />
Install and setup TAPIT Multi-User (page 8 - “Installing <strong>Tapit</strong> Multi-User”).<br />
If you purchased this option, install and setup TAPIT Remote Manager (refer to the<br />
TAPIT Remote Manager manual on the CD in Docs folder). Install TAPIT Web Reports<br />
following the instructions on page 110.<br />
Before installing your software<br />
In an effort to separate possible hardware and software issues we need to confirm the<br />
presence of clear SMDR data (this will tell us if the connection between PBX and<br />
<strong>com</strong>puter is intact). To do that we’ll use a <strong>com</strong>munications software called<br />
HyperTerminal®, which <strong>com</strong>es bundled with Microsoft® Windows. Please follow the<br />
steps below:<br />
1. Click on Start<br />
2 • Installation <strong>Tapit</strong>
2. Click on Programs<br />
3. Click on Accessories<br />
4. Click on HyperTerminal®<br />
5. Double-click Hypertrm.exe<br />
6. Enter name for session, i.e. SMDR Test. Click OK<br />
7. Using the arrow on the right of Connect using: select Direct to Com X (where<br />
X= the number of the <strong>com</strong>port connected to the PBX). Click OK<br />
8. Configure COM Port settings as per PBX specifications. Click OK<br />
9. Proceed with Step 10, unless you get a message Unable to open Com X. If you<br />
see this message, you will need to change the X value (use a different Com Port).<br />
Here is what you need to do:<br />
• Click File on the Menu Bar<br />
• Click New Connection<br />
• Go back to Step 6<br />
10. You should see “Connected” in the left lower corner with elapsed time counter.<br />
11. At this stage, if you have e<strong>ver</strong>ything configured properly, e<strong>ver</strong>y time you hang up<br />
after a <strong>com</strong>pleted call, you should see legible call data displayed on the screen.<br />
12. If clear data is displayed write down <strong>com</strong>munication parameters and exit<br />
HyperTerminal. Now you can proceed with the installation of <strong>Trisys</strong>, Inc.<br />
software.<br />
13. Howe<strong>ver</strong>, if NO data or “garbled” is displayed you may have a problem with either<br />
your cable (between PBX and the Com Port) or PBX’s SMDR port. At this stage<br />
you should contact you Phone Dealer for help.<br />
<strong>Tapit</strong> Installation • 3
Installing <strong>Tapit</strong> Single User<br />
1. Insert TAPIT CD into the CD ROM drive. <strong>Trisys</strong> StartUp Manager screen is<br />
displayed.<br />
(If this screen is not displayed automatically then use the Run <strong>com</strong>mand on the Start<br />
(Windows) menu by typing D:\Startup.exe, where D is represents your CD ROM<br />
drive, in the Open text box and clicking on OK.)<br />
2. Click on Install TAPIT. TAPIT Setup screen appears.<br />
Click on Continue.<br />
3. Click on the OK button on the next screen to install TAPIT <strong>EX</strong> in TAPITW32 folder<br />
on drive C: or click on the Change Folder button to change a destination drive or<br />
folder (must be local drive with available required free disk space). The TAPIT<br />
4 • Installation <strong>Tapit</strong>
Setup screen appears.<br />
4. Click on the Install button/icon to continue (or click on the Change Folder button<br />
to change a destination drive or folder).<br />
Program installs TAPIT files and updates your system.<br />
5. Program displays a message asking if your TAPIT software has a serial number. If<br />
you have a serial number click on YES, otherwise click on NO and TAPIT will be<br />
installed as a trial <strong>ver</strong>sion.<br />
6. TAPIT displays the Enter Serial Number screen. Enter your TAPIT software<br />
serial number. Click on OK.<br />
7. TAPIT processes the serial number. Product information message is displayed. Click<br />
on OK.<br />
8. Setup program displays a registration message as a reminder to register TAPIT<br />
software.<br />
It is <strong>ver</strong>y important to register your TAPIT promptly. TAPIT will stop<br />
functioning if you do not register it 30 days from the date of installation.<br />
You can find registration instructions on page 19 of this manual, “Getting Started”<br />
booklet included with your package or TAPIT CD in register.txt file.<br />
9. When installation is <strong>com</strong>pleted the installation program displays a message “TAPIT<br />
Setup was <strong>com</strong>pleted successfully”. Click on OK. It is re<strong>com</strong>mended to restart the<br />
<strong>com</strong>puter. Next step is to proceed with <strong>Tapit</strong> Setup.<br />
10. Go to START/Programs/TAPIT and run TAPIT Setup - see Setting up TAPIT<br />
Single User instructions following this section.<br />
Setting up TAPIT Single User<br />
1. When the program installation is <strong>com</strong>pleted you can proceed with the configuration<br />
of TAPIT so it will <strong>com</strong>municate with the phone system properly.<br />
Open Setup program by clicking on Start/Programs/<strong>Tapit</strong>/<strong>Tapit</strong> Setup.<br />
A message with product information is displayed. This message contains the TAPIT<br />
Serial Number. Verify the number is correct and click on Yes.<br />
<strong>Tapit</strong> Installation • 5
2. The TAPIT Setup screen appears. This screen displays your software serial number<br />
and product description.<br />
3. Click on the START SETUP button.<br />
4. The setup program will display a message indicating your database location and will<br />
ask you if you want to keep the current location settings. We re<strong>com</strong>mend the default<br />
directory is accepted (that is where program files were installed). Howe<strong>ver</strong>, a<br />
different drive and/or directory may be specified if i.e. there is not enough free disk<br />
space on the drive where application files were installed.<br />
Click on Yes to accept the default location.<br />
6 • Installation <strong>Tapit</strong>
5. System Parameters screen is displayed.<br />
Note: All settings for this screen can be changed in the TAPIT application<br />
on Maintenance/System Parameters screen.<br />
6. Click on the Your Telephone Number field and enter your main telephone<br />
number (do not use an 800 number).<br />
7. Load Calls from Text File:<br />
check this check box only if you want the call records to be loaded from a text file<br />
instead of a Com Port.<br />
When Load Calls from Text File: is checked the adjacent text box with the path to<br />
a call records file is enabled. Accept the default value or enter a new path.<br />
8. Process Text File E<strong>ver</strong>y______seconds<br />
This option be<strong>com</strong>es available when the Load Calls from Text File box is<br />
checked.<br />
The value entered in this box determines how often TAPIT loads data from the text<br />
file.<br />
9. Load Calls into Database E<strong>ver</strong>y __ minutes<br />
The value entered in this box determines how often TAPIT processes data (con<strong>ver</strong>ts<br />
raw information into TAPIT database format). Twenty minutes is the default value<br />
for this field.<br />
10. Click on the down arrow icon in the PBX Type/SMDR Format field to select a<br />
telephone system type the <strong>com</strong>puter is receiving data from.<br />
Data will not be processed accurately if incorrect selection is made.<br />
<strong>Tapit</strong> Installation • 7
11. eXtended Processing (not available for ALL PBX formats)<br />
Check this box only when you are certain TAPIT supports extended processing<br />
format or when suggested by <strong>Trisys</strong> Technical Support.<br />
12. Click on the PBX or Computer options in the Use Computer or Telephone<br />
System Date? field to specify whether date information for the call records is<br />
going to be processed based on the <strong>com</strong>puter or PBX date.<br />
You must check the Computer date option if your phone system is not<br />
generating the following date information: day, month and year.<br />
Otherwise we re<strong>com</strong>mend you use the PBX date.<br />
Note: The Port, Speed, Parity, Data Bits and Stop Bits options are enabled<br />
only when the Load Calls From Text File: box is unchecked.<br />
13. Click on the down arrow in the Port field to select a port the SMDR cable is<br />
connected to.<br />
14. Click on the down arrow icon in the Speed field to select the phone system<br />
transmission speed/baud rate.<br />
15. Click on the down arrow icon in the Parity field to select the phone system parity<br />
setting.<br />
16. Click on 7 or 8 in the Data Bits fields to select the phone system data bits setting.<br />
17. Click on 1 or 2 in the Stop Bits fields to select the phone system stop bits setting.<br />
18. Click on OK.<br />
Setup program will ask if you have a V&H Data Diskette. This is an optional pricing<br />
table that can be purchased with TAPIT.<br />
19. If you have purchased V&H pricing tables, click on Yes.<br />
TAPIT starts loading V&H pricing tables. This process will take se<strong>ver</strong>al minutes.<br />
You can also load V&H pricing files later directly from the TAPIT application.<br />
Otherwise, click on No.<br />
20. If setup is <strong>com</strong>pleted successfully, click on <strong>EX</strong>IT, otherwise print out a log file (go to<br />
SHOW LOG and click on the Print button) and call <strong>Trisys</strong> Technical Support at 973<br />
360 2300.<br />
21. If e<strong>ver</strong>ything is <strong>com</strong>plete reboot your <strong>com</strong>puter.<br />
22. Verify the TAPIT Monitor is running and start your TAPIT application by clicking<br />
on Start/Programs/<strong>Tapit</strong>/<strong>Tapit</strong>.<br />
To confirm that TAPIT is collecting data, run a detail activity report for the day.<br />
Installing <strong>Tapit</strong> Multi-User<br />
TAPIT Ser<strong>ver</strong> Installation<br />
1. One of the <strong>com</strong>puters on the network must be configured as an administrative station. This is<br />
where data from the phone equipment will be collected. The administrative station (TAPIT<br />
Ser<strong>ver</strong>) is the only <strong>com</strong>puter that has to go through the TAPIT registration<br />
process.<br />
8 • Installation <strong>Tapit</strong>
2. Follow the instructions from the Installing <strong>Tapit</strong> Single User section above (page 4) pt. 1<br />
through 7.<br />
3. TAPIT processes the serial number. The product information message is displayed followed<br />
by the message:<br />
Click on Yes.<br />
4. The setup program displays a registration message as a reminder to register the TAPIT<br />
software.<br />
5. When installation is <strong>com</strong>pleted the installation program displays a message “TAPIT Setup was<br />
<strong>com</strong>pleted successfully”. Click on OK. It is re<strong>com</strong>mended to restart the <strong>com</strong>puter.<br />
Setting up TAPIT Ser<strong>ver</strong><br />
When the program installation is <strong>com</strong>pleted you can proceed with the configuration of<br />
TAPIT so it will <strong>com</strong>municate with the phone system properly.<br />
1. Open the Setup program by clicking on Start/Programs/<strong>Tapit</strong>/<strong>Tapit</strong> Setup.<br />
A message with product information is displayed. This message contains the TAPIT<br />
Serial Number. Verify the number and click on Yes.<br />
TAPIT Setup screen appears. This screen displays your software serial number and<br />
product description.<br />
2. Click on the START SETUP button.<br />
3. Product information message is displayed followed by the message: “Will this <strong>com</strong>puter be<br />
connected to the Telephone System?”.<br />
Click on YES .<br />
4. The Setup program displays a message indicating the initial database location and asks you if<br />
you want to keep the current location settings. Click on No to reject the current location.<br />
5. The message "..Store <strong>Tapit</strong> in the default folder for <strong>Tapit</strong>/w Multi-user Access?"<br />
appears. Click on Yes.<br />
6. Follow instructions on page 5 - Setting up TAPIT Single User - pt.5 - pt.22<br />
Note: Maintenance option can be accessed only on the TAPIT Ser<strong>ver</strong><br />
Computer. Also when making any changes on the Maintenance Screen<br />
(i.e. Reindex, Data Maintenance or Recosting) make sure that TAPIT<br />
applications on all Client <strong>com</strong>puters are closed.<br />
7. Open your Windows Explorer and go to <strong>Tapit</strong>W32 folder. Find the DATA folder. Make sure<br />
this folder is shared with read/write access on the network.<br />
Note: Where<strong>ver</strong> you decide to store your data the basic rule for the TAPIT<br />
Ser<strong>ver</strong> setup is: <strong>Tapit</strong> Database must be stored in the subfolder of the<br />
shared folder.<br />
TAPIT Client Installation<br />
Client installation must be performed on e<strong>ver</strong>y workstation that is used to access TAPIT<br />
data.<br />
<strong>Tapit</strong> Installation • 9
Insert <strong>Trisys</strong> Software CD in the CD ROM drive. <strong>Trisys</strong> StartUp Manager screen is<br />
displayed.<br />
1. Follow the instructions from Installing <strong>Tapit</strong> Single User section above (page 4) pt. 1<br />
through 7.<br />
2. TAPIT processes the serial number. Product information message is displayed followed by the<br />
message:<br />
Click on NO since this is a client <strong>com</strong>puter and is not going to be connected to PBX.<br />
3. When installation is <strong>com</strong>pleted the Setup program displays a message “TAPIT Setup was<br />
<strong>com</strong>pleted successfully”. Click on OK. It is re<strong>com</strong>mended to restart the <strong>com</strong>puter.<br />
Setting up TAPIT Client<br />
Before running TAPIT Setup, it is re<strong>com</strong>mended to map a network drive at the client<br />
<strong>com</strong>puter to the folder DATA shared on the TAPIT Ser<strong>ver</strong> machine. For example, if you<br />
have mapped it as drive T: then the path to the TAPIT database on the T: drive will look<br />
like: T:\MAIN\TAPITDB.MDB. Howe<strong>ver</strong>, you can also find the shared DATA folder via<br />
Network Neighborhood during setup and create the database path then.<br />
The next step is to configure TAPIT on the client station, so it will properly <strong>com</strong>municate with the<br />
database.<br />
1. Open setup by clicking on Start/Programs/TAPIT/TAPIT Setup.<br />
A message with product information is displayed. This message contains the TAPIT<br />
Serial Number. Verify the number and click on Yes.<br />
TAPIT Setup screen appears. This screen displays your software serial number and<br />
product description.<br />
2. Click on the START SETUP button.<br />
3. Product information message is displayed followed by the message: “Will this <strong>com</strong>puter be<br />
connected to the Telephone System?”.<br />
Click on NO.<br />
4. The message "Do you want to locate <strong>Tapit</strong> Database Now? (Re<strong>com</strong>mended)" appears.<br />
Click on Yes.<br />
5. The file browser window is displayed. Locate the previously mapped network drive and the<br />
database in the MAIN folder, or go to Network Neighborhood and find shared DATA folder.<br />
Click on Open.<br />
6. If setup is <strong>com</strong>pleted successfully, click on <strong>EX</strong>IT, otherwise print out a log file (go to<br />
SHOW LOG and click on a Print button) and call <strong>Trisys</strong> Technical Support at 973<br />
360 2300 option 3.<br />
7. If e<strong>ver</strong>ything is <strong>com</strong>pleted reboot your <strong>com</strong>puter.<br />
8. To confirm that TAPIT Client is connected to the ser<strong>ver</strong> run a detail activity report for the day.<br />
Note: Maintenance option can be accessed only on the TAPIT Ser<strong>ver</strong><br />
Computer. Also when making any changes on the Maintenance Screen<br />
(i.e. Reindex, Data Maintenance or Recosting) make sure TAPIT<br />
applications on all Client <strong>com</strong>puters are closed. To avoid any<br />
inappropriate changes to system configuration, delete the shortcut to the<br />
TAPIT Monitor from <strong>Tapit</strong> program group on Client <strong>com</strong>puter.<br />
10 • Installation <strong>Tapit</strong>
NOTE FOR NOVELL NETWARE 3.11 USERS<br />
Access Locking and Novell NetWare 3.11<br />
When using data from a ser<strong>ver</strong> back end, Access uses the locking facilities provided by<br />
that back end. There is a bug in NetWare 3.11 TTS (Transaction Tracking System) that<br />
can result in a ser<strong>ver</strong>'s abending when running certain Access queries or otherwise<br />
requesting a large number of locks. Each page of records Access locks uses one or more<br />
locks from the NetWare TTS. The defaults in NetWare allow a single workstation to<br />
have 500 locks at any given time. This results in a limit of 1M of data that Access can<br />
deal with in a single transaction. Since Access tries to lock e<strong>ver</strong>y record involved in<br />
either an update or a delete query before actually carrying out the update or delete, it is<br />
quite possible to bump into this limit on a moderately large database.<br />
The problem is that NetWare 3.11 reacts rather poorly to having its lock limit exceeded.<br />
It appears to count a lock violation e<strong>ver</strong>y time it looks at the connection in question,<br />
which is still trying to lock more records. Eventually (in about 3-5 minutes) some<br />
internal table o<strong>ver</strong>flows, and the entire ser<strong>ver</strong> goes down, with a frightening message that<br />
instructs you to cycle the power. There are two things you can do if this happens to you.<br />
The first is to increase the number of locks available, and the second is to apply the<br />
NetWare patch that prevents the abend of the ser<strong>ver</strong>. (Very large queries can still fail, but<br />
at least the ser<strong>ver</strong> doesn't fail along with them.) To increase the number of locks<br />
available, enter the following <strong>com</strong>mands at the file ser<strong>ver</strong> console or in your<br />
AUTO<strong>EX</strong>EC.NCF file:<br />
set maximum record locks per connection = 10000<br />
set maximum record locks = 200000<br />
The first parameter is the most locks any single connection can have, and the second is<br />
the most the entire ser<strong>ver</strong> can keep track of. These values (10,000 and 200,000) are the<br />
maximums that NetWare 3. 11 can ac<strong>com</strong>modate. By setting the maximum record locks<br />
per connection to 10,000, Access can handle a transaction up to 20MB. To fix the ser<strong>ver</strong><br />
abend problem, you need to download the latest NetWare 3.11 patch file. It can be found<br />
on CompuServe in the NOVFILES download area, as of this writing, the current <strong>ver</strong>sion<br />
is 311PTD.ZIP. You will need to load two of the NLMs from this file, either directly<br />
from the ser<strong>ver</strong> console or in your AUTO<strong>EX</strong>EC.NCF file:<br />
load patchman.nlm<br />
load ttsfix.nlm<br />
This problem is specific to NetWare <strong>ver</strong>sion 3.11 and has been fixed in later <strong>ver</strong>sions of<br />
NetWare.<br />
Upgrading TAPIT <strong>EX</strong> using different serial<br />
number<br />
This section of the manual pertains to a registered <strong>ver</strong>sion of TAPIT <strong>EX</strong> that is upgraded<br />
to a different type of TAPIT call accounting software (i.e. upgrading TAPIT <strong>EX</strong> Single-<br />
User to TAPIT <strong>EX</strong> Multi-User). In such cases, please call Technical Support at 973 360<br />
2300 for instructions.<br />
<strong>Tapit</strong> Installation • 11
Moving TAPIT <strong>EX</strong> to another <strong>com</strong>puter<br />
Follow the instructions in this section if your TAPIT <strong>EX</strong> software is registered and you<br />
need to move it to another <strong>com</strong>puter.<br />
1. At the new <strong>com</strong>puter install and configure TAPIT <strong>EX</strong> by following the upgrade<br />
instructions from the Upgrading TAPIT <strong>EX</strong> To TAPIT <strong>EX</strong> section bellow.<br />
2. Note: Make sure that you have access to the old <strong>com</strong>puter. Call<br />
Technical Support to deactivate previous registration and obtain a new registration<br />
number.<br />
Reinstalling TAPIT <strong>EX</strong><br />
Follow the instructions in this section if you need to reinstall your TAPIT <strong>EX</strong> software on<br />
the same <strong>com</strong>puter with the same serial number.<br />
Open your Windows Explorer.<br />
Go to TAPITW32 folder.<br />
Select Setup folder and delete it.<br />
Now you can proceed with installing TAPIT - refer to the Installing TAPIT Single User<br />
(page 4). Your system already has information about previously used serial number.<br />
While reinstalling TAPIT, program will ask you to either accept or reject existing serial<br />
number. Accept the number provided by the system.<br />
Upgrading TAPIT <strong>EX</strong> to TAPIT <strong>EX</strong><br />
Follow instructions from the Upgrading TAPIT 2000 to TAPIT <strong>EX</strong> section below.<br />
Upgrading TAPIT 2000 to TAPIT <strong>EX</strong><br />
1. Click on the Maintenance icon on the TAPIT Main Menu of a current <strong>ver</strong>sion of<br />
your software.<br />
2. Click on Data Maintenance. Data Maintenance screen opens on the Export<br />
tab by default.<br />
Click All in the Export field for all data to be exported. The default folder is your<br />
current TAPIT folder. You may choose another folder if you want. DO NOT Check<br />
“Delete Existing Data from Database”. Click Continue. You will receive “Data<br />
Export Completed” message.<br />
Note: If you are using account codes with matter codes you need to<br />
follow the steps below before you export your call records. Otherwise<br />
proceed with step 3.<br />
1. Go to the Systems Parameters screen and select the Call Costing tab.<br />
2. Write down the Matter Code Length setting for later use.<br />
3. Change the Matter Code Length setting to 0.<br />
12 • Installation <strong>Tapit</strong>
4. Click on OK.<br />
5. Click on Reindex Database.<br />
6. Select second option.<br />
7. Click on Continue.<br />
8. Filter screen appears. Enter the date range criteria for the call records<br />
you intend to export.<br />
9. Click on Continue.<br />
10. <strong>Tapit</strong> reindexes the data. The confirmation message appears when<br />
done. Click on OK.<br />
3. Click on Call Records Maintenance tab. Click on Export & Keep Call<br />
Records. Then specify the filename for the call records: Calls.txt. Click on<br />
Continue. At the filter screen, you must enter the date range for the<br />
records you wish to keep and click on Continue. You will receive “Call<br />
Records Export Completed” message. Exit from Data Maintenance screen.<br />
4. Close TAPIT 2000 and TAPIT SMDR Monitor.<br />
5. Go to Windows Explorer and locate the TAPITW32 folder. Rename the folder as<br />
TAPITOLD (if prompted with a warning by the operating system click on OK). Find<br />
TAPIT.INI and SERIAL.TXT files. TAPIT. INI file resides in the same folder where<br />
TAPIT database is located. If you are not sure of its whereabouts open TAPIT<br />
program and press CTRL + F1 keys at the Main Menu screen. Copy both files to<br />
another folder as backup.<br />
6. Proceed with the new installation of TAPIT <strong>EX</strong>.<br />
7. Insert TAPIT CD into the CD ROM drive. The <strong>Trisys</strong> StartUp Manager screen is<br />
displayed.<br />
8. Click on Install TAPIT . TAPIT Setup screen appears.<br />
9. Click on Continue button. TAPIT is searching for the installed <strong>com</strong>ponents.<br />
10. Click on OK button to install TAPIT in TAPITW32 folder on drive C. TAPIT Setup<br />
screen appears.<br />
11. Click on Install button to continue (Note: Change Folder button allows a different<br />
TAPIT destination path than default).<br />
12. Program installs TAPIT files and updates your system.<br />
13. Program displays a following message: “Setup has found Serial Number (your<br />
current serial number). Is it your current valid Serial Number?” Click on NO.<br />
14. TAPIT displays Enter Serial Number screen. Enter your TAPIT software serial<br />
number. Click on OK.<br />
15. TAPIT processes the serial number. Product information message is displayed. Click<br />
on OK.<br />
16. Setup program displays a registration message as a reminder to register TAPIT<br />
software.<br />
17. It is <strong>ver</strong>y important to register your TAPIT promptly. TAPIT will stop functioning if<br />
you do not register it 30 days from the date of installation.<br />
You can find registration instructions on page 19 of this manual, “Getting Started”<br />
booklet included with your package or TAPIT CD in register.txt file.<br />
<strong>Tapit</strong> Installation • 13
Setup program displays a message “TAPIT Setup was <strong>com</strong>pleted successfully”.<br />
Click on OK (If prompted by system, restart the <strong>com</strong>puter).<br />
18. Copy TAPIT.INI file from TAPITOLD folder into new TAPITW32 folder (where<br />
your TAPIT database files reside). Let it o<strong>ver</strong>write the existing file.<br />
19. Go to START/Programs/TAPIT and run TAPIT Setup. Note: While running TAPIT<br />
Setup, System Parameters screen reflects settings from your previous <strong>ver</strong>sion of<br />
TAPIT. Do not change anything unless required. (For setup instructions see Setting<br />
up TAPIT on page 5 of this manual.)<br />
20. After <strong>com</strong>pleting Setup go to START/Programs/TAPIT/TAPIT.<br />
TAPIT provides the following message: “TAPIT will be connected to the<br />
database…”. Click OK.<br />
21. From the Main Menu, click on Maintenance, click on Data Maintenance,<br />
click on Import tab.<br />
Check all the boxes <strong>EX</strong>CEPT V&H Data. Do Not Check ALL. Go to Directory<br />
and change folder to C:\TAPITOLD. Click Continue. After import is finished,<br />
you will receive “Data Import Completed” message.<br />
22. Click on Call Records Maintenance. Click on Import Call Records. Go to<br />
Directory and change the folder to C:\<strong>Tapit</strong>Old. Go to File Name and enter the<br />
file name: Calls.txt. Click on Continue. At the filter screen, you must enter the<br />
date range for the records you wish to keep and click on Continue. After<br />
the import is finished, you will receive “Call Record Import Completed” message.<br />
Exit Call Records Maintenance screen.<br />
Note: If you are using account codes with matter codes you need to follow<br />
the steps below after you import your call records. Otherwise proceed with<br />
step 12.<br />
1. Go to the Systems Parameters screen and select the Call Costing tab.<br />
2. Change the Matter Code Length setting to the previously recorded setting.<br />
3. Click on OK.<br />
23. Click on Reindex Database. Select second option. Click on Continue. Filter<br />
screen appears. Enter the date range criteria for the call records you intend to export.<br />
Click on Continue. <strong>Tapit</strong> reindexes the data. The confirmation message appears<br />
when done. Click on OK.<br />
24. To confirm successful import of data, run a Detail Activity by Date report from<br />
the Report Menu.<br />
25. If e<strong>ver</strong>ything is running after you <strong>com</strong>pleted the above, you may go back to<br />
Windows Explorer and delete the TAPITOLD folder. Note: The old TAPIT 2000<br />
program group is not automatically removed from the MS Windows START/<br />
Programs menu. You have to delete it manually (see MS Windows help).<br />
Upgrading TAPIT for Windows to TAPIT <strong>EX</strong><br />
14 • Installation <strong>Tapit</strong>
Upgrading TAPIT on the SAME <strong>com</strong>puter:<br />
1. Click on the Maintenance icon on the TAPIT Main Menu of a current <strong>ver</strong>sion of<br />
your software.<br />
2. Click on Data Maintenance and in the Export field, click All for all data to be<br />
exported. The default folder is your current TAPIT folder. You may choose another<br />
folder if you want. DO NOT Check “Delete Existing Data from Database”. Click on<br />
Continue. You will receive “Data Export Completed” message.<br />
Note: If you are using account codes with matter codes you need to<br />
follow the steps below before you export your call records. Otherwise<br />
proceed with step 3.<br />
1. Go to the Systems Parameters screen and select the Call Costing tab.<br />
2. Write down the Matter Code Length setting for later use.<br />
3. Change the Matter Code Length setting to 0.<br />
4. Click on OK.<br />
5. Click on Reindex Database.<br />
6. Select second option.<br />
7. Click on Continue.<br />
8. Filter screen appears. Enter the date range criteria for the call records<br />
you intend to export.<br />
9. Click on Continue.<br />
10. <strong>Tapit</strong> reindexes the data. The confirmation message appears when<br />
done. Click on OK.<br />
3. Click on the Call Records Maintenance tab. Click on Export & Keep Call<br />
Records. Then specify the filename for the call records, Calls.txt. Click on<br />
Continue. At the filter screen enter the date range criteria for the records you wish<br />
to keep (leave it blank for all) and click on Continue. You will receive “Call<br />
Records Export Completed” message. Exit the Data Maintenance screen.<br />
4. Close TAPIT for Windows and TAPIT SMDR Monitor.<br />
5. Go to Windows Explorer and locate the TAPITW folder. Rename the folder as<br />
TAPITOLD. Find TAPIT.INI. It resides in the same folder where TAPIT database is<br />
located. If you are not sure, open TAPIT program and press CTRL + F1 keys at the<br />
Main Menu screen.<br />
Copy both files to another folder as backup.<br />
6. Proceed with TAPIT <strong>EX</strong> installation.(see Installing TAPIT Single User on page.4)<br />
7. Copy TAPIT.INI from TAPITOLD folder into new TAPITW32 folder (where<br />
TAPIT database files reside). Allow TAPIT to o<strong>ver</strong>write an existing file.<br />
8. Go to START/Programs/TAPIT and run TAPIT Setup. Note: While running TAPIT<br />
Setup, System Parameters screen will reflect settings from your previous <strong>ver</strong>sion of<br />
TAPIT. Do not change anything unless required. (For setup instructions see Setting<br />
up TAPIT on page 5 of this manual.)<br />
9. After <strong>com</strong>pleting Setup, go to START/Programs/TAPIT/TAPIT.<br />
TAPIT provides the following message: “TAPIT will be connected to the<br />
database…”. Click OK.<br />
<strong>Tapit</strong> Installation • 15
10. From Main Menu, click on Maintenance, click on Data Maintenance, click<br />
on the Import tab, and then check all the boxes <strong>EX</strong>CEPT V&H Data. Do Not<br />
Check ALL. Go to Directory and change folder to C:\TAPITOLD. Click<br />
Continue. After import is finished, you will receive “Data Import Completed”<br />
message.<br />
11. Click on Call Records Maintenance. Click on Import Call Records. Go to<br />
Directory and change the folder to C:\<strong>Tapit</strong>Old. Go to File Name and enter the<br />
file name: Calls.txt. Click on Continue. At the filter screen, you must enter the<br />
date range for the records you wish to keep and click on Continue. After<br />
the import is finished, you will receive “Call Record Import Completed” message.<br />
Exit Call Records Maintenance screen.<br />
Note: If you are using account codes with matter codes you need to follow<br />
the steps below after you import your call records. Otherwise proceed with<br />
step 12.<br />
1. Go to the Systems Parameters screen and select the Call Costing tab.<br />
2. Change the Matter Code Length setting to the previously recorded setting.<br />
3. Click on OK.<br />
12. Click on Reindex Database. Select second option. Click on Continue. Filter<br />
screen appears. Enter the date range criteria for the call records you intend to export.<br />
Click on Continue. <strong>Tapit</strong> reindexes the data. The confirmation message appears<br />
when done. Click on OK.<br />
To confirm successful import of data, run a Detail Activity by Date report from the<br />
Report Menu.<br />
If you have <strong>com</strong>pleted the above and e<strong>ver</strong>ything is running, you may go back to<br />
Windows Explorer and delete the TAPITOLD folder. It is re<strong>com</strong>mended to delete the<br />
old TAPIT for Windows program group from the START, Programs menu (see MS<br />
Windows help).<br />
Upgrading TAPIT on the DIFFERENT <strong>com</strong>puter:<br />
1. Click on the Maintenance icon on the TAPIT Main Menu.<br />
2. Click on Data Maintenance and in the Export field click All for all data to be<br />
exported. The default folder is your current TAPIT folder. You may choose another<br />
folder if you wish. DO NOT Check “Delete Existing Data from Database”. Click on<br />
Continue. You will receive “Data Export Completed” message.<br />
Note: If you are using account codes with matter codes you need to<br />
follow the steps below before you export your call records. Otherwise<br />
proceed with step 3.<br />
1. Go to the Systems Parameters screen and select the Call Costing tab.<br />
2. Write down the Matter Code Length setting for later use.<br />
3. Change the Matter Code Length setting to 0.<br />
4. Click on OK.<br />
5. Click on Reindex Database.<br />
16 • Installation <strong>Tapit</strong>
6. Select second option.<br />
7. Click on Continue.<br />
8. Filter screen appears. Enter the date range criteria for the call records<br />
you intend to export.<br />
9. Click on Continue.<br />
10. <strong>Tapit</strong> reindexes the data. The confirmation message appears when<br />
done. Click on OK.<br />
3. Click on Call Records Maintenance tab. Click on Export & Keep Call<br />
Records. Then specify the filename for the call records, Calls.txt. Click<br />
Continue. At the filter screen enter the date range criteria for the records you wish<br />
to keep (leave it blank for all) and click on Continue. You will receive “Call<br />
Records Export Completed” message. Exit Data Maintenance screen.<br />
4. Close TAPIT for Windows and TAPIT SMDR Monitor.<br />
5. Copy all the exported data files and TAPIT.INI file to an external storage.<br />
TAPIT.INI resides in the same folder where TAPIT database is located. If you are<br />
not sure, open TAPIT program and press CTRL + F1 keys at the Main Menu screen.<br />
Keep this file as backup.<br />
6. Proceed with TAPIT <strong>EX</strong> installation on a new <strong>com</strong>puter. See Installing TAPIT<br />
Single User on page 4.<br />
7. Copy TAPIT.INI and all the exported data files from the external storage into new<br />
TAPITW32 folder. In case of TAPIT.INI allow it to o<strong>ver</strong>write existing file.<br />
8. Run TAPIT Setup Program – START/Programs/TAPIT/TAPIT Setup.<br />
Note: While running TAPIT Setup, System Parameters screen will reflect settings<br />
from your previous <strong>ver</strong>sion of TAPIT. Do not change anything unless required. (For<br />
setup instructions see Setting up TAPIT on page 5 of this manual).<br />
9. After <strong>com</strong>pleting Setup program, go to START/Programs/TAPIT/TAPIT.<br />
TAPIT provides the following message: “TAPIT will be connected to the<br />
database…”. Click OK.<br />
10. From the Main Menu, click on Maintenance, click on Data Maintenance,<br />
click on Import tab, and then check all the boxes <strong>EX</strong>CEPT V&H Data. Do Not<br />
Check ALL. Go to Directory and set folder to C:\TAPITW32. Click Continue.<br />
After import is finished, you will receive “Data Import Completed” message.<br />
11. Click on Call Records Maintenance. Click on Import Call Records. Go to<br />
Directory and change the folder to C:\<strong>Tapit</strong>Old. Go to File Name and enter the<br />
file name: Calls.txt. Click on Continue. At the filter screen, you must enter the<br />
date range for the records you wish to keep and click on Continue. After<br />
the import is finished, you will receive “Call Record Import Completed” message.<br />
Exit Call Records Maintenance screen.<br />
Note: If you are using account codes with matter codes you need to follow<br />
the steps below after you import your call records. Otherwise proceed with<br />
step 12.<br />
1. Go to the Systems Parameters screen and select the Call Costing tab.<br />
<strong>Tapit</strong> Installation • 17
2. Change the Matter Code Length setting to the previously recorded setting.<br />
3. Click on OK.<br />
12. Click on Reindex Database. Select second option. Click on Continue. Filter<br />
screen appears. Enter the date range criteria for the call records you intend to export.<br />
Click on Continue. <strong>Tapit</strong> reindexes the data. The confirmation message appears<br />
when done. Click on OK.<br />
To confirm successful import of data, run a Detail Activity by Date report from the<br />
Report Menu.<br />
Upgrading TAPIT for DOS to TAPIT <strong>EX</strong><br />
Note: you need to have TAPIT for DOS <strong>ver</strong>sion 2.9.8 in order to upgrade it to<br />
TAPIT <strong>EX</strong>.<br />
1. Go to C:\<strong>Tapit</strong>> prompt and type TPDB<strong>EX</strong>P then press ENTER<br />
2. Start TAPIT for DOS<br />
3. Select 6 (System Maintenance)<br />
4. Select A (Export for Billing)<br />
5. Enter criteria for call records that you would like to be imported into TAPIT for<br />
Windows<br />
6. Enter 0 (Zero) in Select Billing Interface field and press F3<br />
7. Exit TAPIT using F10 to the C:\TAPIT> prompt. You need to copy exported files to<br />
an external storage media. Floppy disk is used here as an example of such media.<br />
Insert a floppy disk into your floppy drive. Proceed with coping exported files to a<br />
floppy disk. Type the following:<br />
copy tapit.txt a:\ - and press Enter<br />
copy client.txt a:\ - and press Enter<br />
copy dept.txt a:\ - and press Enter<br />
copy user.txt a:\ - and press Enter<br />
copy rates.txt a:\ - and press Enter<br />
8. Install TAPIT <strong>EX</strong> – <strong>com</strong>plete the instructions on page 4 of this manual.<br />
9. Run TAPIT Setup – see the instructions on page 5.<br />
10. Copy exported files from the floppy disk to TAPITW32 directory.<br />
11. Start TAPIT <strong>EX</strong> – Start/Programs/TAPIT/TAPIT<br />
12. Click on Maintenance icon located on the Main Menu screen.<br />
13. Click on Data Maintenance icon.<br />
14. Click on Import DOS data (Assumes .txt files are in TAPITW32 host folder)<br />
15. Click on OK when a message confirming the Import process is <strong>com</strong>pleted appears on<br />
the screen<br />
16. Click on Exit to leave Data Maintenance screen<br />
18 • Installation <strong>Tapit</strong>
17. Run a Detail Activity by Date report to confirm import of call records.<br />
18. Close any running program, and exit out of Windows and reboot the <strong>com</strong>puter.<br />
<strong>Tapit</strong> Installation • 19
Registration<br />
It is <strong>ver</strong>y important to register your software promptly; otherwise, it will stop<br />
functioning within 30 days from the date of installation.<br />
For registration instructions refer to the Registration.txt file on the CD or the<br />
<strong>com</strong>pany website - www.trisys.<strong>com</strong> (option Registration).<br />
20 • Installation <strong>Tapit</strong>
Main Menu<br />
Main Menu - O<strong>ver</strong>view<br />
The Main Menu screen is displayed when you start TAPIT.<br />
The buttons/icons on the menu allow you to access different options by clicking on them.<br />
The top menu bar has the following options:<br />
Main - offers access to each part of the <strong>Tapit</strong> program.<br />
Window - contains the standard Windows’ functions for aligning different screens:<br />
Tile, Cascade, Arrange Icons, Hide, Unhide and Size to Fit.<br />
Help - provides access to TAPIT’s Help Screen alternatively to pressing F1 key.<br />
To close the TAPIT application click on the Exit button/icon or open the drop down Main<br />
menu bar option and click on Exit.<br />
Before exiting, make sure Main Menu is the only screen open within TAPIT.<br />
<strong>Tapit</strong> Main Menu • 21
Users/Departments<br />
O<strong>ver</strong>view<br />
The Users/Departments screen is used to define employees’ names, extensions in<br />
addition to defining and assigning department information.<br />
It is divided into two sections. The left section of the screen has 3 tabs: Hierarchy,<br />
Departments and Users.<br />
The right-hand side contains detailed information and is dependent on the selection made<br />
in the list(left) section. When clicked, Departments and Users tabs, display the<br />
corresponding departments and users screens. A list of departments, or users appears on<br />
the left-hand side. You can navigate it by clicking on list's items. You can also sort by<br />
clicking on the header labels of the list. When a particular record is highlighted the right<br />
section of the User/Department screen displays its detail information. This screen<br />
allows you to change, add, or delete department's or user's data. Hierarchy tab shows<br />
Hierarchy of Departments tree on the left-hand side. The right side initially displays<br />
instructions but when any of the tree nodes is selected, the screen changes to an edit<br />
mode.<br />
Users<br />
Users screen is used to maintain employees' records. It has two sections. The left section<br />
is a list of users. You can navigate it by clicking on list's items. You can also sort by<br />
clicking on the header labels of the list. When a particular record is highlighted the right<br />
section displays user's detail information. This screen allows you to change, add, or<br />
delete user's data.<br />
22 • Users/Departments <strong>Tapit</strong>
Adding new users<br />
1. Click on the Users tab. The left section of the screen displays users' list. If you<br />
entered the users screen for the first time or none of the records is highlighted, the<br />
right section of the screen displays instructions, otherwise user detail information<br />
screen appears.<br />
2. Click on New button located above the detail section.<br />
3. Enter appropriate information into User Last Name/Company (press Tab key to<br />
move to the next field), User First Name and Authorization Code text boxes (if<br />
this function of the telephone system is utilized by your <strong>com</strong>pany, if not leave this<br />
field blank).<br />
4. If TAPIT is pricing your calls and you want to surcharge this particular user’s calls,<br />
go to Surcharge Per Minute or Surcharge Per Call field and enter dollar<br />
amount or click on Multiplier and enter % (percentage value). By surcharge or<br />
multiplier we mean extra money that will be applied on the top of the rate table that<br />
is used to price calls.<br />
Note: Two types of surcharges and multiplier may be used at the same time<br />
5. Click on a down arrow next to Department text box to open departments' list.<br />
Select appropriate department and click on it to assign it to the user.<br />
6. Enter ext. number in the text box located below Add>> button. Click on Add>> or<br />
press Enter. Extension has been assigned to the user and is displayed in<br />
Extension(s) list box. To remove extension number from the list, select it and click<br />
on Remove
Editing or deleting users<br />
1. If not active, click on the Users tab. The left section of the screen displays users' list.<br />
If you entered the users screen for the first time or none of the users is highlighted,<br />
the right section of the screen displays instructions, otherwise user detail information<br />
screen appears.<br />
2. From the users list select a user to be edited and click on it (you can sort users list by<br />
clicking on list's header labels).<br />
Go to the detail section.<br />
Navigate with Tab and type in new values in any of User Last Name/Company,<br />
User First Name, Authorization Code, Surcharge Per Minute, Surcharge<br />
Per Call and Multiplier fields.<br />
3. To change or assign department, click on a down arrow next to Department text<br />
box and open departments' list. Select appropriate department and click on it.<br />
4. Enter ext. number in the text box located below Add>> button. Click on Add>> or<br />
press Enter. Extension has been assigned to the user and is displayed in<br />
Extension(s) list box. To remove extension number from the list, select it and click<br />
on Remove
highlighted the right section displays department's detail information. This screen allows<br />
you to change, add, or delete department's data.<br />
Adding new departments<br />
1. Click on the Departments tab. The left section of the screen displays departments'<br />
list. If you entered the departments' screen for the first time or none of the<br />
departments is highlighted, the right section of the screen displays instructions,<br />
otherwise department detail information screen appears.<br />
2. Click on New button located above the detail section of the screen.<br />
3. Type in department's name. If this is a sub-department check Parent check box.<br />
Click on a down arrow next to Parent department text box and open departments'<br />
list. Select appropriate department and click on it.<br />
4. Click on Save.<br />
Note: Pressing Enter saves any changes prior to it.<br />
5. Click on Exit.<br />
Editing or deleting departments<br />
1. If not active, click on Departments tab. The left section of the screen displays the<br />
departments' list. If you entered departments' screen for the first time or none of the<br />
departments is highlighted, the right section of the screen displays instructions,<br />
otherwise department information screen appears.<br />
2. Click on a department to be edited (you can sort departments list by clicking on list's<br />
header labels).<br />
3. Go to the detail section and type in changes to the department's name.<br />
4. You can assign, change or remove a parent department.<br />
To assign a parent department, check Parent check box and click on a down<br />
<strong>Tapit</strong> Users/Departments • 25
arrow next to Parent department text box. Departments' list opens. Select<br />
appropriate department and click on it. To change existing parent<br />
department, click on a down arrow next to Parent department text box.<br />
Departments' list opens. Select appropriate department and click on it.<br />
To remove parent department, click on the Parent check box to uncheck it.<br />
Click on Save.<br />
Note: Unlike proceeding cases, removing parent department is not reflected in the<br />
left-hand side departments' list right away. You have to click on the Save button to<br />
update the left section of the screen.<br />
5. To delete a department, go to the list section and click on a department to be deleted.<br />
Click on Delete button. The confirmation message appears. Click on Yes. General<br />
instructions screen takes place of the detail screen and user is no longer found in a<br />
list section.<br />
6. Click on Save.<br />
Note: Pressing Enter saves any changes prior to it.<br />
7. Click on Exit.<br />
It is a good practice to run Reindex Database (Main<br />
Menu/Maintenance/Reindex Database) after adding, changing or<br />
deleting user records.<br />
Printing departments list<br />
1. Click on Print button. List of reports appears. You can print any listed report from<br />
this screen.<br />
2. Select List of Departments from the list of reports.<br />
3. Click on Open Report.<br />
4. Click on Options. Select Print and click on it.<br />
5. When report has finished printing, close preview screen by clicking on Options and<br />
then Exit.<br />
26 • Users/Departments <strong>Tapit</strong>
Hierarchy Tree<br />
Hierarchy Tree screen displays structure of departments and users.<br />
1. If not active, click on Hierarchy Tree tab. The left section of the screen displays<br />
Hierarchy of Departments Tree. If you entered this screen for the first time or<br />
none of the nodes is selected, the right section of the screen displays instructions<br />
otherwise detail information screen (corresponding to your selection) appears.<br />
2. Select any node by clicking on it. If the node is a department then department screen<br />
appears on your right-hand side. Correspondingly, if the node is a user then user<br />
screen appears in the detail section. You add, edit or delete departments or users<br />
from here.<br />
3. Click on Save after you're done with any changes. If you are adding, editing or<br />
deleting any of the departments or users records from this screen, you must update<br />
the Hierarchy Tree when finished. In order to do this, click anywhere on a white<br />
space of the screen or press F5, otherwise changes will not be reflected.<br />
Printing Hierarchy Tree<br />
1. Click on Print button. List of reports appears. You can print any listed report from<br />
this screen.<br />
2. Select Department Hierarchy from the list of reports.<br />
3. Click on Open Report.<br />
4. Click on Options. Select Print and click on it.<br />
5. When report has finished printing, close preview screen by clicking on Options and<br />
then Exit.<br />
<strong>Tapit</strong> Users/Departments • 27
It is a good practice to run Reindex Database (Main<br />
Menu/Maintenance/Reindex Database) after adding, changing or<br />
deleting user records.<br />
28 • Users/Departments <strong>Tapit</strong>
Clients<br />
Managing Clients<br />
The Client screen is used to enter, view and edit client’s information.<br />
It contains two sections. The left section of the screen displays a list of clients.<br />
You can navigate it by clicking on list's items. When a particular client's record is<br />
highlighted the right section of the Clients screen displays its detail information. The<br />
detail section allows you to add, edit or delete client's data.<br />
Adding new client<br />
1. Click on New button located above the detail section.<br />
2. Enter data into Client Last Name/Company, Client First Name, Account<br />
Code and address fields. Press Tab key to move to the next field.<br />
3. Click on Save.<br />
Note: Pressing Enter saves any changes prior to it.<br />
4. Click on Exit.<br />
<strong>Tapit</strong> Clients • 29
Editing or deleting clients<br />
1. From the clients' list select a client's record to be edited and click on it (you can sort<br />
clients list by clicking on header labels of the list).<br />
2. Go to the detail section of the screen. Navigate with Tab and type in new values in any of<br />
Client Last Name/Company, Client First Name, Account Code, and address<br />
fields.<br />
3. Enter new phone number in the text box located below Add>> button. Click on Add>><br />
or press Enter. Phone number has been assigned to a client and is displayed in Phone<br />
Number(s) list box. To remove phone number from the list, select it and click on<br />
Remove
Reports<br />
Generating Reports<br />
The Report Selection screen lists available report groups and individual reports names.<br />
We re<strong>com</strong>mend you try all of the reports at least once to see the difference among the<br />
reports, and then choose the reports you will be running in the future.<br />
Note: Other Reports button located at the bottom of the Report Selection screen.<br />
Click on it to invoke the Special Reports screen. These additional reports cannot be<br />
modified. They can be scheduled using Report Scheduler.<br />
Click here to view the additional set of custom reports. Custom CallerID Deluxe<br />
report is one of them.<br />
Go back to the Reports Selection screen.<br />
Click on the report group buttons to see available reports. For example: All button<br />
displays all reports, User button brings up only user related reports and clicking on<br />
Custom button displays reports built with a Report Designer ( see Report Designer<br />
chapter later in this manual).<br />
Running a report – HOW TO USE FILTER SCREEN<br />
Select a report (by clicking on its name) and click on Continue.<br />
<strong>Tapit</strong> Reports • 31
The filter screen is displayed.<br />
The same screen is used in other parts of TAPIT, please read the following<br />
section carefully.<br />
Available options are:<br />
1. Date<br />
You must enter a start and end date for the data to be reported on the<br />
report or click on the button next to the word Date and make a selection from<br />
the pull down list.<br />
When the date selection or entry is made a “+” sign appears next to the Date<br />
field.<br />
To clear the selection, click on the same button again. A “+” sign disappears.<br />
2. Time<br />
Enter start time and end time (leave these fields blank to generate a report<br />
without any time restrictions) in military time format “hh:mm”.<br />
3. Call Duration<br />
This field is used to specify the duration of call records to be included in the<br />
report.<br />
For example:<br />
32 • Reports <strong>Tapit</strong>
Enter 00:01:00 in the first field and 00:10:00 in the second field to display calls<br />
longer than 1 min. and shorter than 10 min.<br />
Enter 00:05:00 in the first field and leave the second field blank to display all<br />
calls longer than 5 min.<br />
To clear both fields, click on the button next to the word Call Duration.<br />
4. Ring Duration<br />
- indicates the length of the ring time before the call is picked up. The report will<br />
display all records with a ring time equal to or more than the entered value.<br />
5. On Hold Duration<br />
- indicates the length of the time the call stayed on hold. The report will display<br />
all records with a hold time equal to or more than the entered value.<br />
6. Call Direction<br />
Click on the button next to the word Call Direction and select one or the<br />
<strong>com</strong>bination of In<strong>com</strong>ing, Outgoing and Internal options. When finished<br />
the button displays a “+” sign.<br />
7. Call Type<br />
Click on the button next to Call Type and select Transfer – TAPIT will report<br />
now only on transferred calls.<br />
8. Call Status<br />
Click on the button next to Call Status – select one or the <strong>com</strong>bination of the<br />
following options: Normal, Continued, Abandoned.<br />
Normal – calls that are neither transferred or terminated.<br />
Continued – transferred calls.<br />
Abandoned – terminated calls.<br />
9. Department<br />
To include all departments in the report leave both fields empty.<br />
To specify a range of departments, click on the square button to the right of the<br />
Department label.<br />
The Select List of Department screen appears.<br />
Left-side list contains all<br />
available departments.<br />
Right-side list contains<br />
selected departments.<br />
<strong>Tapit</strong> Reports • 33
Check one of the option buttons, Include or Exclude, located on the top of the<br />
selection screen.<br />
Include – the report is run only for the selected departments.<br />
Exclude – the selected departments are excluded from the report.<br />
To add a department<br />
Click on the item in the left-side list to highlight it.<br />
Transfer the selection to the right-side list by clicking on the right arrow.<br />
To remove a department<br />
Click on the item in the right-side list to highlight it.<br />
Transfer the selection to the left-side list by clicking on the left arrow.<br />
If you want to start o<strong>ver</strong> click on the Clear button.<br />
When finished click on OK to accept the selection and go back to the filter<br />
screen. To cancel the selection and go back to the filter screen click on the<br />
Cancel button.<br />
At the filter screen note a “+” sign next to the Department label and a dotted<br />
line between the department fields. This indicates the range of departments that<br />
has been selected.<br />
10. User<br />
To include all users in the report leave both fields empty.<br />
To specify a range of users, click on the square button to the right of the User<br />
label.<br />
The Select List for User screen appears.<br />
Left-side list contains all<br />
available users.<br />
Check one of the option buttons, Include or Exclude, located on the top of the<br />
selection screen.<br />
Include – the report is run only for the selected users.<br />
Exclude – the selected users are excluded from the report.<br />
To add a user<br />
Right-side list contains<br />
selected users.<br />
34 • Reports <strong>Tapit</strong>
Click on the item in the left-side list to highlight it.<br />
Transfer the selection to the right-side list by clicking on the right arrow.<br />
To remove a user<br />
Click on the item in the right-side list to highlight it.<br />
Transfer the selection to the left-side list by clicking on the left arrow.<br />
If you want to start o<strong>ver</strong> click on the Clear button.<br />
When finished click on OK to accept the selection and go back to the filter<br />
screen. To cancel the selection and go back to the filter screen click on the<br />
Cancel button.<br />
At the filter screen note a “+” sign next to the User label and a dotted line<br />
between the user fields. This indicates the range of users that has been selected.<br />
11. Client<br />
To include all clients in the report leave both fields empty.<br />
To specify a range of clients, click on the square button to the right of the<br />
Client label.<br />
The Enter List for Client screen appears.<br />
Left-side list contains all<br />
available clients.<br />
Right-side list contains<br />
selected clients.<br />
Check one of the option buttons, Include or Exclude, located on the top of the<br />
selection screen.<br />
Include – the report is run only for the selected clients.<br />
Exclude – the selected clients are excluded from the report.<br />
To add a client<br />
Click on the item in the left-side list to highlight it.<br />
Transfer the selection to the right-side list by clicking on the right arrow.<br />
To remove a client<br />
Click on the item in the right-side list to highlight it.<br />
Transfer the selection to the left-side list by clicking on the left arrow.<br />
If you want to start o<strong>ver</strong> click on the Clear button.<br />
<strong>Tapit</strong> Reports • 35
When finished click on OK to accept the selection and go back to the filter<br />
screen. To cancel the selection and go back to the filter screen click on the<br />
Cancel button.<br />
At the filter screen note a “+” sign next to the Client label and a dotted line<br />
between the client fields. This indicates the range of clients that has been<br />
selected.<br />
12. Extension – source extension.<br />
To include all extensions in the report leave both fields empty.<br />
Otherwise, enter a range of extensions or click on the square button to the right<br />
of the Extension label.<br />
The Enter List for Extension screen appears.<br />
Enter the extension you want<br />
to add to the right-side list.<br />
Check one of the option buttons, Include or Exclude, located on the top of the<br />
selection screen.<br />
Include – the report is run only for the selected extensions.<br />
Exclude – the selected extensions are excluded from the report.<br />
To add an extension<br />
Enter the extension in a text box on the left side of the screen.<br />
Transfer the entry to the right-side list by clicking on the right arrow.<br />
To remove an extension<br />
Click on the item in the right-side list to highlight it.<br />
Remove it from the list by clicking on the left arrow.<br />
Right-side list contains<br />
selected extensions.<br />
If you want to start o<strong>ver</strong> click on the Clear button.<br />
When finished click on OK to accept the selection and go back to the filter<br />
screen. To cancel the selection and go back to the filter screen click on the<br />
Cancel button.<br />
At the filter screen note a “+” sign next to the Extension label and a dotted line<br />
36 • Reports <strong>Tapit</strong>
etween the extension fields. This indicates the range of extensions that has<br />
been selected.<br />
13. 2nd Extension - destination extension.<br />
To include all destination extensions in the report leave both fields empty.<br />
Otherwise, enter a range of extensions or click on the square button to the right<br />
of the 2nd Extension label.<br />
The Enter List for 2nd Extension screen appears. This screen works exactly<br />
the way Enter List for Extension screen does. Refer to pt.12 for instructions.<br />
14. Trunk<br />
To include all trunks in the report leave both fields empty.<br />
Otherwise, enter a range of trunks or click on the square button to the right of<br />
the Trunk label.<br />
The Enter List for Trunk screen appears.<br />
Enter the trunk you want to<br />
add to the right-side list.<br />
Check one of the option buttons, Include or Exclude, located on the top of the<br />
selection screen.<br />
Include – the report is run only for the selected trunks.<br />
Exclude – the selected trunks are excluded from the report.<br />
To add an trunk<br />
Enter the trunk in a text box on the left side of the screen.<br />
Transfer the entry to the right-side list by clicking on the right arrow.<br />
To remove an trunk<br />
Click on the item in the right-side list to highlight it.<br />
Remove it from the list by clicking on the left arrow.<br />
Right-side list contains<br />
selected trunks.<br />
If you want to start o<strong>ver</strong> click on the Clear button.<br />
When finished click on OK to accept the selection and go back to the filter<br />
screen. To cancel the selection and go back to the filter screen click on the<br />
<strong>Tapit</strong> Reports • 37
Cancel button.<br />
At the filter screen note a “+” sign next to the Trunk label and a dotted line<br />
between the trunk fields. This indicates the range of trunks that has been<br />
selected.<br />
15. 2nd Trunk - destination trunk.<br />
To include all destination trunks in the report leave both fields empty.<br />
Otherwise, enter a range of trunks or click on the square button to the right of<br />
the 2nd Trunk label.<br />
The Enter List for 2nd Trunk screen appears. This screen works exactly the<br />
way Enter List for Trunk screen does. Refer to pt.14 for instructions.<br />
16. Area Code<br />
To include all area codes in the report leave both fields empty.<br />
Otherwise, enter a range of area codes or click on the square button to the right<br />
of the Area Code label.<br />
Enter the area code you want<br />
to add to the right-side list.<br />
Right-side list contains<br />
selected area codes.<br />
Check one of the option buttons, Include or Exclude, located on the top of the<br />
selection screen.<br />
Include – the report is run only for the selected area codes.<br />
Exclude – the selected area codes are excluded from the report.<br />
To add an area code<br />
Enter the area code in a text box on the left side of the screen.<br />
Transfer the entry to the right-side list by clicking on the right arrow.<br />
To remove an area code<br />
Click on the item in the right-side list to highlight it.<br />
Remove it from the list by clicking on the left arrow.<br />
If you want to start o<strong>ver</strong> click on the Clear button.<br />
38 • Reports <strong>Tapit</strong>
When finished click on OK to accept the selection and go back to the filter<br />
screen. To cancel the selection and go back to the filter screen click on the<br />
Cancel button.<br />
At the filter screen note a “+” sign next to the Area code label and a dotted<br />
line between the area code fields. This indicates the range of area codes that has<br />
been selected.<br />
17. State<br />
To include all states on the report leave both fields empty.<br />
To include or exclude states, click on the button next to the word State.<br />
The Enter List for State screen appears.<br />
Left-side list contains all<br />
available states.<br />
Right-side list contains<br />
selected states.<br />
Check one of the option buttons, Include or Exclude, located on the top of the<br />
selection screen.<br />
Include – the report is run only for the selected states.<br />
Exclude – the selected states are excluded from the report.<br />
To add a state<br />
Click on the item in the left-side list to highlight it.<br />
Transfer the selection to the right-side list by clicking on the right arrow.<br />
To remove a state<br />
Click on the item in the right-side list to highlight it.<br />
Transfer the selection to the left-side list by clicking on the left arrow.<br />
If you want to start o<strong>ver</strong> click on the Clear button.<br />
When finished click on OK to accept the selection and go back to the filter<br />
screen. To cancel the selection and go back to the filter screen click on the<br />
Cancel button.<br />
<strong>Tapit</strong> Reports • 39
At the filter screen note a “+” sign next to the State label and a dotted line<br />
between the state fields. This indicates the range of states that has been selected.<br />
18. Phone Number<br />
To include all phone numbers in the report leave both fields empty.<br />
Otherwise, enter a range of phone numbers or click on the square button to the<br />
right of the Phone label (note: this field can accept partial numbers i.e. enter<br />
800 in the area code to run report only for 800 numbers).<br />
The Enter List for Phone Number screen appears.<br />
Enter the phone number you<br />
want to add to the right-side<br />
list.<br />
Right-side list contains<br />
selected phone numbers.<br />
Check one of the option buttons, Include or Exclude, located on the top of the<br />
selection screen.<br />
Include – the report is run only for the selected phone numbers.<br />
Exclude – the selected phone numbers are excluded from the report.<br />
To add a phone number<br />
Enter the phone number in a text box on the left side of the screen.<br />
Transfer the entry to the right-side list by clicking on the right arrow.<br />
To generate global search for a particular exchange or a number, use a space bar<br />
to move forward through the phone number field.<br />
I.e. if you are looking for the phone numbers with an exchange of 512, type the<br />
following in the phone number field: 512.<br />
When finished click on the right arrow button on the screen and the number will<br />
be automatically transferred to the right-side list. This number should read<br />
????512 in order to be processed correctly (“?” in place of each space).<br />
To remove a phone number<br />
Click on the item in the right-side list to highlight it.<br />
Remove it from the list by clicking on the left arrow.<br />
40 • Reports <strong>Tapit</strong>
If you want to start o<strong>ver</strong> click on the Clear button.<br />
When finished click on OK to accept the selection and go back to the filter<br />
screen. To cancel the selection and go back to the filter screen click on the<br />
Cancel button.<br />
At the filter screen note a “+” sign next to the Phone label and a dotted line<br />
between the phone number fields. This indicates the range of phone numbers<br />
that has been selected.<br />
19. DNIS Number<br />
To include all DNIS numbers in the report leave both fields empty.<br />
Otherwise, enter a range of DNIS numbers or click on the square button to the<br />
right of the DNIS Number label.<br />
Enter DNIS number you want<br />
to add to the right-side list.<br />
Right-side list contains<br />
selected DNIS numbers.<br />
Check one of the option buttons, Include or Exclude, located on the top of the<br />
selection screen.<br />
Include – the report is run only for the selected DNIS numbers.<br />
Exclude – the selected DNIS numbers are excluded from the report.<br />
To add a DNIS number<br />
Enter the DNIS number in a text box on the left side of the screen.<br />
Transfer the entry to the right-side list by clicking on the right arrow.<br />
To remove a DNIS number<br />
Click on the item in the right-side list to highlight it.<br />
Remove it from the list by clicking on the left arrow.<br />
If you want to start o<strong>ver</strong> click on the Clear button.<br />
When finished click on OK to accept the selection and go back to the filter<br />
screen. To cancel the selection and go back to the filter screen click on the<br />
Cancel button.<br />
At the filter screen note a “+” sign next to the DNIS number label and a dotted<br />
<strong>Tapit</strong> Reports • 41
line between the DNIS number fields. This indicates the range of DNIS numbers<br />
that has been selected.<br />
20. Account Code, Matter Code, Author. Code<br />
To include all account/matter/author codes on the report leave both fields empty<br />
for all options.<br />
To select a range click on the square button to the right of Account Code,<br />
Matter Code or Author.Code label.<br />
Since all three screens work in the same way we will use the “Enter List for<br />
Account Code” screen as an example.<br />
The Enter List for Account Code screen appears.<br />
Enter the account code you<br />
want to add to the right-side<br />
list.<br />
Right-side list contains<br />
selected account codes.<br />
Check one of the option buttons, Include or Exclude, located on the top of the<br />
selection screen.<br />
Include – the report is run only for the selected account codes.<br />
Exclude – the selected account codes are excluded from the report.<br />
To add an account code<br />
Enter the account code in a text box on the left side of the screen.<br />
Transfer the entry to the right-side list by clicking on the right arrow.<br />
To remove an account code<br />
Click on the item in the right-side list to highlight it.<br />
Remove it from the list by clicking on the left arrow.<br />
If you want to start o<strong>ver</strong> click on the Clear button.<br />
When finished click on OK to accept the selection and go back to the filter<br />
screen. To cancel the selection and go back to the filter screen click on the<br />
Cancel button.<br />
42 • Reports <strong>Tapit</strong>
At the filter screen note a “+” sign next to the Account code label and a<br />
dotted line between the account code fields. This indicates the range of account<br />
codes that has been selected.<br />
21. Cost<br />
Enter dollar amount values for call records to be included on the report<br />
For example:<br />
Enter .50 in the first field and 5.00 in the second field to display calls with cost<br />
o<strong>ver</strong> $.50 and less then $5.00.<br />
Enter 1.00 in the first field and leave the second field blank to display all calls<br />
with cost o<strong>ver</strong> $1.00.<br />
To clear both fields click on the button next to the word Cost.<br />
22. IP Addr. Out<br />
Enter the source IP address. A wild character “*” at the end of a partial IP<br />
address runs a report for all IP addresses containing the entered string.<br />
23. IP Addr In<br />
Type in the destination IP address. A wild character “*” at the end of a partial IP<br />
address runs a report for all IP addresses containing the entered string.<br />
24. Show Only Local Calls - check the box to display only local calls in the<br />
report.<br />
25. Do not Show Local Calls - check the box to exclude all local calls from the<br />
report<br />
PLEASE NOTE: LOCAL AREA CODE AND <strong>EX</strong>CHANGES HAVE TO BE DEFINED IN<br />
THE DESTINATION TABLE. REFER TO THIS SECTION LATER IN THIS MANUAL.<br />
There are four <strong>com</strong>mand buttons on the right side of the filter screen.<br />
Continue – click on it to run the report.<br />
Clear - click on this button to erase all filter criteria.<br />
Cancel - click on it to exit filter screen<br />
Click on Predefined button to save your selection for the future use (such filters <strong>com</strong>e<br />
handy when setting Report Scheduler).<br />
Enter the name of the filter in a Save Filter screen and click on OK<br />
The Predefined Filters screen replaces the buttons on the right side of the screen.<br />
<strong>Tapit</strong> Reports • 43
Click on the filter name in the<br />
list to recall previously saved<br />
selection and here to generate a<br />
report<br />
Click here to close this<br />
screen<br />
Click here to save current<br />
selection. You will be prompted<br />
to enter a new name<br />
Click on the filter name in<br />
the list and then here to<br />
delete previously saved<br />
selection<br />
Click on Continue to generate a report, Cancel if you do not want to run a report,<br />
Delete if you would like to delete a filter.<br />
You can also make some changes to the filter criteria and click on Save to o<strong>ver</strong>write old<br />
filter or create a new one by giving it a different name.<br />
Generated report is displayed in a preview mode. If it has more than one page you can<br />
navigate through them with arrows at the bottom of the report screen.<br />
Click here to go to the<br />
previous page of the report<br />
Click here to go to the next<br />
page of the report<br />
Report window is equipped with a menu with the following options:<br />
Print option will send report to the printer currently selected in the MS WINDOWS Print<br />
screen.<br />
Print Setup will take you to the MS WINDOWS Page Setup screen where you can<br />
control printer options<br />
Output To File option will invoke the Save As Text screen. It enables you to save report<br />
in a file.<br />
Zoom will control the size of the displayed report.<br />
Go To Page will allow you to type a page number you would like to go to.<br />
Exit will close the report window.<br />
44 • Reports <strong>Tapit</strong>
Statistics<br />
Statistics Concepts<br />
Statistics function provides a graphical representation for your call records data.<br />
To access statistics click on the Statistics icon on the Main Menu<br />
To generate statistical graph<br />
For top 10 values<br />
1. Click on Top 10 Values in the report group<br />
2. Select a report category by clicking on its name in the Report Categories section.<br />
3. Select a report type by clicking on its name in the Report Type section.<br />
4. Select a chart type by clicking on its picture located in the Chart Types section.<br />
5. Click on Continue.<br />
6. Enter criteria on the filter screen.<br />
See page 30 on how to use filter screen.<br />
<strong>Tapit</strong> Statistics • 45
7. Click on Continue.<br />
Chart will be displayed on your screen in a few moments.<br />
For Date and Time<br />
1. Click on Date and Time in the report group<br />
2. Select a report category by making selection from the Report Categories option<br />
group.<br />
3. Select a report type from the Report Type group.<br />
4. Select a chart type by clicking on one of the icons in Charts Type selection group.<br />
5. Click on Continue.<br />
6. Enter criteria on the filter screen.<br />
How to use filter screen(see page 30 on how to use filter screen)<br />
7. Click on Continue.<br />
Chart will be displayed on your screen in a few moments<br />
8. For Date and Time - Detail<br />
9. Click on Date and Time - Detail in the report group<br />
10. Select a report category by choosing from Report Categories group.<br />
11. Note that in addition to the category, you may select time or days category.<br />
12. Select a report type by clicking on its name.<br />
13. Select a chart type by clicking on its picture.<br />
14. Click on Continue.<br />
15. Enter criteria on the filter screen.<br />
How to use filter screen (see page 30 on how to use filter screen)<br />
16. Click on Continue.<br />
Chart will be displayed on your screen in a few moments.<br />
WE ENCOURAGE YOU TO RUN DIFFERENT STATISTICAL REPORTS TO SEE<br />
WHICH ONES SUIT YOUR NEEDS THE BEST.<br />
46 • Statistics <strong>Tapit</strong>
System Maintenance<br />
System Maintenance - O<strong>ver</strong>view<br />
The System Maintenance allows you to access different options by clicking on<br />
icons/buttons.<br />
Click on the Exit button to go back to the Main Menu screen.<br />
<strong>Tapit</strong> System Maintenance • 47
System Parameters<br />
System Parameters Screen<br />
The System Parameters screen allows you to configure various settings of the TAPIT<br />
system.<br />
Click on the Maintenance icon on the Main Menu and then click on the System<br />
Parameters icon.<br />
The System Parameters screen is displayed. It consists of six different screens:<br />
Communications, Call Costing, Activity, Trunks, Destination, and Data.<br />
48 • System Parameters <strong>Tapit</strong>
Communications<br />
The Communications screen is displayed as a default.<br />
1. Click on the Your Telephone Number field and enter your main telephone<br />
number (do not use an 800 number).<br />
2. Load Calls from Text File:<br />
check this box only if you want the call records to be loaded from a text file instead<br />
of a Com Port.<br />
When Load Calls from Text File: is checked the adjacent text box with the path to<br />
a call records file is enabled. Accept the default value or enter a new path.<br />
3. Process Text File E<strong>ver</strong>y______seconds<br />
This option be<strong>com</strong>es available when the Load Calls from Text File box is<br />
checked.<br />
The value entered in this box determines how often TAPIT loads data from the text<br />
file.<br />
4. Process Calls E<strong>ver</strong>y __ Minutes<br />
The value entered in this box determines how often TAPIT processes data (con<strong>ver</strong>ts<br />
raw information into TAPIT database format). Twenty minutes is the default value<br />
for this field.<br />
5. Click on the down arrow icon in the PBX Type field to select a telephone system<br />
type the <strong>com</strong>puter is receiving data from.<br />
Data will not be processed accurately if an incorrect selection is<br />
made.<br />
<strong>Tapit</strong> System Parameters • 49
6. eXtended Processing (not available for ALL PBX formats)<br />
Check this box only if you are certain TAPIT supports extended processing format or<br />
when suggested by <strong>Trisys</strong> Technical Support.<br />
7. Click on the PBX or Computer options in the Use Computer or Telephone<br />
System Date? field to specify whether date information for the call records is<br />
going to be processed based on the <strong>com</strong>puter or PBX date.<br />
You must specify Computer date if your phone system is not<br />
generating the following date information: day, month and year.<br />
Otherwise we re<strong>com</strong>mend using the PBX date.<br />
Note: The Port, Speed, Parity, Data Bits and Stop Bits options are enabled<br />
only when the Load Calls From Text File: check box is unchecked.<br />
8. Click on the down arrow icon in the Port field to select a port on the <strong>com</strong>puter the<br />
SMDR cable is connected to.<br />
9. Click on the down arrow icon in the Speed field to select a transmission speed<br />
the phone system is set at.<br />
10. Click on the down arrow icon in the Parity field to select a parity setting of the<br />
phone system.<br />
11. Click on 7 or 8 in the Data Bits fields to select a data bits setting of the phone<br />
system.<br />
MS Windows MUST be shut down and restarted when making any<br />
changes in the Communications Parameters Screen<br />
8. Click on OK to save changes or Cancel to exit the screen without saving any<br />
changes.<br />
9. From the Communications screen the Password function may be accessed.<br />
Click on Password button<br />
Enter the system password here<br />
Re-enter the system password here to confirm<br />
the correct spelling<br />
50 • System Parameters <strong>Tapit</strong>
Call Costing<br />
1. The Call Costing settings for <strong>Tapit</strong> Pricing table section is used to specify<br />
pricing intervals and increments. Click on First Interval and enter the number of<br />
seconds for the first interval. Click on Next Interval and enter the number of<br />
seconds for each additional interval. By default these fields are set to 60 seconds and<br />
the calls are priced per minute.<br />
2. Click on the First Increment field and enter the number of seconds for the first<br />
increment within an interval. Click on the Next Increment field and enter the<br />
number of seconds for each additional increment within an interval. If <strong>Tapit</strong> Carrier<br />
is used to price the calls, the values of increment fields indicate in how many<br />
seconds per increment TAPIT prices calls.<br />
For example: let’s assume a price for the first minute is 10 cents, First Interval<br />
equals 60 and First Increment equals 6. In such case the call record with a call<br />
duration equal to 6 seconds is priced at 1 cent.<br />
This option does not apply to V&H pricing table.<br />
3. Would you like to price in<strong>com</strong>ing calls? – check this box if you would like to<br />
price in<strong>com</strong>ing calls.<br />
This requires special settings in the pricing table (see page 59 for detail information -<br />
TAPIT Pricing).<br />
3. Would you like to surcharge calls which cost $0.00?<br />
Check this option if you would like to surcharge calls that cost $0.00.<br />
<strong>Tapit</strong> System Parameters • 51
4. Default surcharges - numbers you enter in these fields appear automatically in<br />
surcharge and multiplier fields when adding a new user (see User setup).<br />
Click on Per Call field and enter dollar amount to apply per call surcharge.<br />
Click on Per Minute field and enter dollar amount to apply per minute surcharge.<br />
Click on Multiplier and a percentage value to apply as a surcharge.<br />
5. Zero Plus Pricing @ – this field holds prices and surcharges for operator assisted<br />
calls.<br />
6. Account/Authorization Code Processing Options: - selection in this option<br />
group determines whether account codes generated by the phone system will be<br />
associated with user name or client name.<br />
Click on Client Code to associate this number with client name (if your system<br />
supplies only account code).<br />
Click on User Authorization Code to associate this number with user name (if<br />
your system supplies only authorization code).<br />
If Client Code is selected a Matter Code field be<strong>com</strong>es available (a sub-account<br />
code).<br />
Click on the Matter Code Length field to enter the number of digits of used by<br />
the matter codes (this number must be shorter than a length of the account code).<br />
Click on the Separate Account & Authorization Codes to associate<br />
Account Code with the client and Authorization Code with the user (if your<br />
system supplies both Account and Authorization Codes).<br />
7. Click on OK to save changes or Cancel to exit the screen without saving any<br />
changes.<br />
52 • System Parameters <strong>Tapit</strong>
Activity<br />
This screen allows you to specify what type of the phone activity to store in the TAPIT<br />
database.<br />
1. In the Call Direction field click on:<br />
ALL (default setting) to store outgoing , in<strong>com</strong>ing and internal calls.<br />
Outgoing to store only outgoing calls.<br />
In<strong>com</strong>ing to store only in<strong>com</strong>ing calls.<br />
iNternal to store only internal calls. This option works if TAPIT allows for internal<br />
calls.<br />
2. Check the Local Calls (default) box if you want local calls to be stored.<br />
Local is defined as a 7 digit or less dialed number.<br />
Please note: Local Area Code and Exchanges must be defined in the<br />
Destination Table. Refer to this section later in this manual.<br />
3. Calls Longer Than - Click on this field and enter the duration time of calls (calls<br />
with a shorter duration time will not be stored in TAPIT’s database). The default<br />
value is 00:00:00.<br />
<strong>Tapit</strong> System Parameters • 53
4. Exclude Activity For<br />
Enter an extension you do<br />
not want to store activity for,<br />
then click on the arrow<br />
pointing to the left<br />
To remove an extension from the list, double-click on its number in the lefthand<br />
column.<br />
To remove a trunk from the list, double-click on its number in the right-hand<br />
column.<br />
5. Click on OK to save changes or Cancel to exit the screen without saving any<br />
changes.<br />
Trunks<br />
Enter a trunk you do not want<br />
store activity for, then click on<br />
the arrow pointing to the right<br />
This screen will allow you to assign trunk numbers that are programmed on the phone<br />
system to different carriers.<br />
This option is available only if you purchased and installed V&H pricing tables<br />
Adding new trunks<br />
1. Click on New.<br />
54 • System Parameters <strong>Tapit</strong>
2. Enter a trunk number in the Trunk field.<br />
3. Click on the down arrow next to the carrier field to select an appropriate carrier from<br />
the list.<br />
Deleting trunks<br />
1. Click any place on the trunk field to select it for deletion.<br />
2. Click on Delete.<br />
Printing a list of the trunks<br />
1. Click on the Print List button.<br />
2. Click on OK to save changes or Cancel to exit the screen.<br />
Destination<br />
This screen allows you to view, edit, add and delete records in the city and state<br />
destination table.<br />
Adding new destination record<br />
1. Click on New.<br />
2. Enter area code and exchange of the new record in the Destination field, press<br />
Enter.<br />
3. Enter destination description in the City field, press Enter.<br />
4. Enter state description in the State field, press Enter.<br />
5. Enter L in Code field if an area code and exchange being added is Local.<br />
<strong>Tapit</strong> System Parameters • 55
It is a good practice to run Reindex Database (Main<br />
Menu/Maintenance/Reindex Database) after adding, changing or<br />
deleting destination information.<br />
Deleting destination records<br />
1. Place the cursor on the field you want to delete or click on Find button and enter<br />
area code and exchange to be deleted and click on OK.<br />
The record you want to delete should be highlighted.<br />
2. Click on Delete button.<br />
It is a good practice to run Reindex Database (Main<br />
Menu/Maintenance/Reindex Database) after adding, changing or<br />
deleting destination information.<br />
Editing destination records<br />
1. Place the cursor on the field you want to edit and click on the Find button.<br />
Enter the value of the field to be edited and click on OK.<br />
For example: place the cursor on any Area/Exch. field and click on Find. Enter the<br />
value of the desired area code and/or exchange. Click on OK. The record you want<br />
to edit is highlighted.<br />
2. Edit field value.<br />
It is a good practice to run Reindex Database (Main<br />
Menu/Maintenance/Reindex Database) after adding, changing or<br />
deleting the destination information.<br />
To clear all “L“ codes in the Code field:<br />
If you purchased a V&H pricing table, all local exchanges in your area code are marked<br />
with an L code. If you do not want to process these calls as local, then click on the Code<br />
button. This removes all L settings from the destination table.<br />
To remove ALL L codes click here<br />
Click on OK to save changes and exit the screen.<br />
56 • System Parameters <strong>Tapit</strong>
DATA<br />
Create Backup on exit<br />
When this box is checked TAPIT will create a backup copy of the main database e<strong>ver</strong>y<br />
time you exit the software. When exiting TAPIT make sure within the TAPIT application<br />
only Main Menu window is open.<br />
We re<strong>com</strong>mend you leave this box checked to secure the integrity of the database.<br />
Note: depending on the size of the database this process may take some<br />
time.<br />
<strong>Tapit</strong> System Parameters • 57
Call Editor<br />
Working with Call Editor<br />
This facility allows you to change existing phone activity records and add new call<br />
records that were made outside of your environment.<br />
1. Click on the Maintenance icon on the Main Menu and then click on the Call<br />
Editor icon.<br />
2. A filter screen appears (see page 30 how to use filter screen), enter filter criteria<br />
information and click on Continue. Call Editor screen appears.<br />
58 • Call Editor <strong>Tapit</strong>
Adding new call records<br />
1. Click on the New button - a new blank record appears.<br />
2. Start entering the call record information.<br />
The Dir And Status field can have the following values:<br />
O - outgoing calls<br />
Depending on the output of your phone system the in<strong>com</strong>ing call entries can be a<br />
variation of I, X, C, A where I stands for in<strong>com</strong>ing, X - transferred, C – continued,<br />
A-abandoned (i.e. IX, IXC, IA)<br />
N - internal calls.<br />
3. Click on Exit (changes are saved automatically).<br />
Editing call records<br />
1. Click on the field where the information is to be edited and using the Delete or the<br />
Backspace keys erase the existing information. Enter the new data.<br />
2. Click on Exit (changes are saved automatically).<br />
Deleting call records<br />
1. Click any place on the record to be deleted and click on the Delete button.<br />
2. Click on Exit (changes are saved automatically).<br />
<strong>Tapit</strong> Call Editor • 59
TAPIT Pricing<br />
Pricing Call Records<br />
The <strong>Tapit</strong> Pricing Table screen is used to enter pricing information to apply cost to the<br />
call records.<br />
Click on the Maintenance icon on the Main Menu screen and click on the <strong>Tapit</strong><br />
Pricing icon.<br />
The <strong>Tapit</strong> Pricing Table screen allows you to enter prices for the first and the next<br />
minute/interval for the three different time periods.<br />
SCREEN 1<br />
60 • TAPIT Pricing <strong>Tapit</strong>
SCREEN 2<br />
If the same prices apply 24 hours a day, use only the first section of the pricing table<br />
leaving the From column at 00:00.<br />
Note: When pricing local calls an exchange must be prefixed by the local<br />
area code. I.e. 411 calls must be entered with the local area code – i.e.<br />
“973411”.<br />
TINxxxx – entry in the pricing table allows for pricing in<strong>com</strong>ing calls for trunk xxxx.<br />
The entry is <strong>com</strong>posed of the prefix TIN and the trunk number (xxxx). In other words the<br />
entry TIN00123 would price in<strong>com</strong>ing calls for trunk 00123.<br />
Note: this setting does not affect in<strong>com</strong>ing calls that are already priced via Caller ID or<br />
DNIS. In<strong>com</strong>ing trunk pricing has lower priority than Caller ID and DNIS.<br />
In our example:<br />
SCREEN 1:<br />
• 973411<br />
All 411 calls for 973 area code are priced at a flat rate of 33 cents per call.<br />
• DNIS1111 - DNISxxxx<br />
In<strong>com</strong>ing calls with the DNIS number equal to “1111” are priced at one dollar per<br />
each minute/interval.<br />
<strong>Tapit</strong> TAPIT Pricing • 61
• NNN555<br />
All 555 information calls are priced at a flat rate of 50 cents per call.<br />
• QQQ<br />
The domestic long distance calls are priced 11 cents per first minute/interval and 8<br />
cents per each additional minute/interval.<br />
• IN973360 - INaaaxxx<br />
In<strong>com</strong>ing calls with “973” area code and “360” exchange are priced 8 cents per each<br />
minute/interval.<br />
• IN973 - INaaa<br />
The remaining in<strong>com</strong>ing calls with “973” area code are priced at 10 cents per each<br />
minute/interval.<br />
• INCID<br />
Call records with Caller ID are priced at 5 cents for each minute/interval.<br />
• IN<br />
All other in<strong>com</strong>ing calls are priced at 4 cents per each minute/interval.<br />
• 01141 – 011xxxxxx<br />
International calls with the 41 country code are priced 70 cents per first<br />
minute/interval and 65 cents per each additional minute/interval.<br />
• 011<br />
All other international calls are priced at 85 cents per each minute/interval<br />
SCREEN 2:<br />
• IPI234.123.12.* - IPIxxx.xxx.xxx.*<br />
All calls in<strong>com</strong>ing to IP Addresses containing “234.123.12.” are priced 80 cents per<br />
the first minute/interval and 40 cents per each additional minute/interval.<br />
• IPO123.234.12.34 - IPOxxx.xxx.xxx.xxx<br />
All calls outgoing to “123.234.12.34” IP Address are priced 50 per each<br />
minute/interval.<br />
• IPO234.123.12.* - IPOxxx.xxx.xxx.*<br />
All calls outgoing to IP Addresses containing “234.123.12.” are priced 80 cents per<br />
the first minute/interval and 40 cents per each additional minute/interval.<br />
• L<br />
All local calls are priced 10 cents per first minute/interval and 5 cents per each<br />
additional minute/interval.<br />
• TLC001- TLCxxxx<br />
Local calls originating from trunk “001” are priced the rate of 10 cents per each<br />
minute/interval.<br />
• TLD001 – TLDxxxx<br />
Long distance calls originating from trunk “001” are priced the rate of 10 cents per<br />
each minute/interval.<br />
• 201593 -aaaxxx<br />
Calls made to the area code “201” and the exchange “593” are priced at 25 cents for<br />
the first minute/interval and 20 cents for each additional minute/interval between<br />
8:00 AM and 11:00 AM.<br />
Between 11:00 AM and 23:00 calls are priced at 20 cents for the first minute/interval<br />
and 15 cents for each additional minute/interval.<br />
62 • TAPIT Pricing <strong>Tapit</strong>
After 23:00 until 8:00 AM the rate is 11 cents for the first minute/interval and 8 cents<br />
for each additional minute/interval.<br />
• 201 - aaa all other calls made to the area code “201” are priced at 30 cents for the<br />
first minute/interval and 25 cents for each additional minute/interval between 8:00<br />
AM and 11:00 AM.<br />
Between 11:00 AM and 23:00 calls are priced at 25 cents for the first minute/interval<br />
and 23 cents for each additional minute/interval.<br />
After 23:00 until 8:00 AM the rate is 15 cents for the first minute/interval and 10<br />
cents for each additional minute/interval.<br />
• 800 - all 800 calls would be free of charge.<br />
• NNN - all other calls would be priced at 55 cents per each minute/interval.<br />
To activate in<strong>com</strong>ing pricing:<br />
- set the Would you like to price in<strong>com</strong>ing calls? option on the Call Costing<br />
screen (see page 50 for detailed instructions).<br />
Adding new pricing record<br />
1. Click on the New button - cursor is inserted in a blank record line.<br />
2. Enter the phone number code in the Number Dialed field (follow the guidelines<br />
from “The Number Dialed entries” section below).<br />
3. Enter a start time for the first time period in the first Start Time field. If your time<br />
period is 24 hours long, leave this field at 00:00 value.<br />
4. Enter the rate for the first minute/interval in the First field under the Rate Per<br />
Minute/Interval section. If the Next field is left empty then this rate is applied<br />
flatly to all the calls for the specified phone number code. This means regardless of<br />
call duration or the System Parameters/Communications price increment<br />
setting all call records for the specified phone number code are going to be priced at<br />
the rate of the first minute/interval.<br />
5. If you want to price additional minutes/intervals enter the desired rate in the Next<br />
field under the Rate Per Minute/Interval section. Each additional minute/interval<br />
will be priced according to this setting.<br />
6. If the time and rate settings are different for the remaining time periods fill in<br />
appropriate values, otherwise, leave them blank and TAPIT will assume that call<br />
records are priced at the same rate all day.<br />
7. Click on the New button to create another record or Exit to leave the screen.<br />
Changes are saved automatically.<br />
Deleting pricing records<br />
1. Click anywhere on the record to be deleted and click on Delete button.<br />
2. Click on Exit to leave the screen. Changes are saved automatically.<br />
Finding specific record in the Number Dialed field<br />
1. Click anywhere on the Number Dialed field.<br />
2. Click on the Find button.<br />
<strong>Tapit</strong> TAPIT Pricing • 63
3. Enter the value to look for in the Look for text box.<br />
You can also select from the list of previous searches by clicking on a down arrow.<br />
4. Click on OK.<br />
64 • TAPIT Pricing <strong>Tapit</strong>
Reindex Database<br />
Reindexing<br />
This facility will allow you to reassign pointers in TAPIT’s Databases.<br />
It is strongly re<strong>com</strong>mended that you run this program after making any<br />
changes in User, Client, Department, Pricing or Destination Databases.<br />
1. Click on the Maintenance icon on the Main Menu and then click on the<br />
Reindex Database icon. After clicking Reindex Database icon filter screen<br />
appears(see page 30 on how to use filter screen).<br />
Enter filter criteria information and click on continue.<br />
2. While your Database is being Reindexed it is <strong>ver</strong>y important that you do not reboot<br />
or shut down your <strong>com</strong>puter. The reindex process can sometimes take 20 to 30<br />
minutes depending on your <strong>com</strong>puter resources as well as the size of your database.<br />
If you interrupt this process your entire database will be corrupted.<br />
3. When the reindexing is finished status screen appears with the appropriate message.<br />
4. Click on OK, TAPIT’s database has been reindexed.<br />
<strong>Tapit</strong> Reindex Database • 65
Recosting<br />
Recosting Call Records<br />
Recosting function will allow you to recost existing phone activity based on your<br />
selection.<br />
1. Click on the Maintenance icon on the Main Menu and then click on the<br />
Recosting icon.<br />
2. The Recosting screen appears.<br />
66 • Recosting <strong>Tapit</strong>
Using Custom option<br />
1. Click on Custom selector in Type of Recosting.<br />
2. Click on either Decrement or Increment.<br />
3. Click on Per Call or Per Minute.<br />
4. Click on Percentage and enter percentage value in the Value field or click on<br />
Dollar value and enter dollar amount in the Value field.<br />
5. Click on OK.<br />
6. Filter screen appears(see page 30 on how to use filter screen).Enter filter criteria and<br />
click on Continue. TAPIT will start recosting calls.<br />
<strong>Tapit</strong> Recosting • 67
Using <strong>Tapit</strong> Carrier option<br />
1. Click on <strong>Tapit</strong> Carrier option in Type of Recosting.<br />
2. Click on OK.<br />
The Type of Recost screen appears.<br />
3. Check one of the option buttons according to the instructions on the screen.<br />
4. Click on Continue.<br />
5. Filter screen appears (see page 30 on how to use filter screen).Enter filter criteria and<br />
click on Continue.<br />
TAPIT will start recosting calls.<br />
Using V&H Carrier option<br />
1. This option is available only if you have purchased TAPIT’s V&H Pricing table.<br />
2. Click on the V&H Carrier option in Type of Recosting.<br />
3. A list of available carriers appears on the screen. Click on the carrier you want to use<br />
for recosting and click on OK.<br />
Filter screen appears (see page 30 on how to use filter screen).Enter filter criteria and<br />
click on Continue.<br />
TAPIT will start recosting calls.<br />
While your Data Base is being recosted it is <strong>ver</strong>y important that you do not<br />
reboot or shut down your <strong>com</strong>puter. The recosting process can<br />
sometimes take 20 to 30 minutes depending on your <strong>com</strong>puter resources<br />
as well as the size of your data base. If you interrupt this process your<br />
entire database will be corrupted.!!!<br />
68 • Recosting <strong>Tapit</strong>
Dialing Patterns<br />
Working with Dialing Patterns<br />
Dialing Patterns function will allow you to separate the actual telephone number from<br />
<strong>com</strong>plex dialing digit sequences.<br />
Click on the Maintenance icon on the Main Menu and then click on the Dialing<br />
Patterns icon.<br />
Enter/Edit Patterns in this field<br />
Cost Indicator<br />
To define a dialing pattern you may use the following characters:<br />
T - represents one digit of the telephone number (0-9)<br />
0-9, #, * - indicates a one to one correspondence between the appropriate character and<br />
the dialing string<br />
N - represents any one character of the dialing string that is not a part of the dialed<br />
number<br />
X - ignores all characters from this point on, can be used only once and after the longest<br />
dialing pattern<br />
C - indicates an authorization or account code that directly proceeds or follows the<br />
telephone number dialed on the SMDR string.<br />
When defining dialing patterns, please remember that it is important what digits are<br />
generated by your telephone system. Sometimes they do not match what you have dialed,<br />
i.e. dialing 1-202-593-8200 may generate<br />
494-1-202-593-8200. Correct pattern would be NNNTTTTTTTTTTT.<br />
The following examples may already contain patterns that you can use. If not, they<br />
should at least help you to create correct patterns for your environment:<br />
DIALED COMBINATION<br />
PATTERN<br />
1-201-593-8200 TTTTTTTTTTT<br />
<strong>Tapit</strong> Dialing Patterns • 69
593-8200 TTTTTTT<br />
9-593-8200-123 9TTTTTTTNNN<br />
1-593-8200 1TTTTTTT<br />
10288-1-201-593-8200 10NNNTTTTTTTTTTT<br />
1800-593-82004333#1123 TTTTTTTTTTTX<br />
4994-1201-593-8200 4994TTTTTTTTTTT<br />
*<br />
1234-1201-593-8200 CCCCTTTTTTTTTTT<br />
*<br />
1202-593-82001234 TTTTTTTTTTCCCC<br />
*In last two examples 1234 is an account code. This pattern can be used only if account<br />
or authorization code is generated with EVERY telephone number.<br />
Adding new dialing pattern<br />
1. Click on New button.<br />
2. Type in a new dialing pattern.<br />
3. Click on Cost Indicator to associated cost with applicable pattern.<br />
4. Click on New button if you want to create a new dialing pattern or<br />
on OK button to save changes and exit.<br />
Clicking on Cancel button will exit the screen without saving the changes.<br />
Deleting dialing patterns<br />
1. Click on existing dialing pattern on the list.<br />
2. Click on Delete button.<br />
3. Click on OK button to save changes and exit.<br />
Editing dialing patterns<br />
1. Click on existing dialing pattern on the list.<br />
2. Add new characters or o<strong>ver</strong>write existing ones in the Dialing Pattern field.<br />
3. Click on OK button to save changes and exit.<br />
It is strongly re<strong>com</strong>mended that you exit out of the TAPIT program as well<br />
as the SMDR Monitor and reboot the <strong>com</strong>puter for the dialing pattern<br />
changes to take effect. The changes will effect only the calls processed<br />
after PC has been rebooted.<br />
70 • Dialing Patterns <strong>Tapit</strong>
Report Scheduler<br />
Using Report Scheduler<br />
Report Scheduler screen will allow you to generate selected reports automatically.<br />
TAPIT software must be running in order for Report Scheduler to generate a<br />
report.<br />
Click on the Maintenance icon on the Main Menu and then click on the Report<br />
Scheduler icon.<br />
Adding a new report<br />
1. Click on the New button.<br />
The Report Selection screen is displayed.<br />
2. Select the report name you want to add.<br />
3. Click on Continue.<br />
The filter screen is displayed. It is the same screen used to filter data in Reports<br />
module of TAPIT. To apply filter criteria to reports generated by Report<br />
Scheduler you must save a filter as Predefined or use an existing Predefined<br />
filter (see page 30 on using a filter screen).<br />
Click on Continue.<br />
Report Selection screen will close. The name of the selected report and filter (if<br />
<strong>Tapit</strong> Report Scheduler • 71
used) will appear on the Report Scheduler screen in Scheduled Report and<br />
Applied Filter fields.<br />
4. Enter the time for the report to be generated in Time text box.<br />
5. Select one of the options from the Output to listbox.<br />
Print - the report will be sent to a printer<br />
File - the report will be saved as a file. Click on the Settings button located next to<br />
the Output to list. Accept the default file name and path or enter a new one. Select<br />
an appropriate file format from the File format list box. Click on OK to save<br />
changes or Cancel to leave the screen without saving.<br />
Email - the report will be sent to the provided email address. Click on the Settings<br />
button located next to the Output to list. Choose a name for the To and CC fields.<br />
Go to File format and choose from Rich Text, HTML and Text formats. Enter the<br />
title of your email message in a Subject field and a short description in the<br />
Description field. Click on OK to save changes or Cancel to leave the screen<br />
without saving.<br />
6. Confirm both Scheduled Report and Applied Filter fields have the correct<br />
values entered.<br />
7. Click on Frequency button and select a frequency (how often) the report will be<br />
generated with.<br />
Daily - a report is generated e<strong>ver</strong>y day at the specified time.<br />
Weekly - a report is generated once a week at the specified time and day of the<br />
week.<br />
Monthly - a report is generated once a month at the specified time and day of the<br />
month.<br />
8. Click on Exit to leave the screen and save changes.<br />
Editing report records<br />
1. To edit Time and File Name fields click on them and enter new values.<br />
2. If you want to change the report name or the filter name click on the Report button<br />
and make your selection.<br />
3. Click on Frequency button to change the setting for how frequently the report is<br />
going to be generated.<br />
4. Check Print check box (if required) or leave it unchecked if you want to print to a<br />
file.<br />
5. Click on Exit to leave the screen and save the changes.<br />
Deleting report records<br />
1. Click on Time or File Name field on the report record you want to delete.<br />
2. Click on the Delete button to delete a report record.<br />
3. Click on Exit to leave the screen and save the changes.<br />
72 • Report Scheduler <strong>Tapit</strong>
Data Maintenance<br />
Data Maintenance Concepts<br />
Data Maintenance screen will allow you to maintain TAPIT’s data export and import<br />
functions.<br />
Click on the Maintenance icon on the Main Menu and then click on the Data<br />
Maintenance icon.<br />
1. An Export/Import/Billing Data screen will be displayed. It consists of six<br />
different sections: Export, Import, Call Records Maintenance, Export to<br />
Billing Software, Import <strong>Tapit</strong> DOS Data, Import V&H Data<br />
2. Export screen is displayed first as a default<br />
<strong>Tapit</strong> Data Maintenance • 73
Export<br />
1. Export facility will allow you to export selected data for different categories to a<br />
file. Exported data can be used as a back-up or it can be imported by TAPIT<br />
installed at another location.<br />
2. Select data category to be exported in the Export Categories box (select All if you<br />
wish to export all categories).<br />
3. Click on Directory field and enter a destination path (do not enter anything if you<br />
wish to accept default destination).<br />
4. Check the Delete Existing Data from Database box if you wish to remove data<br />
while exporting. Please be careful and make sure that you do not export already<br />
empty files , because they will o<strong>ver</strong>write already exported data (for example<br />
exporting twice in a row with Delete option on).<br />
5. Click on Continue button.<br />
6. TAPIT will create a number of files (depending on categories selected) in the<br />
destination directory with TXT extensions.<br />
74 • Data Maintenance <strong>Tapit</strong>
Import<br />
Import feature allows you to import TAPIT’s data after it was exported as describe in<br />
Export section<br />
Select a category to be imported in the Import Categories box (select All if you wish<br />
to import all categories)<br />
1. Click on Directory field and enter a source path (do not enter anything if data<br />
resides in C:\TAPITW32 directory)<br />
2. Click on Continue button<br />
3. TAPIT will start importing data. If appropriate files are not found in the specified<br />
directory TAPIT will notify you with a message. Those files will not be imported.<br />
The files were not found most likely because they were not exported from TAPIT or<br />
were exported to a different directory.<br />
When finished TAPIT will display “Data Import Completed” message.<br />
<strong>Tapit</strong> Data Maintenance • 75
Call Records Maintenance<br />
Call Records Maintenance facility allows to export, purge, archive and import call<br />
records.<br />
1. Select Type of Calls Maintenance<br />
Available options are:<br />
2. Purge Call Records - selected call records (a filter screen will be displayed in the<br />
next step) will be deleted permanently from TAPIT database.<br />
3. Export and Remove Call Records - selected call records will be copied to the<br />
specified directory and deleted from TAPIT database. A file name for exported<br />
records must be entered in the File Name box (i.e. 0896.txt for exported records for<br />
August 1996). We re<strong>com</strong>mend a .txt extension for this file.<br />
Please keep track of all file names that are used when exporting since<br />
you will need to know them when importing records.<br />
4. Export and Keep Call Records - selected call records will be copied to the<br />
specified directory. They will not be deleted from TAPIT database. A file name for<br />
exported records must be entered in the File Name box (i.e. 0896.txt for exported<br />
records for August 1996). This option can be used if you would like to have a copy<br />
of the call records on a different location where TAPIT is installed. Note that<br />
when this option is used importing data from the newly created export<br />
file will create duplicate call records.<br />
Please keep track of all file names that are used when exporting since<br />
you will need to know them when importing records.<br />
5. Import Call Records - choose this option to import call records that have been<br />
exported using either Export or Remove Call Records or Export and Keep<br />
Call Records utility. Type in the directory name in the Directory box where file<br />
76 • Data Maintenance <strong>Tapit</strong>
with call records are stored and the file name that was used when exporting call<br />
records in the File Names box.<br />
6. After the selection has been made click on Continue button.<br />
7. A filter screen will be displayed, enter criteria on the<br />
filter screen and click on Continue. (see page 30 on how to use filter screen)<br />
We do not re<strong>com</strong>mend exporting call records directly to floppy diskettes.<br />
The possibility exists that there will be not enough room on the floppy disk<br />
when exporting and the results may be unpredictable. It is a better<br />
practice to export data to a hard drive and then copy it to an alternate<br />
location for extended storage (i.e. floppy disk, tape drive, file ser<strong>ver</strong>, etc.)<br />
Export to Billing Software<br />
Export to Billing Software is an export facility that will allow you to export TAPIT’s<br />
call data in various formats supported by major Database, Spreadsheet and Time&Billing<br />
software applications.<br />
1. Select an application format in the Data File Format field.<br />
2. Click on Directory field and enter a destination path (do not enter anything if you<br />
wish to accept C:\TAPITW32 destination).<br />
3. Check the Delete Existing Data from Database box if you wish to remove call<br />
records data while exporting.<br />
4. Click on Continue button .<br />
5. A filter screen may be displayed, enter criteria on the filter screen and click on<br />
Continue. (see page 30 on how to use filter screen)<br />
6. TAPIT will create a file with an appropriate extension for the output format (i.e.<br />
DBF for Dbase, XLS for Microsoft Excel) in the specified destination.<br />
Import <strong>Tapit</strong> DOS Data<br />
<strong>Tapit</strong> Data Maintenance • 77
Use Import <strong>Tapit</strong> DOS Data function when upgrading to current TAPIT <strong>ver</strong>sion.<br />
Please follow instructions from Upgrading TAPIT for DOS to TAPIT <strong>EX</strong> on page 18.<br />
Import V&H Data<br />
Use Import V&H Data function to import V&H pricing file<br />
1. Click on Import V&H Data.<br />
2. Make sure that the area code and exchange of a telephone number entered in<br />
System Parameters screen matches area code and exchange imprinted on the<br />
V&H diskette.<br />
3. Click on Continue.<br />
Enter the name of a drive containing V&H disk if it is different from default option<br />
and click on OK.<br />
4. Loading will take some time to <strong>com</strong>plete. When finished program will display a<br />
following message: “ V&H Data Load Completed”<br />
Click on OK.<br />
78 • Data Maintenance <strong>Tapit</strong>
Report Designer<br />
Creating Custom Reports<br />
Report Designer screen allows you to create your own custom detail or summary<br />
reports.<br />
Click on the System Maintenance icon on the Main Menu and then click on the<br />
Report Designer icon.<br />
Creating a new detail report<br />
1. Click on the New button.<br />
2. Primary Sort Sequence<br />
Select the field name for the primary sort sequence by clicking on the appropriate<br />
option button.<br />
Click on the Ascending or Descending button to indicate the sort order.<br />
Check the Page Break box if you want the information for different values of the<br />
selected field to always start on a new pages. e.i. If Date is selected as a primary sort<br />
sequence field and the Page Break is checked the data for each date will start on a<br />
new page.<br />
<strong>Tapit</strong> Report Designer • 79
3. Secondary Sort Sequence<br />
Select the field name for the secondary sort sequence by clicking on one of the<br />
option buttons.<br />
Click on the Ascending or Descending button to indicate the sort order.<br />
Check Subtotal box if you want to see totals for the secondary sort field.<br />
4. Available Fields box lists all fields available for the reports.<br />
Click on the field name to be included on the report and click on the right arrow to<br />
move the field to the Chosen Fields list box (you may also double click the field<br />
name to add it to the list). The number of fields you can select is limited by the page<br />
size. Page may print landscape in order to fit wide reports. Note: The order of the<br />
columns on the report is the same as the order of the selected fields.<br />
To remove a field from the report, click on the field name in the Chosen Fields<br />
box and click on the left arrow or double click the field name.<br />
5. Click on the Save button.<br />
6. Enter the report name and click on OK.<br />
The example screen above:<br />
The detail report is grouped first by Date and then by Extension. Each date will start on<br />
the new page. Totals for each extension are going to be displayed. The report sort order is<br />
ascending.<br />
7. Click on the Test Run button to generate a report.<br />
8. The report filter screen appears. Enter the report criteria.<br />
If you want to run this report always based on the same criteria:<br />
Click on the Predefined Filter button.<br />
”Do you want to save the current filter selection as a predefined filter?” message<br />
appears.<br />
Click on Yes.<br />
Save Filter screen appears. Fill in the filter name and click on OK.<br />
Click on Continue. The message “Do you want to associate the selected<br />
predefined filter with this report for future use?”.<br />
Click on Yes.<br />
You can also choose from the list of existing predefined filters and associate<br />
your report with one of them.<br />
To change the predefined filter to another predefined filter open the Report<br />
Filter screen (either via MainMenu/Reports or Test Run ) and select another<br />
existing filter name or create a new one. Run the report. When the “Do you want<br />
to associate the selected predefined filter with this report for future use”<br />
message. Click on Yes.<br />
If you do not want to run this report always based on the same criteria:<br />
Click on Continue.<br />
9. Verify the report and close the report screen.<br />
10. Click on Exit to leave the screen.<br />
80 • Report Designer <strong>Tapit</strong>
Creating a new summary report<br />
1. Click on the Summary field .<br />
2. Select a field the summary report is going to be grouped by (Date is a default) by<br />
clicking on the appropriate option button in the Group By section.<br />
3. Click on the Ascending or Descending button to indicate the sort order.<br />
4. Check the Page Break box if you wish to have a page break inserted after each<br />
Group By field.<br />
5. Select a sort sequence for the summary report by clicking on the appropriate field in<br />
the Sort By box.<br />
6. Note: There are no Available Fields and Chosen Fields list boxes on the<br />
summary report screen.<br />
Fields that are included on summary reports are:<br />
the selected field from the Group By section, number of calls, Time, A<strong>ver</strong>age Time,<br />
Cost, and A<strong>ver</strong>age Cost.<br />
7. Click on the Save button.<br />
8. Enter the report name and click on OK.<br />
9. Click on the Test Run button to generate a report. Follow instructions.<br />
10. The report filter screen appears. Enter the report criteria.<br />
If you want to run this report always based on the same criteria follow<br />
the instructions below.<br />
Click on the Predefined Filter button.<br />
”Do you want to save the current filter selection as a predefined filter?” message<br />
appears.<br />
Click on Yes.<br />
Save Filter screen appears. Fill in the filter name and click on OK.<br />
Click on Continue. The message “Do you want to associate the selected<br />
predefined filter with this report for future use?”.<br />
Click on Yes.<br />
You can also select from the list of existing predefined filters and associate your<br />
report with one of them.<br />
To change the predefined filter to another predefined filter open the report filter<br />
screen (either via MainMenu/Reports or Test Run located on the Report<br />
<strong>Tapit</strong> Report Designer • 81
Designer screen) and select another existing filter name or create a new one.<br />
Run the report. When the “Do you want to associate the selected predefined<br />
filter with this report for future use” message appears click on Yes.<br />
If you do not want to run this report always based on the same criteria<br />
click on Continue.<br />
11. Verify the report and close the report screen.<br />
12. Click on Exit to leave the screen.<br />
Creating reports from templates<br />
1. Click on Open.<br />
2. The Report Selection screen <strong>com</strong>es up.<br />
3. Select the report you want to base your new report on and click on Continue.<br />
4. The Report Selection screen disappears and the Report Designer screen reflects<br />
the criteria of the open report.<br />
5. You can edit the reports criteria in any way you need (refer to sections on creating<br />
detail and summary reports above) and save the report using Save As option. If you<br />
want to associate this report with the predefined filter, follow instructions from pt. 8<br />
to pt. 12 from the section Creating a new summary report above.<br />
Editing custom reports<br />
1. Click on Open.<br />
2. The Report Selection screen <strong>com</strong>es up.<br />
3. Select the report that needs editing and click on Continue.<br />
4. The Report Selection screen disappears and the Report Designer screen reflects<br />
the criteria of the open report.<br />
5. You can edit reports criteria in any way you need (refer to the section on creating<br />
detail and summary reports above) and save the report using Save (if you want to<br />
o<strong>ver</strong>write the same report name) or Save As option (if you want to save it as a new<br />
report).<br />
6. To run the custom reports from the Main Menu click on the Reports icon. On the<br />
Report Selection screen click on the Custom tab. Select the name of the report<br />
and click on Continue. For help with running reports refer to the Reports chapter<br />
(page 30).<br />
Note: Standard TAPIT Reports cannot be modified and saved with the<br />
same name. You can open and modify a Standard TAPIT Report; howe<strong>ver</strong>,<br />
you must use Save As option to save it under different name.<br />
.<br />
82 • Report Designer <strong>Tapit</strong>
Fraud Alert<br />
Fraud Alert Features<br />
Fraud Alert will notify you of unusual activity on the phone system according to the<br />
parameters specified.<br />
TAPIT MUST BE RUNNING (EVEN MINIMIZED) IN ORDER FOR FRAUD ALERT TO<br />
WORK.<br />
Click on the Maintenance icon on the Main Menu and then click on the Fraud<br />
Alert icon.<br />
Fraud Alert will slow down your processing speed<br />
Parameters<br />
This facility allows you to define the parameters that will control Fraud Alert.<br />
To access Parameters click on the Parameters icon.<br />
<strong>Tapit</strong> Fraud Alert • 83
Fraud Alert will not function if the parameters are NOT defined or are not properly<br />
defined!<br />
The following is a description of fields that are available on this screen:<br />
Working Hours - In order to distinguish between your work and off-work hours, you<br />
need to provide this information using these fields. Please be as accurate as possible.<br />
Work hours are the time period in which you normally conduct business (i.e. 8:00 AM -<br />
5:00 PM would be 08:00 to 17:00). Note that the times are in military format. Anytime<br />
that is not specified as work is by default off-hours. Saturday would be 00:00 to 00:00,<br />
this means that there are NO work hours for that day and all the time will be off-hours.<br />
Alarms<br />
There are se<strong>ver</strong>al alarms available to you. To specify which alarms will be utilized, click<br />
on the check box in the corresponding fields.<br />
Printer - If selected, e<strong>ver</strong>y time that an alarm condition is triggered, a message based on<br />
the condition will be sent to your printer.<br />
Video - If selected, e<strong>ver</strong>y time that an alarm condition is triggered, a warning message<br />
will flash in the center of your <strong>com</strong>puter screen.<br />
Audio - If selected, e<strong>ver</strong>y time that an alarm condition is triggered, a siren will be<br />
activated on your <strong>com</strong>puter. The sound quality is hardware dependent, so it may vary<br />
from <strong>com</strong>puter to <strong>com</strong>puter.<br />
Dial - If selected and your <strong>com</strong>puter is equipped with a Hayes <strong>com</strong>patible modem, e<strong>ver</strong>y<br />
time that an alarm condition is triggered, a call will be initiated to a specified telephone<br />
number.<br />
COM port - If you are planning to use a modem, you need to specify which COM port<br />
(serial port) you are going to use. REMEMBER that TAPIT is ALSO using a port. For<br />
example, if TAPIT is using COM1, you may use your modem on COM2 or COM4, etc.<br />
LPT port - If using a printer, this field identifies LPT#.<br />
Modem init string - If you are planning to dial out to a pager, you are going to need a<br />
Hayes <strong>com</strong>patible modem. There are many varieties. Some of them may need to be<br />
initialized with special "AT" <strong>com</strong>mands. Fraud Alert will use "AT" sequence if nothing<br />
is entered in this field.<br />
Please refer to your modem documentation.<br />
Modem dial string - This field needs to be entered by the user. It should contain a<br />
telephone number for a pager or service, as well as characters to be transmitted in the<br />
event of an alarm condition. For example: "AT2125551234,,,,,25276" (this string<br />
interprets as dial # 212-555-1234; wait 10 seconds; dial "ALARM").<br />
Log Alarm to File - If selected, e<strong>ver</strong>y time that an alarm condition is triggered, a<br />
message based on the condition will be written to "TPWFRAUD.TXT" file in the<br />
TAPIT directory. This file may be stored somewhere else as configured by the user.<br />
This is a standard ASCII text file that you may print, view and edit.<br />
To exit this screen click on the Exit button, changes will be saved automatically.<br />
Print Log File - click on this icon to send output of the Log File<br />
("TPWFRAUD.TXT") to the printer<br />
84 • Fraud Alert <strong>Tapit</strong>
E<strong>ver</strong>y time that an alarm condition is triggered, a message based on the condition will be<br />
written to "TPWFRAUD.TXT" file.<br />
To Print "TPWFRAUD.TXT" file click on the Print List button<br />
Example:<br />
01/24/96 9:02 <strong>EX</strong>TENSION 116 <strong>EX</strong>CEEDED 1 IN CALLS BY 0 (OFF) IN HOUR<br />
14:00<br />
This record means that at 9:02 AM on January 24, 1996 extension 116 had exceeded it’s<br />
check value of one (1) in<strong>com</strong>ing call by 0 calls during off hours (OFF) in hour period<br />
14:00 (2:00 PM). This alarm was to check for any calls from extension 116 during offhours.<br />
Delete Log File<br />
E<strong>ver</strong>y time that an alarm condition is triggered, a message based on the condition will be<br />
written to "TPWFRAUD.TXT" file. This file is ne<strong>ver</strong> o<strong>ver</strong>written, so there is a possibility<br />
that it may grow quite large (depending on your telephone activity). It is advisable to<br />
delete this file periodically.<br />
Click on the Delete Log File button to delete "TPWFRAUD.TXT"<br />
Test Alarms<br />
As we have mentioned earlier, there are se<strong>ver</strong>al "alarms" available to you. They are<br />
defined on the Fraud Alert Parameters screen.<br />
To get a good feel for what they are, you may want to try them out first before using<br />
them. Also, if you plan to use a modem to dial out to a pager in the event of Toll Fraud,<br />
you can test that process with this facility.<br />
Click on the Test Alarms button to test alarms<br />
<strong>Tapit</strong> Fraud Alert • 85
Trunks<br />
This facility allows you to specify a condition for a particular trunk which, if met, will<br />
trigger an alarm (please see "Alarm" section). You can use TAPIT Call Accounting<br />
software to get a feel for your normal trunk activity prior to setting up these conditions.<br />
You may define se<strong>ver</strong>al conditions for each trunk. Depending on the type of business<br />
you are in, there is an acceptable number of calls (in<strong>com</strong>ing and outgoing) as well as the<br />
cost that occurs on a trunk during any particular hour (please remember the difference<br />
between work-hours and off-hours).<br />
The following is a description of fields that are available to you:<br />
Trunk - 4-character identification of a trunk (you should run TAPIT's Summary By<br />
Trunk report to see some valid Trunk IDs).<br />
Type - up to 30 characters describing a trunk (i.e. CO, TIE, FX, WATS, etc.). This field<br />
is optional.<br />
In<strong>com</strong>ing Calls - Alert Conditions<br />
Hourly call volume exceeds - this number will set a number of calls that can be<br />
received on the trunk before an alarm is triggered, a different number can be used for<br />
work and off hours.<br />
For Number of calls "0" value is valid. It will not trigger an alarm condition<br />
for that particular entry.<br />
With call length O<strong>ver</strong>/Under - this option will set duration for each call that is<br />
allowed to be received on the trunk before an alarm is triggered.<br />
Outgoing Calls - Alert Conditions<br />
Hourly call volume exceeds - this number will set a number of calls that can be<br />
made on the trunk before an alarm is triggered, a different number can be used for work<br />
and off hours.<br />
For Number of calls "0" value is valid. It will not trigger an alarm condition<br />
for that particular entry.<br />
With call length O<strong>ver</strong>/Under - this option will set duration for each call that is<br />
allowed to be made on the trunk before an alarm is triggered.<br />
86 • Fraud Alert <strong>Tapit</strong>
Hourly call cost exceeds - alarm will be triggered if specified amount of cost is<br />
exceeded during the work and off hours regardless of number of calls made<br />
Adding new trunk record<br />
Click on New button and type in the desired information for a Trunk<br />
Editing and retrieving existing trunk records<br />
Click on the arrow pointing down and select a Trunk from the drop down list. Type new<br />
or o<strong>ver</strong>write existing settings.<br />
Deleting trunk records<br />
Retrieve an existing Trunk record and click on Delete button<br />
Click on Exit to leave Fraud Trunk Configuration screen<br />
Extensions<br />
This screen allows you to specify a condition for a particular extension which, if met, will<br />
trigger an alarm (please see "Alarm" section). You can use TAPIT Call Accounting<br />
software to get a feel for your normal extension activity prior to setting up these<br />
conditions.<br />
Following is the description of fields that are available to you:<br />
From Extension - 4-digit identification of this extension (it may be helpful to run<br />
TAPIT's Summary by Extension report to see some valid Extensions).<br />
To Extension - when creating or deleting a range of Extensions, this field will contain<br />
the "To" Extension.<br />
Parameters may be entered for a range of extensions i.e. from 110 to 120 or just for one<br />
extension i.e. from 125 to 125<br />
In<strong>com</strong>ing Calls - Alert Conditions<br />
Hourly call volume exceeds - this number will set a number of calls that can be<br />
received by a single extension or each extension in the range before an alarm is triggered,<br />
a different number can be used for work and off hours<br />
For Number of calls "0" value is valid. It will not trigger an alarm condition<br />
for that particular entry.<br />
<strong>Tapit</strong> Fraud Alert • 87
With call length O<strong>ver</strong>/Under - this option will set duration for each call that is<br />
allowed to be received by a single extension or each extension in the range before an<br />
alarm is triggered.<br />
Outgoing Calls - Alert Conditions<br />
Hourly call volume exceeds - this number will set a number of calls that can be<br />
made by a single extension or each extension in the range before an alarm is triggered, a<br />
different number can be used for work and off hours.<br />
For Number of calls "0" value is valid. It will not trigger an alarm condition<br />
for that particular entry.<br />
With call length O<strong>ver</strong>/Under - this option will set duration for each call that is<br />
allowed to be made by a single extension or each extension in the range before an alarm<br />
is triggered.<br />
Hourly call cost exceeds - alarm will be triggered if specified amount of cost is<br />
exceeded during the work and off hours regardless of number of calls made.<br />
Adding new extension record<br />
Click on New button and type in the desired information for an extension or an extension<br />
range.<br />
Editing and retrieving existing extension records<br />
Click on the arrow pointing down and select an extension or extension range from the<br />
drop down list. Type new or o<strong>ver</strong>write existing settings.<br />
Deleting extension records<br />
Retrieve an existing extension or extension range record and click on Delete button.<br />
Click on Exit to leave Fraud Alert Extension Configuration screen.<br />
Dialed Numbers<br />
This facility allows you to specify which outgoing calls will trigger an alarm (please see<br />
"Alarm" section).<br />
Depending on your type of business, you may be concerned with excessive international<br />
or long distance calls, or you may be interested in monitoring calls to a particular Area<br />
Code, Country, or even a local exchange. Here you may set conditions for a particular<br />
telephone number. For example, if you specify "411”, this entry will be processed<br />
EVERY time when someone dials Information. You can also specify an area code<br />
separately, such as “800” or “900” calls.<br />
88 • Fraud Alert <strong>Tapit</strong>
You may define se<strong>ver</strong>al conditions for each number dialed. You should know the<br />
acceptable number of outgoing calls as well as the cost that occurs during any particular<br />
hour (please remember the difference between work-hours and off-hours).<br />
Following is the description of fields that are available to you:<br />
Area Code - 3-digit field in which you may enter specific area codes that you may be<br />
concerned with. You can also enter “NNN” and the system will populate your specified<br />
phone number with all available area codes (to co<strong>ver</strong> 555-1212 calls for all area codes for<br />
example). Note that area code must be present if phone number is populated.<br />
Number Dialed - 12-digit field in which you may enter telephone numbers that you<br />
may be concerned with.<br />
Hourly call volume exceeds - this number will set an amount of calls that can be<br />
made to a particular number or area code before an alarm is triggered, a different number<br />
can be used for work and off hours.<br />
For Number of calls "0" value is valid. It will not trigger an alarm condition for that<br />
particular entry.<br />
With call length O<strong>ver</strong>/Under - this option will set duration for each call that is<br />
allowed to be made to a particular number or area code before an alarm is triggered.<br />
Hourly call cost exceeds - alarm will be triggered if specified amount of cost is<br />
exceeded during the work and off hours regardless of number of calls made.<br />
Adding new Number Dialed record<br />
Click on New button and type in the desired information for a telephone number.<br />
Editing and retrieving existing Number Dialed records<br />
Click on the arrow pointing down and select a Number Dialed record from the drop<br />
down list. Type new or o<strong>ver</strong>write existing settings.<br />
Deleting Number Dialed records<br />
Retrieve a Number Dialed record and click on Delete button.<br />
Click on Exit to leave Fraud Alert Extension Configuration screen.<br />
Note that making a change on any of the configuration screens will cause<br />
the system to reset all the counters for Fraud Alert.<br />
<strong>Tapit</strong> Fraud Alert • 89
Database Repair Utility<br />
Using Repair Utility<br />
Occasionally database may get damaged or corrupted. The most <strong>com</strong>mon reason for this<br />
type of situation is either a power outage or user action of shutting <strong>com</strong>puter down when<br />
application is still open.<br />
TAPIT ships with a utility that will try to repair databases that were not closed properly.<br />
If you start getting error messages related to databases or if advised by our technical<br />
support staff:<br />
1. Exit from TAPIT application.<br />
2. Run Scandisk.<br />
3. Go to Start\TAPIT\<strong>Tapit</strong> Repair.<br />
Carefully read the message on your screen. If you are ready to run a repair utility click on<br />
OK.<br />
TAPIT Repair Utility screen appears.<br />
It displays your system’s information.<br />
90 • Database Repair Utility <strong>Tapit</strong>
Click on Repair Database button.<br />
TAPIT will attempt to repair your database file. It will notify you with a message if the<br />
process has been successful.<br />
Restore Files button allows you to replace damaged files with backup files.<br />
When advised by Tech Support you can restore application files or database files using<br />
the above utility. To prevent data loss be <strong>ver</strong>y careful and follow all TAPIT messages<br />
guiding you through the process.<br />
Restoring damaged file:<br />
1. Check or uncheck the Restore from Default Backup Folders check box<br />
depending on what folder contains the backup file.<br />
2. Select file you would like to restore from Select file to restore: list by clicking on<br />
it. The correct path for both damaged and backup files will appear in text boxes<br />
below. If Repair Utility cannot locate the file it will notify you with a message and<br />
you will have to enter the correct path manually.<br />
3. Click on Restore button.<br />
Try to recreate the problem when repairing is <strong>com</strong>pleted.<br />
<strong>Tapit</strong> Database Repair Utility • 91
SMDR Monitor<br />
Understanding SMDR Monitor<br />
SMDR Monitor is a <strong>com</strong>munication program that collects SMDR information generated<br />
by the PBX. It can also display the SMDR information on the screen of your <strong>com</strong>puter in<br />
real time in the raw format.<br />
SMDR Monitor <strong>com</strong>mand line is added to the Microsoft Windows WIN.INI file Load<br />
statement, so e<strong>ver</strong>y time Microsoft Windows is started SMDR Monitor is loaded<br />
minimized and is ready to collect the call records data.<br />
SMDR Monitor must be running in order for TAPIT to collect the call activity<br />
information.<br />
By default SMDR Monitor loads the call data from COM Port. Howe<strong>ver</strong>, the program<br />
can be set up to process the data from the file. To load the call data from the file special<br />
settings need to be placed under the [TAPIT] entry in the mz.ini file (the mz.ini file can<br />
be found in the Windows folder on your <strong>com</strong>puter. See the following example below.<br />
Statements starting with a semicolon are <strong>com</strong>ments and do not need to be entered to the<br />
mz.ini file.<br />
;FileProc=1 - process the call data from the file, not from COM Port.<br />
FileProc=1<br />
;FileTimer=n - load the call data from the file e<strong>ver</strong>y "n" seconds in 60 sec increments, for<br />
example: 180 = 3 minutes.<br />
;The actual value depends on your requirements. The minimum value is 120 and the<br />
maximum value is 3600.<br />
FileTimer=180<br />
;FilePath= - the path to the file containing the call records data.<br />
;You can use wild-card characters in a file name. For example: if your file name is<br />
changed daily to reflect the date of the data collection (smdr111201.log) you can<br />
substitute the "111201" string with the "?" wild-card character - "smdr??????.log". The<br />
file cannot have ".tmp" extension and a wild-card character "*" cannot be used in the<br />
file's extension as well.<br />
FilePath=E:\tapitw32\Data\Main\telmsg.dat<br />
;FileKill=1 - delete the temporary file after processing is done.<br />
;FileKill=0 - keep the temporary file until the next load (re<strong>com</strong>mended).<br />
FileKill=0<br />
To view the SMDR data in real time, double-click on SMDR Monitor minimized icon.<br />
The SMDR Monitor screen is displayed.<br />
92 • SMDR Monitor <strong>Tapit</strong>
SMDR Monitor Menu Options:<br />
Action<br />
Connect - will allow you to connect to a specified serial port (see Settings).<br />
Disconnect - will allow you to disconnect from a specified serial port.<br />
Flush - will dump any SMDR data that may be currently in SMDR Monitor buffer.<br />
Print - will print a content of current screen.<br />
Exit - will exit program. TAPIT will stop collecting data.<br />
Settings<br />
<strong>Tapit</strong> COM Port Options<br />
1. Port - Click on the down arrow icon in the Port field to select a port on the<br />
<strong>com</strong>puter the SMDR cable is connected to.<br />
2. Baud Rate - Click on the down arrow icon in the Baud Rate field to select a<br />
transmission speed the phone system is set at.<br />
3. Data Bits - Click on the down arrow icon in the Data Bits field to select a data<br />
bits setting of the phone system.<br />
<strong>Tapit</strong> SMDR Monitor • 93
4. Parity - Click on the down arrow icon in the Parity field to select a parity setting<br />
of the phone system.<br />
5. Stop Bits - Click on the down arrow icon in the Stop Bits field to select a stop<br />
bits setting of the phone system.<br />
6. Flow Ctrl. - Check an appropriate box to select a flow control parameter that may be<br />
required by the PBX (refer to PBX’s documentation).<br />
7. Com Buffer Size - a number of characters SMDR Monitor will hold in the<br />
memory buffer before saving data to the hard disk of the <strong>com</strong>puter (re<strong>com</strong>mended<br />
setting is 80).<br />
Control Options<br />
1. Write Log File TELMSG.DAT - check this box if you wish TAPIT to save a raw<br />
SMDR information in the separate file (TELMSG.DAT in directory where TAPIT’s<br />
database is stored).<br />
2. Display Errors - Check this box if you wish TAPIT to display <strong>com</strong>munication<br />
errors in the SMDR Monitor window.<br />
3. Always on top - check this if you wish SMDR Monitor icon or window to be<br />
always on the foreground of the desktop.<br />
Display Options<br />
1. Autowrap - some PBX SMDR string is longer than can fit on the screen, check this<br />
option to force the string to wrap to the next string when the right edge of the SMDR<br />
Monitor window is reached.<br />
2. Add Line Feed - Check this box if you wish to have a blank line inserted between<br />
SMDR call records (it may improve readability of SMDR records displayed on the<br />
SMDR Monitor).<br />
PBX<br />
94 • SMDR Monitor <strong>Tapit</strong>
PBX Format - Click on it if you would like to select a PBX Format.<br />
1. Go to Select current PBX format list box and click on a down arrow to select<br />
appropriate PBX format from the list.<br />
2. Go to eXtended Processing check box. For some PBX formats TAPIT supports<br />
extensions up to 7 digits and trunks up to 8 characters.<br />
Check this box if you are certain that TAPIT Monitor supports extended processing for<br />
your PBX format.<br />
In case Monitor does not support this feature for your PBX format and<br />
eXtended Processing box is checked TAPIT will not process calls at all.<br />
Load Telmsg.dat -<br />
Click on it if you would like to load data from Telmsg.dat file.<br />
Loading Telmsg.dat may result in duplicate records in your TAPIT<br />
database.<br />
You have to disconnect (Action/Disconnect) form the COM port before<br />
attempting loading.<br />
<strong>Tapit</strong> SMDR Monitor • 95
Software License Agreement<br />
Contents<br />
Software License Agreement<br />
TO PERSONS WHO PURCHASE OR USE THIS SOFTWARE:<br />
Carefully read all the terms and conditions of this agreement before opening this package.<br />
Opening of this package indicates your acceptance of the terms and conditions of this<br />
License Agreement.<br />
Parties. The Licenser is TRISYS, INC.<br />
215 Ridgedale Avenue, Florham Park, NJ 07932, and you are the Licensee.<br />
1. Grant of License.<br />
The Licensor grants to the Licensee a non-transferable, non-exclusive, non-assignable<br />
license to use the copyright materials and programs as set forth herein for the purposes<br />
stated herein, and none other. The licensed program materials are identified as "TAPIT".<br />
2. Identification of Materials Subject to the License.<br />
The copyright materials and programs are identified as the "program materials", and<br />
include the program diskette and the documentation manual.<br />
3. Modification of the Program(s).<br />
Licensee may not alter, amend, change or otherwise modify the program, and any such<br />
change voids the license effective as of the date of the licensee's first receipt of the<br />
program materials.<br />
4. No Copying Allowed.<br />
All program materials have been provided to the Licensee upon the strict condition that<br />
they may not be copied. The program materials have been provided to the Licensee upon<br />
the strict condition that they may not be distributed or modified in any way without the<br />
prior written approval of the Licensor. Any copies other than as set forth herein are<br />
illegal, and will cause the License to be breached automatically.<br />
5. Ownership of the Program.<br />
Licensee acknowledges that the program materials identified herein are and remain the<br />
sole and exclusive property of the Licensor. The program materials may not be resold,<br />
given or otherwise transmitted by the Licensee to any other third party or parties, or<br />
reused by the Licensee in any other application without the express written consent of the<br />
Licensor.<br />
LICENSEE MAY NOT COPY, MODIFY, TRANSFER OR TRANSLATE THE<br />
PROGRAMS OR RELATED DOCUMENTATION <strong>EX</strong>CEPT AS <strong>EX</strong>PRESSLY<br />
PROVIDED FOR IN THIS AGREEMENT.<br />
6. Copyright.<br />
The program materials are copyrighted. All other copies of the programs and their related<br />
documentation in the possession of the Licensee are in violation of this license, and<br />
96 • Software License Agreement <strong>Tapit</strong>
Licensee agrees to destroy them, and/or allow the Licensor to destroy them if the<br />
Licensee is unable or unwilling to do so.<br />
7. Warranty.<br />
Licensor warrants that TAPIT will substantially conform to its current published<br />
specifications when installed and will be free of defects that substantially affect system<br />
performance.<br />
Licensor will correct substantial software errors at no charge, provided the Licensee<br />
returns <strong>com</strong>plete TAPIT with a dated proof of purchase to Licensor within 3 years of<br />
deli<strong>ver</strong>y. These are the sole remedies for any breach of warranty.<br />
Licensee agrees that Licensor’s liability arising out of contract, negligence, strict liability<br />
in tort or warranty shall not exceed the then existing dealer's cost of TAPIT at the time of<br />
the claim or the purchase, whiche<strong>ver</strong> is less.<br />
Except as specifically provided above, Licensor makes no warranty or representation,<br />
either express or implied, with respect to the software or documentation, including their<br />
quality, performance, merchantability, or fitness for a particular purpose.<br />
THE ABOVE IS A LIMITED WARRANTY AND IT IS THE ONLY WARRANTY<br />
MADE BY LICENSOR. LICENSOR MAKES AND LICENSEE RECEIVES NO<br />
WARRANTY <strong>EX</strong>PRESS OR IMPLIED AND THERE ARE <strong>EX</strong>PRESSLY <strong>EX</strong>CLUDED<br />
ALL WARRANTIES OF MERCHANTABILITY AND FITNESS FOR A<br />
PARTICULAR PURPOSE. LICENSOR SHALL HAVE NO LIABILITY WITH<br />
RESPECT TO ITS OBLIGATIONS UNDER THIS AGREEMENT FOR<br />
CONSEQUENTIAL, <strong>EX</strong>EMPLARY, OR INCIDENTAL DAMAGES EVEN IF IT HAS<br />
BEEN ADVISED OF THE POSSIBILITY OF SUCH DAMAGES. THE STATED<br />
<strong>EX</strong>PRESS WARRANTY IS IN LIEU OF ALL LIABILITIES OR OBLIGATIONS OF<br />
LICENSOR FOR DAMAGES ARISING OUT OF OR IN CONNECTION WITH THE<br />
DELIVERY, USE, OR PERFORMANCE OF TAPIT.<br />
8. Go<strong>ver</strong>ning Law.<br />
This Agreement shall be go<strong>ver</strong>ned by the laws of the State of New Jersey, and of the<br />
United States, where applicable, and shall inure to the benefit the Licensor, its successors,<br />
administrators, heirs and assigns.<br />
9. Remedy - Limitation of Damages.<br />
The Licensee's obligations under this License are of a special and unique character which<br />
gives them a particular value, and the Licensor cannot be reasonably or adequately<br />
<strong>com</strong>pensated in damages in an action at law in the event of the Licensee's breach of this<br />
License. Therefore, the Licensee expressly agrees that the Licensor shall be entitled to<br />
injunctive and other equitable relief in the event of such breach or threatened breach in<br />
addition to any other rights or remedies which the Licensor may possess. Licensor’s<br />
entire obligation, and Licensee's exclusive remedy shall be the replacement by the<br />
Licensor of the diskette and/or backup diskette supplied, if defective in materials or<br />
workmanship.<br />
IN NO EVENT SHALL THE LICENSER BE LIABLE FOR DIRECT, INDIRECT,<br />
INCIDENTAL, CONSEQUENTIAL OR SPECIAL DAMAGES ARISING OUT OF<br />
THIS LICENSE OR THE USE OR NON-USE OF THE PROGRAM MATERIALS OR<br />
THE <strong>EX</strong>ISTENCE, FURNISHING, FUNCTIONING OR THE USE BY THE<br />
LICENSEE OF THE PROGRAM MATERIALS, AS LICENSED HEREIN.<br />
The Licensee agrees that the Licensor’s liability arising out of strict liability, negligence,<br />
<strong>Tapit</strong> Software License Agreement • 97
tort or warranty shall not exceed any amounts paid by the Licensee for the program<br />
materials.<br />
10. Indemnification.<br />
Licensor, at its own expense, will defend the Licensee in any action brought against same<br />
to the extent that said action is based on a claim of infringement against a patent,<br />
copyright or any other property right pertaining to the program materials. Licensor<br />
reserves the right to control the defense of any such claim, lawsuit or other proceeding. In<br />
no event shall the Licensee settle any claim, lawsuit or proceeding without the prior<br />
written consent of the Licensor.<br />
11. Supersedes All Prior Agreements.<br />
This license supersedes all prior understandings and agreements by and between the<br />
Licensor and Licensee related to the subject matter hereof, and is intended to be the<br />
exclusive and <strong>com</strong>plete statement of the parties of the terms of this license.<br />
BY USING THIS SOFTWARE YOU SPECIFICALLY AND <strong>EX</strong>PRESSLY CONSENT<br />
TO THIS LICENSE AGREEMENT<br />
98 • Software License Agreement <strong>Tapit</strong>
Technical Support<br />
Technical Support from <strong>Trisys</strong>, Inc.<br />
Free Technical Support is available, by calling 973.360.2300 to all registered users of<br />
TAPIT for 30 days from the date of the first call. Extended Technical Support plan is<br />
available, please contact your dealer or <strong>Trisys</strong>, Inc. for details.<br />
<strong>Trisys</strong>, Inc.<br />
215 Ridgedale Avenue<br />
Florham Park, NJ 07932<br />
Visit also <strong>Trisys</strong> Web site http:\\www.trisys.<strong>com</strong> when looking for help in<br />
troubleshooting your software.<br />
When calling Technical Support please have the following information ready in order to<br />
expedite your call.<br />
• Serial number of the TAPIT software.<br />
• Version number.<br />
• Com Port Settings.<br />
• Cable specifics for PBX Connection (start to finish cable type/any adapters?).<br />
• PBX type (name and model).<br />
• Computer specs - your processor type and speed.<br />
• The amount of free disk space.<br />
• The amount of RAM.<br />
Troubleshooting<br />
Unable to get the report to display on screen<br />
TAPIT program gets all of its printing capabilities from the printer setup within windows.<br />
In order for the report to <strong>com</strong>e up to the screen there must be a print dri<strong>ver</strong> installed and a<br />
default printer selected.<br />
The monitor is not getting any SMDR Data<br />
1. Configure HyperTerminal session using TAPIT settings. SMDR Monitor has to be<br />
turned off at that time.<br />
2. Check the pin outs - DB-25 connector (3=receiving, 7=ground), DB-9 connector<br />
(2=receiving, 5=ground).<br />
3. The cable may not be functioning.<br />
4. The COM ports may be damaged.<br />
<strong>Tapit</strong> Technical Support • 99
5. The PBX is not actually outputting the SMDR.<br />
Error 3040 - "Disk I/O error" or "Disk I/O error during read".<br />
TAPIT is having difficulty putting data to the hard drive or getting data from it. This<br />
error is <strong>com</strong>mon to Windows and is most often caused by a misreporting of file size by<br />
the operating system. This can be corrected by running a Scandisk.<br />
1. Run Scandisk with a surface scan when using Windows 3.1/3.11 or as a Thorough<br />
Scan in Win95.<br />
2. Following Scandisk activate the TAPIT Repair Database utility which has two<br />
phases.<br />
The first phase <strong>com</strong>pletes with a message "Repair Database Completed Successfully"<br />
and an "OK" box.<br />
Clicking on the "OK" box begins the second phase, which <strong>com</strong>pacts the database by<br />
removing any blank space found or created by the repair, thereby making the<br />
database more efficient.<br />
3. Once <strong>com</strong>pleted restart TAPIT and repeat the operation that yielded the error<br />
message.<br />
Error 3000 - "Reserved error - There is no message for this error".<br />
This error occurs when there has been damage to the application files preventing TAPIT<br />
from operating properly, but not in an expected or predictable manner to which a<br />
dedicated message could be referenced. This error is <strong>com</strong>mon following an upgrade or<br />
reinstallation of the software when the proper sequence wasn't followed.<br />
1. Close all applications and restart the <strong>com</strong>puter.<br />
2. Following restart run Scandisk including surface scan (Thorough Scandisk in<br />
Win95/98).<br />
3. Run Repair Database utility located in the TAPIT program group.<br />
"NPA Summary"<br />
NPA stands for Numbering Plan Administration and this is an example of an Area Code<br />
being recognized by TAPIT but the Exchange is unknown. The Exchange was most<br />
likely created after this <strong>ver</strong>sion of TAPIT was released. Contact your vendor about a<br />
City/State Update.<br />
Error 3075 - TAPIT<br />
It mentions an illegal function but the program still loads.<br />
This error shows that some other program or your operating system has loaded newer<br />
<strong>com</strong>mon files than TAPIT was expecting. Please visit our web site www.trisys.<strong>com</strong>. Go<br />
to Tech Support and select Product Update Downloads. Click on TAPIT and download<br />
the <strong>Tapit</strong>app.bak file for your installation ( it is available as a single file or zipped in<br />
multidisk format). It will need to be installed on each machine running TAPIT in multiuser<br />
environments. If you have any further questions please contact <strong>Trisys</strong> Tech Support<br />
at 973 360 2300.<br />
Error 3197 - "Data has changed - Operation Stopped"<br />
This message appears following a failed upgrade, an upgrade by incorrect methods, or in<br />
limited cases - data corruption. The corrective action is <strong>com</strong>pletely dependent on the<br />
cause. Please contact our technical support at 973.360.2300.<br />
100 • Technical Support <strong>Tapit</strong>
Error Message “CONNECTION FAILED” when Monitor opens<br />
The following message will appear when SMDR Monitor is opened, if there is a conflict<br />
with that <strong>com</strong>port (any other program or hardware device using that <strong>com</strong>port); or you<br />
have selected a <strong>com</strong>port that is not in your <strong>com</strong>puter<br />
Monitor shows gibberish for call records<br />
Do you see gibberish (symbols, not clear readable records) across the screen when you<br />
receive a call record?<br />
You need to double-check your parameters. Gibberish across the screen means that the<br />
Parity, Stop Bits, Data Bits, or Baud Rate are not matched with what the PBX is<br />
sending out. Again go to Action and select disconnect and then go to Settings and<br />
select the proper parameters.<br />
DO NOT CHANGE THE COMPORT SETTING!!!<br />
If you are still getting gibberish across the screen contact your PBX manufacturer for<br />
proper settings, or have the COM port checked for proper operation.<br />
Error 2202 There is no default printer.<br />
TAPIT cannot create reports or print to file without the use of your <strong>com</strong>puters print<br />
dri<strong>ver</strong>s.<br />
1. Go to Control Panel.<br />
2. Select Printers.<br />
3. Select a default printer or install one.<br />
Note that you do not need a printer to be physically attached to the<br />
<strong>com</strong>puter in order to install printer’s dri<strong>ver</strong>.<br />
You can select a generic ink jet or laser jet to supply the necessary dri<strong>ver</strong>.<br />
TAPIT End of the Month Procedures<br />
In order to maintain adequate speed and data integrity, we re<strong>com</strong>mend that the following<br />
procedures be attended to at the beginning of each month.<br />
1. Enter Maintenance Menu from TAPIT Main Menu.<br />
2. Select Data Maintenance.<br />
3. Select Call Records Maintenance.<br />
4. Select Export and Remove Calls.<br />
5. Enter the correct archive drive (normally d: which is your zip drive) and directory<br />
(root directory is ok). Example: d:\.<br />
6. Enter file name (april.txt).<br />
7. Click on Continue.<br />
8. Enter the correct dates in the filter screen (04/01/1998 – 04/30/1998).<br />
9. Click on Continue.<br />
10. After the process is <strong>com</strong>plete, exit TAPIT program (only SMDR Monitor should be<br />
running).<br />
11. Run scandisk utility on drive c:.<br />
12. Run Database Repair.<br />
<strong>Tapit</strong> Technical Support • 101
13. Run defrag utility on drive c:.<br />
14. Restart the <strong>com</strong>puter.<br />
To Prevent Data Loss<br />
1. Consider installing an uninterrupted power supply (UPS) for the <strong>com</strong>puter running<br />
TAPIT.<br />
2. Close TAPIT during non-business hours.<br />
3. Backup all user/client data following initial input and periodically after<br />
changes/updates are done.<br />
4. Close program and restart MS Windows on a periodic basis to refresh system<br />
resources and update operating system to current file statistics. Suggested e<strong>ver</strong>y 1-2<br />
weeks of operation.<br />
5. “Export and Keep” call records on a regular basis to provide backup in the event of<br />
system failure.<br />
6. “Export and Remove” call records that are not needed in the current, active database.<br />
These records can be imported back into the active database if reporting or research<br />
needs to be done.<br />
7. Copy Exported calls files to floppy to allow for system rebuild in the event of a hard<br />
drive failure.<br />
8. Run Repair Database after each “Export and Remove” session to <strong>com</strong>press database<br />
and return available space to the hard drive.<br />
9. Run Thorough Scandisk on monthly, or more frequent, basis to advise on system<br />
storage integrity.<br />
10. Run Defrag to improve system speed and efficiency.<br />
102 • Technical Support <strong>Tapit</strong>
SMDR ALARM<br />
REQUIREMENTS<br />
For newest information and updates go to http://www.trisys.<strong>com</strong>/.<br />
You must have administrative rights for the local <strong>com</strong>puter in Windows<br />
NT/2000 environments in order to install the SMDR Alarm.<br />
<strong>Tapit</strong> Multi-User or <strong>Tapit</strong> Remote Manager must be installed and set up.<br />
SMDR Alarm can work only with Multi-User and Remote Manager <strong>ver</strong>sions<br />
of TAPIT.<br />
When installing SMDR Alarm on a machine other then your TAPIT Ser<strong>ver</strong><br />
make sure that you can point from it to the TAPIT database folder located<br />
on the TAPIT Ser<strong>ver</strong>.<br />
Hardware:<br />
• CPU: Pentium II 166MHz or faster<br />
• RAM: 64 MB (more re<strong>com</strong>mended)<br />
• Hard-disk Space: Minimum 20 MB<br />
• Printer (to Print alarm messages - optional)<br />
• COM Port and Modem (to dial on the Phone and send signal to the Beeper -<br />
optional)<br />
• Sound Card and Speakers (to play Sound alarm message - optional)<br />
Supported Operating Systems:<br />
• Microsoft Windows 98/NT/2000/XP<br />
• Windows NT4.0 Ser<strong>ver</strong> Service Pack 5 or higher<br />
Windows 2000 Ser<strong>ver</strong> Service Pack 1 or higher re<strong>com</strong>mended<br />
Software Requirements:<br />
• E-Mail client application MS Outlook 98/2000 (for E-mail Alarm signal option)<br />
• Media Player capable to play WAV files.<br />
<strong>Tapit</strong> SMDR ALARM • 103
INSTALLATION<br />
Before installing SMDR Alarm<br />
• You must have administrative access rights to the <strong>com</strong>puter where the SMDR Alarm<br />
application will be installed.<br />
• TAPIT Multi-User <strong>ver</strong>sion must be installed and set up.<br />
• When installing SMDR Alarm on a <strong>com</strong>puter other then your TAPIT ser<strong>ver</strong> make<br />
sure that you can point from that machine to the TAPIT database folder located on<br />
the TAPIT Ser<strong>ver</strong>. You must have read and write access rights to the TAPIT<br />
database folder.<br />
Installation program may require rebooting of your PC.<br />
Installing SMDR Alarm<br />
1. Open SMDR Alarm folder located on the TAPIT CD.<br />
2. Double click on Setup.exe file. SMDR Alarm - <strong>Trisys</strong>, Inc. Setup screen appears.<br />
This screen is a reminder to close all running applications before installation begins.<br />
Click on the OK button to continue.<br />
3. Click on the <strong>com</strong>puter icon/button to install in a default folder or click on Change Directory<br />
to install the application in a different folder. Click on Continue.<br />
4. The next screen consists of the Program Group text box and the Existing Group list box.<br />
Accept default value or select of the program groups listed below. Click on Continue.<br />
5. The program begins installation. When installation is <strong>com</strong>pleted SMDR Alarm - <strong>Trisys</strong>, Inc<br />
Setup was <strong>com</strong>pleted successfully. Click on OK.<br />
6. To start SMDR Alarm select Start/Programs/SMDR Alarm.<br />
104 • SMDR ALARM <strong>Tapit</strong>
USER INSTRUCTIONS<br />
Setting up the SMDR Alarm<br />
1. Click the Start menu and choose Programs. Select the program group SMDR Alarm and<br />
then SMDR Alarm.<br />
Application screen appears.<br />
"Waiting..." indicates<br />
the SMDR Alarm<br />
application is<br />
running.<br />
In this example each<br />
<strong>com</strong>ma represents 1-<br />
second delay.<br />
SMDR Alarm screen is not updated automatically to display the current<br />
day of the week settings. Instead the screen shows the settings for the last<br />
viewed/edited day of the week.<br />
2. Check the Report No SMDR Signal box located in the lower left corner of the SMDR<br />
Alarm screen.<br />
3. Click on the down arrow of the Day of Week list box and select the day of the week you<br />
want to setup the alarm first.<br />
4. Enter the Start Time (military time format - hh:mm) and the NO SMDR Timer (minutes)<br />
values.<br />
There are 3 Start Time and NO SMDR Timer settings. They divide a 24-hour day into three<br />
time periods.<br />
<strong>Tapit</strong> SMDR ALARM • 105
The SMDR Alarm will not function if the 3 time periods are not set for each<br />
day of the week.<br />
Start Time indicates the beginning of each SMDR Alarm period. NO SMDR Timer<br />
shows how long (minutes) an interruption in a call data flow has to be prior to sounding<br />
an alarm during the corresponding time period.<br />
There is an approximately 60 second delay during the NO SMDR failure<br />
reporting process.<br />
The example above should be interpreted as follows:<br />
1st setting - Starting 8 AM SMDR Alarm is going to trigger if the call data flow is<br />
interrupted for more than 15 minutes.<br />
2nd setting - Starting 5 PM (17:00 military time) SMDR Alarm is going to trigger if the<br />
call data flow is interrupted for more than 60 minutes.<br />
3rd setting - Starting 9 PM (21:00 military time) SMDR Alarm is not going to trigger<br />
until the next Start Time (8:00 AM).<br />
When the NO SMDR Timer is set to "0" the program will disregard any call<br />
data flow interruptions.<br />
1. Click on the down arrow of the Alarm Signal list box. Select one of the four alarm signal<br />
options.<br />
106 • SMDR ALARM <strong>Tapit</strong>
Each <strong>com</strong>ma<br />
represents<br />
1-second delay.<br />
Each option indicates how a user is notified about the SMDR failure.<br />
Phone option -system pages a user (modem connection required).<br />
Email option - notification message is sent to a user's mailbox (email client required).<br />
Print option - notification is printed (printer connection required).<br />
Visual option - SMDR Alarm flashes the notification message on the screen and plays an<br />
alarm voice recording (sound card required).<br />
Note: By default all options are ac<strong>com</strong>panied with the screen notification<br />
and voice-recorded message.<br />
The alarm on-screen message has the Cancel Alarm button. Click on it to close the<br />
message screen.<br />
You can assign 2 types of alarm signals to one time period.<br />
6. If you selected Phone or E-mail Alarm Signal option, enter the phone number or email<br />
address that corresponds to your choice in the Send Alarm Signal using: text box.<br />
7. Repeat pt 4 through 6 for all time periods.<br />
Note: The SMDR Alarm will not function if the 3 time periods are not set for<br />
each day of the week.<br />
8. Click on the Apply button.<br />
<strong>Tapit</strong> SMDR ALARM • 107
9. Click on the Test Now button. It allows you to test alarm signals.<br />
Note: You can only test alarm signals assigned to a current day and time<br />
period.<br />
Example:<br />
You have clicked on the Test Now button at 9 AM on Friday.<br />
Let us assume that Friday's SMDR Alarm is set to the email and printer options for<br />
the time period starting at 8:AM.<br />
We have to remember that screen and voice alarm by default ac<strong>com</strong>panies all other<br />
types of alarm.<br />
In this case, clicking Test Now prompts the system to send an email notification,<br />
print the message, display the screen alarm message and play the voice-recorded<br />
message.<br />
10. If you want to apply the same settings to all the days of the week, click on the Apply to all<br />
Days button.<br />
Otherwise, click on the down arrow of the Day of the Week list box, select the desired day<br />
and repeat pt.4 through 8. Continue this process for the remaining days of the week (you can<br />
set different options for each day but all days of the week must be set).<br />
11. If you want to clear all settings for a given day, select the day from the Day of Week list box<br />
and click on the Clear Day Alarms button. Click on YES for the confirmation message. All<br />
values for the day are discarded. Enter the new settings and click on Apply.<br />
108 • SMDR ALARM <strong>Tapit</strong>
Setting up Phone Number tracking<br />
The SMDR alarm can be triggered when a specific phone number is dialed.<br />
1. Check the Report Phone Numbers check box located in the lower left corner of the<br />
SMDR Alarm screen.<br />
2. Click on the Phone Numbers button.<br />
The Phone Numbers screen appears.<br />
3. Enter phone numbers in the provided spaces. You can enter up to 8 numbers.<br />
4. Click on Apply.<br />
5. Click on OK. The Phone Numbers screen closes.<br />
After the SMDR Alarm has been set up click on OK. This minimizes the<br />
SMDR Alarm screen and leaves it running.<br />
If the TAPIT Monitor is running, restart it. Otherwise start the TAPIT Monitor<br />
application by clicking on the Start menu, selecting Programs and then<br />
TAPIT/TAPIT Monitor.<br />
<strong>Tapit</strong> SMDR ALARM • 109
Example of the Phone Number tracking<br />
Time period<br />
one<br />
Time period<br />
two<br />
Time period<br />
three<br />
Phone Number tracking works in conjunction with SMDR Alarm settings. The two<br />
examples above can be explained as follows:<br />
According to the Phone Numbers screen above, the following numbers are being tracked:<br />
411, 911 or any numbers starting with 1900 or 1973555 ("%" is a wild character used to<br />
indicate that any digits can follow the preceding number).<br />
110 • SMDR ALARM <strong>Tapit</strong>
In our SMDR Alarm screen example, the following alarm signals are triggered if any of<br />
the above numbers are dialed:<br />
time period one - between 8 AM and 5 PM a user is emailed, presented with a screen<br />
message and a voice-recording.<br />
time period two - between 5 PM and 9 PM a notification message is printed, a user is<br />
paged, a screen message is displayed and a voice recording is played.<br />
time period three - between 9 PM and 8:AM a screen message is displayed and a voice<br />
recording is played.<br />
The NO SMDR Timer setting is disregarded by the Phone Number tracking.<br />
When it is set to "0" the SMDR Alarm is not activated but the alarm for the<br />
phone numbers is still triggered.<br />
Understanding the TPSALARM.LOG file<br />
The TPSALARM.LOG file contains time and date log of the SMDR alarm and the<br />
tracked phone numbers.<br />
The above file is located in the same folder the TAPIT database is stored.<br />
When the TPSALARM.LOG file<br />
be<strong>com</strong>es too large to maintain it is<br />
saved into TPSALOLD.LOG and<br />
the new empty TPSALARM.LOG<br />
file is created.<br />
The tracked phone<br />
number has been<br />
detected. The call<br />
originated from ext. 139.<br />
The alarm has been<br />
triggered.<br />
The SMDR flow has been interrupted<br />
for more than 15 min. The alarm has<br />
been triggered.<br />
<strong>Tapit</strong> SMDR ALARM • 111
WEB REPORTS<br />
REQUIREMENTS<br />
You must have administrative rights for the local <strong>com</strong>puter in Windows<br />
NT/2000 environments in order to Install the <strong>Tapit</strong> Web Reports.<br />
<strong>Tapit</strong> <strong>EX</strong> Multi-User must be installed and set up. <strong>Tapit</strong> Web Reports can<br />
work only with Multi-User <strong>ver</strong>sions of TAPIT.<br />
When installing <strong>Tapit</strong> Web Reports on a machine other then your TAPIT<br />
Ser<strong>ver</strong> make sure you can point from it to the TAPIT database located on<br />
the TAPIT Ser<strong>ver</strong>.<br />
Hardware:<br />
CPU: Pentium II 200MHz or faster<br />
RAM: 64 MB (more re<strong>com</strong>mended)<br />
Hard-disk Space: Minimum 20 MB<br />
Windows NT, Windows 2000 and Windwos XP Professional software<br />
requirements:<br />
OS:<br />
Windows NT4.0 Ser<strong>ver</strong> Service Pack 5 or higher with IIS 4.0 or<br />
higher<br />
Windows 2000 Ser<strong>ver</strong> Service Pack 1 or higher re<strong>com</strong>mended<br />
Browser:<br />
Internet Explorer 5.5 Service Pack 2 or higher<br />
Data Access Dri<strong>ver</strong>s: MDAC 2.5 or higher<br />
112 • WEB REPORTS <strong>Tapit</strong>
INSTALLATION<br />
Before installing <strong>Tapit</strong> Web Reports<br />
• You must have administrative access rights to the <strong>com</strong>puter where the <strong>Tapit</strong> Web Reports<br />
application will be installed.<br />
• TAPIT <strong>EX</strong> Multi-User <strong>ver</strong>sion must be installed and set up.<br />
To <strong>ver</strong>ify the correct <strong>ver</strong>sion of the TAPIT <strong>EX</strong> database, go to Start/<strong>Tapit</strong>/<strong>Tapit</strong> Repair. The<br />
initial TAPIT Repair screen displays the database release number in the lower right corner. If<br />
you have the Remote Manager software installed click on Continue. To <strong>ver</strong>ify the release<br />
number for each location database select the location name and check the lower right corner.<br />
The correct release number for the TAPIT <strong>EX</strong> database is 5.<br />
• When installing <strong>Tapit</strong> Web Reports on a <strong>com</strong>puter other than your TAPIT Ser<strong>ver</strong>, you must be<br />
able to point from that machine to the TAPIT database folder located on the TAPIT Ser<strong>ver</strong>.<br />
You must have read and write access rights to the TAPIT database folder.<br />
Installation program may require you to reboot your PC.<br />
Installing <strong>Tapit</strong> Web Reports<br />
To view <strong>Tapit</strong> Web Reports on the Internet the application needs to be<br />
installed on the <strong>com</strong>puter hosting a web site accessible on the Internet<br />
(i.e. www.trisys.<strong>com</strong>). You must be able to point from that Web Ser<strong>ver</strong> to<br />
the TAPIT database folder located on the TAPIT Ser<strong>ver</strong>.<br />
If you are installing <strong>Tapit</strong> Web Reports on a <strong>com</strong>puter other than TAPIT Ser<strong>ver</strong> machine<br />
follow the instructions below before you proceed with installation.<br />
• On the <strong>com</strong>puter where the TAPIT database is residing check if the database folder is<br />
shared. In this case, we are going to use the following database folder path: i.e.<br />
C:\TAPITW32\Data\Main. For this example Data is a shared folder.<br />
• Confirm the <strong>Tapit</strong>.ini file is located in the TAPIT database folder.<br />
• Map the shared directory onto the <strong>Tapit</strong> Web Reports <strong>com</strong>puter (where the <strong>Tapit</strong> Web<br />
Reports application is going to be installed) i.e. the mapped path to the database folder is<br />
K:\Main.<br />
1. Insert TAPIT CD into the CD ROM drive. <strong>Trisys</strong> StartUp Manager screen is displayed.<br />
(If this screen is not displayed automatically, then use the Run <strong>com</strong>mand on the Start (Windows)<br />
menu by typing D:\Startup.exe, where D is represents your CD ROM drive, in the Open text box<br />
and clicking on OK.).<br />
<strong>Tapit</strong> WEB REPORTS • 113
2. Click on Install <strong>Tapit</strong> Web Reports.<br />
3. <strong>Tapit</strong> Reports Installation screen appears.<br />
Click on the Next button to continue.<br />
4. The new screen <strong>Tapit</strong> Database Folder Path is displayed.<br />
114 • WEB REPORTS <strong>Tapit</strong>
Enter the path to the folder where the <strong>Tapit</strong> database is located or click on a Browse button to<br />
locate the database folder. Only the path to the database folder (without ending backslash) is<br />
required i.e. C:\<strong>Tapit</strong>W32\Data\Main.<br />
Do NOT enter the <strong>Tapit</strong> database file name.<br />
Click on Next.<br />
Note: If TAPIT is not properly installed or you have entered an incorrect path to the database or<br />
the TAPIT database release number is not “5” then the message “Cannot access the <strong>Tapit</strong> database<br />
at : your database path” appears. You cannot continue with <strong>Tapit</strong> Web Reports installation.<br />
5. User Account screen appears.<br />
User Name field - enter a user account to be used by IIS to run the <strong>Tapit</strong> Web Reports<br />
application. This account needs Full Control permissions for all <strong>Tapit</strong> Web Report application<br />
folders (<strong>Tapit</strong>Web folder where <strong>Tapit</strong> Web Reports are installed and its subfolders - especially<br />
<strong>Tapit</strong>Web\<strong>Tapit</strong>Reps\Data folder) and TAPIT database folder (where TAPIT database<br />
resides).<br />
When entering Domain User Name use the following format: DOMAIN\User<br />
Enter this users’ password in the Password field and confirm the password by reentering it in the<br />
Confirm Password field.<br />
6. Application Passwords screen follows.<br />
<strong>Tapit</strong> WEB REPORTS • 115
Create two passwords. These passwords are required to log into the <strong>Tapit</strong> Web Reports application.<br />
Users will not be able to view reports without a password. The passwords are required entries.<br />
Note: User password allows for running all reports except the Authorization Code and Trunk<br />
Analysis categories. Administrator password enables a person to change passwords and generate all<br />
available reports.<br />
7. Click on Next.<br />
8. This screen prompts you to select the path to the folder where the <strong>Tapit</strong> Web Reports application<br />
will be installed.<br />
Accept the default value or click on the Browse button to locate a different folder.<br />
Click on Next.<br />
9. The Ready to Install! screen appears. Click on Next. Setup program starts installing files.<br />
116 • WEB REPORTS <strong>Tapit</strong>
10. Installation Completed screen is displayed. Check the View ReadMe.txt check box if you<br />
would like to print/read user instructions document. Click on Finish.<br />
Changing IIS permissions<br />
During installation entries from the User Account screen are used to set up IIS to use an<br />
appropriate user account when running the <strong>Tapit</strong> Web Reports application. Howe<strong>ver</strong>, you can<br />
change user account settings using provided <strong>Tapit</strong> Web Config utility or manually.<br />
Changing IIS permissions with <strong>Tapit</strong> Web Config utility<br />
1. Click on Start menu and select Start/Programs/<strong>Tapit</strong> Web Reports/ <strong>Tapit</strong><br />
Web Config.<br />
<strong>Tapit</strong> Web Reports Configuration screen opens in your Internet browser.<br />
2. User field contains the currently used (by IIS) User Name. You can type a new<br />
user name if required.<br />
Note: this user account is used by IIS to run the <strong>Tapit</strong> Web Reports and it needs<br />
Full Control permissions for all <strong>Tapit</strong> Web Report application folders<br />
(<strong>Tapit</strong>Web folder where <strong>Tapit</strong> Web Reports are installed and its subfolders -<br />
especially <strong>Tapit</strong>Web\<strong>Tapit</strong>Reps\Data folder) and TAPIT database folder<br />
(where TAPIT database resides).<br />
When entering Domain User Name use the following format: DOMAIN\User<br />
3. Enter this users’ password in a Password field and confirm the password by<br />
reentering it in the Confirm Password field.<br />
4. Click on Change.<br />
If the IIS settings are changed successfully you will receive a confirmation<br />
message.<br />
<strong>Tapit</strong> WEB REPORTS • 117
Changing IIS permissions manually.<br />
1. Click on Start menu and select Programs/Administrative Tools/Internet<br />
Services Manager (when working with Windows NT click on the Internet<br />
Services Manager icon on your desktop). The Internet Information<br />
Services screen (or if using Windows NT the Microsoft Management<br />
Console screen) appears.<br />
2. Click on the Default Web Site folder and select <strong>Tapit</strong>Reps folder below.<br />
Right-click on the folder and select the Properties option from the drop-down<br />
menu.<br />
118 • WEB REPORTS <strong>Tapit</strong>
3. The <strong>Tapit</strong>Reps Properties screen is displayed.<br />
4. Click on the Directory Security tab.<br />
5. Click on the Edit button located in the Anonymous access and authentication<br />
control group.<br />
<strong>Tapit</strong> WEB REPORTS • 119
Authentication Methods screen appears.<br />
6. Click on Edit. The Anonymous User Account screen is displayed.<br />
The screen contains the default account user name for the <strong>Tapit</strong> Web Reports<br />
application used to access the TAPIT database and other files located on a<br />
TAPIT Ser<strong>ver</strong> <strong>com</strong>puter.<br />
This default account does not have read or write permissions to the TAPIT<br />
Ser<strong>ver</strong> machine.<br />
7. Click on the Allow IIS to control password (if using Windows NT -<br />
Enable Automatic Password Synchronization) box to uncheck it.<br />
8. Enter the account name into the Username text box or click on the Browse<br />
button and select the appropriate name from the list. This account needs Full<br />
Control permissions for all <strong>Tapit</strong> Web Report application folders (<strong>Tapit</strong>Web<br />
120 • WEB REPORTS <strong>Tapit</strong>
folder where <strong>Tapit</strong> Web Reports are installed and its subfolders - especially<br />
<strong>Tapit</strong>Web\<strong>Tapit</strong>Reps\Data folder) and TAPIT database folder (where<br />
TAPIT database resides).<br />
9. Enter the new password. Press enter.<br />
Type in the password again in the confirmation screen. Click on OK.<br />
10. Your screen should look similar to the screen below with the exception of the<br />
Username value, which will be different in your case.<br />
11. Click on OK.<br />
• To start the <strong>Tapit</strong> Web Reports application on the same <strong>com</strong>puter:<br />
Go to Start/Programs/<strong>Tapit</strong> Web Reports/<strong>Tapit</strong> Reports.<br />
• To view <strong>Tapit</strong> Web Reports via Network from a different <strong>com</strong>puter:<br />
Note: The <strong>com</strong>puter where the <strong>Tapit</strong> Web Reports application has been installed<br />
must be turned on and its Web Ser<strong>ver</strong> must be running.<br />
Open the Internet Explorer and type in the following link:<br />
http://web ser<strong>ver</strong> name/<strong>Tapit</strong>Reps (i.e. http://myser<strong>ver</strong>/<strong>Tapit</strong>Reps).<br />
• To access <strong>Tapit</strong> Web Reports via Internet from any <strong>com</strong>puter.<br />
Open the Internet Explorer and type in the following link:<br />
www.your domain name/<strong>Tapit</strong>Reps (i.e. www.trisys.<strong>com</strong>/<strong>Tapit</strong>Reps).<br />
<strong>Tapit</strong> WEB REPORTS • 121
UPGRADING TAPIT WEB REPORTS<br />
Note: TAPIT Web Reports <strong>ver</strong>sion 4.1.1.5 and higher works ONLY with the<br />
Multi-User <strong>ver</strong>sions of TAPIT <strong>EX</strong>.<br />
TAPIT <strong>EX</strong> must be installed and set up before upgrading TAPIT Web Reports.<br />
When upgrading TAPIT Web Reports passwords are not carried from the old <strong>ver</strong>sion to<br />
the new <strong>ver</strong>sion.<br />
You have to re-enter passwords while installing the software.<br />
Upgrading TAPIT Web Reports <strong>ver</strong>. 4.1.1.5 and higher (<strong>ver</strong>sions distributed with TAPIT <strong>EX</strong><br />
4.1.0 and higher)<br />
1. Go to Start/<strong>Tapit</strong>Web/Uninstall Web Reports and run the uninstall program.<br />
2. Follow directions from Installing Web Reports section of this document.<br />
Upgrading TAPIT Web Reports <strong>ver</strong>. 1.1.1.4 (<strong>ver</strong>sion distributed with TAPIT 2000 3.1.9)<br />
Note: When upgrading to <strong>ver</strong>sion 4.1.1.5 and higher you must upgrade your TAPIT 2000 to<br />
TAPIT <strong>EX</strong> first.<br />
3. Go to Start/<strong>Tapit</strong>Web/Uninstall Web Reports and run the uninstall program.<br />
4. Follow directions from Installing Web Reports section of this document.<br />
Upgrading TAPIT Web Reports <strong>ver</strong>sion 1.1.1.3<br />
(TAPIT Web Reports <strong>ver</strong>sion 1.1.1.3 has been distributed with the TAPIT<br />
2000 3.1.8 <strong>ver</strong>sion)<br />
Note: When upgrading to <strong>ver</strong>sion 4.1.1.5 and higher you must upgrade your TAPIT 2000 to<br />
TAPIT <strong>EX</strong> first.<br />
This <strong>ver</strong>sion has a problem with the uninstall program.<br />
Do not use the uninstall utility. It can impair your TAPIT software. Remove<br />
<strong>Tapit</strong>WebReports folder as well as <strong>Tapit</strong>Web entries in Start/Programs menu manually.<br />
Proceed with the installation of the new product – see Installing Web Reports section of<br />
this document.<br />
122 • WEB REPORTS <strong>Tapit</strong>
USER INSTRUCTIONS<br />
Logging in to the <strong>Tapit</strong> Web Reports<br />
There are two ways to use <strong>Tapit</strong> Web Reports.<br />
A = if required, you can set up location/department level permissions and only users<br />
with assigned permissions will be able to view reports.<br />
B = you can use <strong>Tapit</strong> Web Reports “as is” – using the two passowrds created during<br />
installation.<br />
1. Open <strong>Tapit</strong> Web Reports.<br />
Login screen appears.<br />
2. A If you are not using location/department permissions<br />
or no permissions have yet been created,<br />
login screen has only one entry field - Password.<br />
(If permissions have already been set up, skip this point and go to point 3.)<br />
Enter your password.<br />
If the administrative password has been entered, the main menu is displayed.<br />
This screen contains the following options: View Reports, Passwords, and Set up<br />
Permissions.<br />
To view reports, click on the View Reports option.<br />
Reports menu screen appears.<br />
For more information on how to generate reports see the Creating /Printing Reports<br />
section below.<br />
If you decide to set up permissions click on the Set up Permissions option. Refer to the<br />
Permissions section for further instructions.<br />
<strong>Tapit</strong> WEB REPORTS • 123
If the users password has been entered, the report menu is displayed.<br />
For more information on how to generate reports see Creating /Printing Reports<br />
section below.<br />
3. B If you are already using location/department level permissions, login<br />
screen displays two entry fields – Login User Id and Password.<br />
Note: if you want to use location/department level permissions and but no permissions<br />
have yet been set up, refer to point 2.<br />
Enter your user id and password.<br />
If the full control user id and password have been entered, the main menu is displayed.<br />
This screen contains the following options: View Reports, Permissions.<br />
To view reports, click on the View Reports option.<br />
Reports menu screen appears.<br />
For more information on how to generate reports see the Creating /Printing Reports<br />
section below.<br />
To add/edit users/permissions click on the Permissions option. Refer to the<br />
Permissions section for further instructions.<br />
If the users password has been entered, the report menu is displayed.<br />
For more information on how to generate reports see Creating /Printing Reports<br />
section below.<br />
124 • WEB REPORTS <strong>Tapit</strong>
Depending on users permissions, the report menu may not have all the options shown<br />
above.<br />
CREATING/PRINTING REPORTS<br />
1. Open the report menu (see Logging in to the <strong>Tapit</strong> Web Reports for instructions on how<br />
to open report menu).<br />
2. Each option on the menu is a report category. Each category contains se<strong>ver</strong>al reports. For<br />
example click on Phone Number. Your screen displays the list of reports in a Phone<br />
Number category.<br />
3. Click on the name of a required report.<br />
<strong>Tapit</strong> WEB REPORTS • 125
4. The filter screen appears. Enter the appropriate criteria.<br />
Location<br />
If the Remote Manager is not installed this list contains only one item – Main. Otherwise<br />
Location list box enables you to switch locations and run reports for any of your remote sites.<br />
Date<br />
enter the time frame in the following format: “mm/dd/yyyy-mm/dd/yyyy” or select data range<br />
from the list box below<br />
Time Window<br />
enter the time window in the following format: “hh:mm-hh:mm”. The report will run only for<br />
calls taking place in that time bracket.<br />
Extension<br />
enter the extension bracket or if you want to run a report for a specific extension, enter the<br />
same value in both text boxes.<br />
Trunk<br />
enter the trunk bracket or if you want to run a report for a specific trunk, enter the same value<br />
in both text boxes.<br />
126 • WEB REPORTS <strong>Tapit</strong>
Account Code<br />
enter the account code bracket or if you want to run a report for a specific account code, enter<br />
the same value in both text boxes.<br />
Matter Code<br />
enter the matter code bracket or if you want to run a report for a specific matter code, enter the<br />
same value in both text boxes.<br />
Author. Code<br />
enter the authorization code bracket or if you want to run a report for a specific authorization<br />
code, enter the same value in both text boxes.<br />
Area Code<br />
enter the area code bracket or if you want to run a report for a specific area code, enter the<br />
same value in both text boxes.<br />
Source IP Addr<br />
enter the source IP address. Use “*” wild character at the end of the entry if you want to search<br />
for all source IP addresses containing the entered string.<br />
Dest. IP Addr<br />
enter the destination IP address. Use “*” wild character at the end of the entry if you want to<br />
search for all destination IP addresses containing the entered string.<br />
Duration<br />
click on the down arrow to open the operator list. Select the appropriate operator and enter the<br />
call duration value in the following format: “hh:mm:ss”.<br />
Ring Duration<br />
click on the down arrow to open the operator list. Select the appropriate operator and enter the<br />
ring duration value in the following format: “hh:mm:ss”. Ring Duration indicates the length<br />
of the ring time before the call was picked up.<br />
Hold Duration<br />
click on a down arrow to open the operator list. Select the appropriate operator and enter the<br />
call duration value in the following format: “hh:mm:ss”. Hold Duration indicates how long<br />
the call stayed on hold.<br />
Cost<br />
click on the down arrow to open the operator list. Select the appropriate operator and enter the<br />
call cost value (i.e. enter 1.0 for $1 and .5 for 50 cents)<br />
Telephone #<br />
enter the telephone number. You can enter partial numbers. i.e. only area code or area code<br />
and exchange (973 or 973 360).<br />
DNIS #<br />
enter the DNIS number.<br />
Direction<br />
select the direction of phone activity.<br />
To select consecutive list entries, click the first item, press and hold down SHIFT, and then<br />
click the last item.<br />
To select list entries that are not consecutive, press and hold down CTRL, and then click each<br />
item.<br />
Call Status<br />
select the desired call status option.<br />
To select consecutive list entries, click the first item, press and hold down SHIFT, and then<br />
click the last item.<br />
To select list entries that are not consecutive, press and hold down CTRL, and then click each<br />
item.<br />
Department, User, Client, States<br />
If your <strong>Tapit</strong> database does not contain any Department, Client or User records the list boxes<br />
will be empty.<br />
To select consecutive list entries, click the first item, press and hold down SHIFT, and then<br />
click the last item.<br />
<strong>Tapit</strong> WEB REPORTS • 127
To select list entries that are not consecutive, press and hold down CTRL, and then click each<br />
item. Only Local Calls/Exclude Local Calls<br />
check one of the boxes if you want to run a report only for local calls or all calls except local<br />
respectively.<br />
5. To start o<strong>ver</strong> clean the filter screen by clicking on Clear.<br />
When you have entered all filter criteria, click on the Create Report button.<br />
Report screen appears. Depending on the size of your database, the scope of the report<br />
and the speed of your Internet connection it may take a few minutes.<br />
If the report has more than one page, links to the next pages (up to 10) appear on the top<br />
and the bottom of the screen. Ten page numbers are displayed at the same time. You can<br />
move to each page by clicking on its number.<br />
To advance to the next 10 pages, click the single arrow pointing to the right.<br />
To go back to the previous 10 pages, click on the single arrow pointing to the left.<br />
Click the right double arrow to go to the last page of the report.<br />
If you want to go to the first page of the report, click the left double arrow<br />
6. Print To File opens the Print To File screen.<br />
Use it if you need to save a copy of a report for printing or emailing.<br />
Select appropriate file type: HTML or <strong>EX</strong>CEL (to view <strong>EX</strong>CEL files MS <strong>EX</strong>CEL must<br />
be installed) and click on Continue.<br />
The Print to File screen expands to display View File button and specs for the newly<br />
generated file.<br />
128 • WEB REPORTS <strong>Tapit</strong>
Click on the View File button to open the report. Some files may take few minutes to<br />
load – depending on their size.<br />
The report file opens in a new window. You can save this file to your disk, print or email<br />
it using Internet Explorer menu options.<br />
Note: once you leave the Print To File screen or generate a new file, the previously<br />
created file is erased.<br />
DRILL DOWN REPORTS<br />
Summary reports contain links to the detail reports for the each record. For example<br />
clicking on a specific user name in the Summary by User report invokes a detail report<br />
for this user. Clicking on the name of state in the Summary by State – Map report<br />
displays the detail report for this state.<br />
Most Active reports are summary reports. They display top 30 (for your filter selection)<br />
most active extensions/account codes/phone numbers. If you purchased TAPIT with<br />
Remote Manager you can run Most Active reports for all or selected locations.<br />
GRAPH REPORTS<br />
There are se<strong>ver</strong>al graph reports available. They display the top 100 records for your filter selection<br />
and can be sorted by call volume or by cost.<br />
<strong>Tapit</strong> WEB REPORTS • 129
TRUNK ANALYSIS REPORTS<br />
1. To run one of the trunk analysis reports click on the Trunk Analysis group.<br />
The list of available reports appears.<br />
2. Click on the required report. The filter screen appears.<br />
Note: It is important to set your trunks and your trunk groups before running reports.<br />
Refer to the sections below on “how to maintain trunks and trunk groups”.<br />
3. When your trunks and trunk groups are set up, correctly enter the required criteria on the filter<br />
screen and click on Create Report.<br />
The report screen appears.<br />
To see field descriptions point to each columns header.<br />
Note: The Trunk Group reports produce no data unless trunk groups are set up.<br />
Hourly All Trunks Busy By Trunk Group accounts only for the time when all trunks are<br />
unavailable for use.<br />
130 • WEB REPORTS <strong>Tapit</strong>
Setting Up Trunk Groups:<br />
1. From the main menu click on the Trunk Analysis report group to display the list of<br />
available reports.<br />
2. Select one of the Trunk Analysis reports.<br />
3. The report filter screen appears.<br />
4. Click on the Setup Trunk Groups button located on the bottom of the screen.<br />
The Trunk Group Setup Screen appears.<br />
<strong>Tapit</strong> WEB REPORTS • 131
5. To add a new group:<br />
Click on the New button. Enter group's name/id in the New Group text box.<br />
Note: When opened for the first time this screen displays the New Group text field<br />
by default.<br />
Select trunk/trunks from the Available Trunks list.<br />
Click on the Add button to add selected trunks to the Assigned Trunks list.<br />
If you need to remove any trunks from Assigned Trunks list, select trunk/trunks<br />
from the Assigned Trunks list and click on the Remove button.<br />
Click on the Save button to save the new group.<br />
The New Group field changes into Available Trunks list.<br />
6. To edit a trunk group:<br />
Select a trunk group from the Available Groups list.<br />
132 • WEB REPORTS <strong>Tapit</strong>
Select trunk/trunks from the Assigned Trunks list and click on the Remove<br />
button to remove them from a trunk group. Select trunk/trunks from the Assigned<br />
Trunks list and click on the Add button to add them to a trunk group.<br />
Click on the Save button to save the changes.<br />
7. To delete an unwanted trunk group:<br />
Select a trunk group from the Available Groups list and click on the Delete<br />
button.<br />
Click OK on the confirmation message. A trunk group has been deleted.<br />
8. Click on Filter to go back to the filter screen.<br />
Setting Up Trunks:<br />
1. Click on the Trunk Analysis report group to display the list of available reports.<br />
2. Select one of the Trunk Analysis reports.<br />
3. The report filter screen appears.<br />
<strong>Tapit</strong> WEB REPORTS • 133
9. Click on the Setup Trunks button located on the bottom of the screen.<br />
10. The Trunk Setup Screen appears.<br />
11. To add a new trunk:<br />
Enter trunk's name/id in the text box provided and click on the Add button.<br />
The entry is added to the Trunks list. You may have to scroll to the bottom to see it.<br />
Click on Save.<br />
12. To remove unwanted trunks:<br />
Select trunk/trunks from the Trunks list and click on the Remove button.<br />
Click on the Save button to save the changes.<br />
Click on Filter to go back to the filter screen.<br />
134 • WEB REPORTS <strong>Tapit</strong>
PASSWORDS<br />
Password screen is available to a user with the administrator password<br />
ONLY if the location/department level permissions have not been set up.<br />
<strong>Tapit</strong> Web reports has two levels of passwords:<br />
- administrator is able to set/change passwords, view Authorization Code and Trunk<br />
Analysis reports<br />
- user is able to view all reports but authorization code group and does not have access to<br />
password setup screen.<br />
Initially passwords are set during the installation, howe<strong>ver</strong> they can be changed later<br />
using the password screen.<br />
1. Open <strong>Tapit</strong> Web Reports application with your administrator password.<br />
2. The Main Menu screen appears.<br />
3. Click on Passwords.<br />
4. The Password screen is displayed.<br />
<strong>Tapit</strong> WEB REPORTS • 135
5. To <strong>ver</strong>ify your privileges enter your password in the Enter your current<br />
password text box.<br />
Password screen is divided into Administrator Password and User Password<br />
sections.<br />
Each section has the New password and Confirm new password text boxes.<br />
Enter the new password in the New password field and confirm it by reentering<br />
the same password in Confirm new password box.<br />
6. Click on Save.<br />
You will obtain a confirmation message on your screen.<br />
If you receive the following message: ”The administrator password has not been<br />
changed. This problem may be related to your <strong>Tapit</strong> Web Reports virtual web folder<br />
security settings. Please refer to the readme.doc file or the <strong>Tapit</strong> manual for further<br />
instructions. Follow instructions from section “Changing IIS permissions” on page 7.<br />
136 • WEB REPORTS <strong>Tapit</strong>
PERMISSIONS<br />
IMPORTANT NOTE:<br />
Once permissions are created, the <strong>Tapit</strong> Web Reports login process<br />
changes.<br />
Only users with permissions are able to access <strong>Tapit</strong> Web Reports.<br />
If a Full Control password or user id is lost, an administrator can use the generic password (old<br />
Administrator Password) to open <strong>Tapit</strong> Web Reports with full control. The generic password needs<br />
to be entered in both Login User Id and Password fields on the login screen.<br />
The generic administrator password should be available only to <strong>Tapit</strong> Web<br />
Reports administrator/s. If users other than administrator/s know it, the<br />
Administrator Password should be changed using the Passwords option<br />
from the Main Menu before permissions are set up.<br />
The Passwords option is not available once permissions are set up.<br />
BEFORE SETTING UP PERMISSIONS: <strong>Tapit</strong> <strong>EX</strong> must be installed and set up.<br />
Remote Manager, if you have purchased this option, must be installed<br />
and set up. Each remote site and the main location must have at least one<br />
department assigned to it.<br />
1. Open <strong>Tapit</strong> Web Reports.<br />
Login screen appears.<br />
2. If no permissions have yet been created, login screen has only one entry field - Password.<br />
Enter your administrative password.<br />
If permissions have already been set up, login screen displays two entry fields – Login User<br />
Id and Password.<br />
Enter your Full Control user id and password.<br />
You must be a <strong>Tapit</strong> Web Reports administrator to access Permissions.<br />
3. The main menu screen appears.<br />
If no permissions have yet been created, this screen displays the following options: View<br />
Reports, Passwords, and Set up Permissions.<br />
If permissions have already been set up, this screen displays the following options: View<br />
Reports, Permissions.<br />
<strong>Tapit</strong> WEB REPORTS • 137
Setting up Permissions for the first time.<br />
1. Click on Set Up Permissions.<br />
User List screen appears.<br />
2. This screen displays instructions, since there have been no users set up yet.<br />
3. Click on the Add User button.<br />
The User Profile screen appears.<br />
4. Enter the following user information:<br />
Login User Id - enter the user id that is going to be used to log in to the <strong>Tapit</strong> Web<br />
Reports. It can be up to 8 char long. The entry must be a unique value and must be<br />
different from the generic password (old Administrator password). If a duplicate user id<br />
is entered, the record is not saved and the page is returned to the browser for correction.<br />
This field is required.<br />
Password - enter the password that is going to be used to log in to the <strong>Tapit</strong> Web<br />
Reports. It can be up to 8 char long. This field is required.<br />
Confirm Password – renter your password here. This field is required.<br />
Full Name - enter a name identifying a user. This name appears on the User List screen.<br />
It may be a first and a last name, or a name of a user group. This field is required.<br />
Default Location – select a value from a list of available locations.<br />
TAPIT <strong>EX</strong> Multi-User WITHOUT Remote Manager option - only one location is<br />
available - MAIN.<br />
TAPIT <strong>EX</strong> WITH Remote Manager option - all active locations are available. The<br />
selected location be<strong>com</strong>es users default location <strong>Tapit</strong> Web Reports opens for report<br />
viewing after a user logs in.<br />
For example: Location New York is selected as a default location for user John Smith.<br />
John Smith logs in to the <strong>Tapit</strong> Web Reports. The report filter screen opens on New York<br />
location. He can run reports for New York. If he has access to any other locations, he can<br />
switch to any of them using the location list box on the report filter screen.<br />
A user must be allowed access to his default location - a location must be open ( ) and<br />
appropriate permission options within a location must be checked. If no permission boxes<br />
are checked, a location is interpreted as denied.<br />
This field is required.<br />
Description - enter a short description of a user/user group. This field is optional.<br />
5. If all required information has been entered, click on Continue.<br />
138 • WEB REPORTS <strong>Tapit</strong>
6. The Location/Department Security Setup part of the User Profile screen opens<br />
up.<br />
To set the same permissions for each location, use one of the preset permission options<br />
( ) located below user information part of the screen.<br />
To set custom permissions for each location use the location/department tree located in<br />
the left pane of the screen (see using location/department tree section below).<br />
7. When you have finished setting up a user, click on Save.<br />
8. The saved record is displayed in your browser.<br />
If you have entered a duplicate User Id then the new record will not be saved and a page<br />
with notification will appear in your browser.<br />
If you want to set up another user click the Go back to User List button and repeat<br />
steps 2 to 6.<br />
To quit, simply close the browser window.<br />
To go to the main menu, click on the Main Menu button.<br />
<strong>Tapit</strong> WEB REPORTS • 139
Using User List Screen<br />
User List screen is a list of the current <strong>Tapit</strong> Web Report users. It allows you to<br />
add/edit/remove users.<br />
The list can be sorted by clicking on the Full Name, Default Location or Description<br />
headers correspondingly.<br />
To enter the User List screen click on the Permissions option on the Main Menu.<br />
User List screen appears.<br />
To add a new user click on the Add User button. The User Profile screen is displayed.<br />
To edit a user double click on users Full Name. The User Profile screen is displayed.<br />
You can also select this user by checking the Select box for the required record. The record is<br />
highlighted. Click on the Edit User button to bring up the User Profile screen<br />
To remove a user, select a user by checking the Select box for the required record. The<br />
record is highlighted. Click on the Remove User button. Click OK to the confirmation<br />
message. The user is removed from the list.<br />
140 • WEB REPORTS <strong>Tapit</strong>
Using User Profile Screen<br />
User Profile screen allows you to enter users information and set up users permissions.<br />
To open the User Profile screen, depending on what you want to do, use the Edit User<br />
or Add User options from the User List screen.<br />
If you are adding a new user, only users information part of the screen is displayed at<br />
first.<br />
To add a new user, follow instructions from the section above - Setting up<br />
Permissions for the first time.<br />
<strong>Tapit</strong> WEB REPORTS • 141
If your are editing a user, users information part as well as Location/Department<br />
Security Setup are displayed.<br />
Entering users information<br />
Login User Id - enter the user id that is going to be used to log in to the <strong>Tapit</strong> Web Reports. It<br />
can be up to 8 char long and it has to be a unique value. If a duplicate user id is entered, the<br />
record is not saved and the page is returned to the browser for correction. This field is<br />
required.<br />
Password - enter the password that is going to be used to log in to the <strong>Tapit</strong> Web Reports. It<br />
can be up to 8 char long. This field is required.<br />
Confirm Password – renter your password here. This field is required.<br />
Full Name - enter a name identifying a user. This name appears on the User List screen. It<br />
may be a first and a last name, or a name of a user group. This field is required.<br />
Default Location – select a value from a list of available locations.<br />
142 • WEB REPORTS <strong>Tapit</strong>
TAPIT <strong>EX</strong> Multi-User WITHOUT Remote Manager option - only one location is available -<br />
MAIN.<br />
TAPIT <strong>EX</strong> WITH Remote Manager option - all active locations are available. The selected<br />
location be<strong>com</strong>es users default location <strong>Tapit</strong> Web Reports opens for report viewing after a<br />
user logs in.<br />
For example: Location New York is selected as a default location for user John Smith. John<br />
Smith logs in to the <strong>Tapit</strong> Web Reports. The report filter screen opens on New York location.<br />
He can run reports for New York. If he has access to any other locations, he can switch to any<br />
of them using the location list box on the report filter screen.<br />
A user must be allowed access to his default location - a location must be open ( ) and<br />
appropriate permission options within a location must be checked. If no permission boxes are<br />
checked, a location is interpreted as denied.<br />
This field is required.<br />
Description - enter a short description of a user/user group. This field is optional.<br />
Using Location/Department Security Setup<br />
Using preset options<br />
There are four preset options located below the user information part of the screen (they<br />
are not displayed right away when entering a new user). You can set the same<br />
permissions for each location by clicking the icon for the appropriate option. Each option<br />
has a description displayed below it.<br />
Using the location/department tree:<br />
By default the location/department tree displays permission options for all available<br />
departments.<br />
When adding a new user, the top Full Control box is unchecked and access is denied<br />
to all locations.<br />
<strong>Tapit</strong> WEB REPORTS • 143
The highest in the location/department permission hierarchy is a user with full control<br />
rights o<strong>ver</strong> all locations.<br />
To assign full control rights to a user, check theAllow … Full Control box on<br />
the top of the location/department tree. For all other users follow instructions below.<br />
To allow access to a location open a location by clicking on a icon to the<br />
left of its name. Location options are displayed and a changes to a .<br />
Set up permissions for a location by checking appropriate location options.<br />
If a location is open ( ) but has NO permission options checked, it is interpreted as<br />
a denied location.<br />
The permission options for each location include: Allow ... to view<br />
Authorization Code reports, Allow ... to view Trunk Analysis reports,<br />
Allow ... to view reports for All Departments and a list of locations<br />
departments.<br />
Check the Allow to ... view Authorization Code reports box if you want a<br />
user to be able to view this kind of reports for a location. The same applies to the<br />
Allow ... to view Trunk Analysis reports option.<br />
144 • WEB REPORTS <strong>Tapit</strong>
Note: to prevent fraud, Authorization Code reports should not be accessible to<br />
e<strong>ver</strong>yone. Trunk Analysis group reports on call traffic. Such reports are NOT of<br />
interest to e<strong>ver</strong>yone and since they take time and resources to generate, you may<br />
decide to deny access to a<strong>ver</strong>age users.<br />
Note: if a location name has a to the left of it, then this location has no<br />
departments. A location must have at least one department, otherwise no<br />
permissions can be assigned to it and it is not accessible for users.<br />
To let a user view reports for all departments within a location click on the<br />
Allow ... to view reports for All Departments box. Otherwise, check the<br />
appropriate department boxes within a location.<br />
To deny access to a location close it by clicking on icon to the left of it.<br />
The icon changes to .<br />
Note: when you deny access to a location all previously set permissions for this<br />
location are cleared.<br />
Forgot Password?<br />
1. If a user forgets the user id/password then an administrator (user with full control) has to<br />
create a new user id/password for this user.<br />
2. If a full control password or user id is forgotten or lost, an administrator can use the<br />
generic password (old Administrator Password) to open <strong>Tapit</strong> Web Reports with full<br />
control. The generic password needs to be entered in both Login User Id and Password<br />
fields on the Login screen.<br />
Glossary of terms<br />
Login User Id is the user id that is going to be used to log in to the <strong>Tapit</strong> Web Reports. It can<br />
be up to 8 char long and it has to be a unique value. If a duplicate user id is entered, the record<br />
is not saved and the page is returned to the browser for correction. This field is required.<br />
Password is the password that is going to be used to log in to the <strong>Tapit</strong> Web Reports. It can<br />
be up to 8 char long. This field is required.<br />
Confirm Password - renter your password here. This field is required.<br />
Full Name is a name identifying a user. This name appears on the User List screen. It may be<br />
a first and a last name, or a name of a user group. This field is required.<br />
Default Location is a list of available locations.<br />
TAPIT <strong>EX</strong> Multi-User WITHOUT Remote Manager option - only one location is available -<br />
MAIN.<br />
TAPIT <strong>EX</strong> WITH Remote Manager option - all active locations are available. The selected<br />
location be<strong>com</strong>es users default location <strong>Tapit</strong> Web Reports opens for report viewing after a<br />
user logs in.<br />
For example: Location New York is selected as a default location for user John Smith. John<br />
Smith logs in to the <strong>Tapit</strong> Web Reports. The report filter screen opens on New York location.<br />
He can run reports for New York. If he has access to any other locations, he can switch to any<br />
of them using the location list box on the report filter screen.<br />
<strong>Tapit</strong> WEB REPORTS • 145
A user must be allowed access to his default location - a location must be open ( ) and<br />
appropriate permission options within a location must be checked. If no permission boxes are<br />
checked, a location is interpreted as denied.<br />
This field is required.<br />
Description is a short description of a user/user group. This field is optional.<br />
Full Control option gives a user full control o<strong>ver</strong> all locations. A full control user is the <strong>Tapit</strong><br />
Web Reports administrator. Full control user can maintain passwords/permissions for all users<br />
and view all available reports for all available sites. Check the preset Full Control option<br />
or the Full Control box on the top of the location/department tree to assign full control to a<br />
user. If a full control password or user id is lost, an administrator can use the generic password<br />
(which is the administrator password used before permissions were set up) to open <strong>Tapit</strong> Web<br />
Reports with full control. The generic password needs to be entered in both Login User Id and<br />
Password fields on the Login screen.<br />
Allow to ... view Authorization Code reports - check this box if you want a user to be<br />
able to view Authorization Code reports for a location. To prevent fraud, Authorization<br />
Code reports should not be accessible to e<strong>ver</strong>yone.<br />
Allow ... to view Trunk Analysis reports - check this box if you want a user to be able to<br />
view Trunk Analysis reports for a location. These are call traffic reports. Such reports are<br />
NOT of interest to e<strong>ver</strong>yone and since they take time and resources to generate, you may<br />
decide to deny access to a<strong>ver</strong>age users.<br />
Deny All - click on this preset option if you don't want to delete user information and at the<br />
same time you want to prevent this user from entering <strong>Tapit</strong> Web Reports.<br />
= access denied. Click on to open permission options for a location.<br />
= location permission options are opened. Access is allowed to this location provided<br />
appropriate option boxes are checked. Clicking on denies access to a location as well as<br />
clears and hides its permission options.<br />
= unavailable location. Location is unavailable because it does not have any departments<br />
assigned to it. A location must have at least one department to allow access. You can save user<br />
information. After departments for a location are set up in TAPIT <strong>EX</strong>, you can go back to this<br />
record in <strong>Tapit</strong> Web Reports to set up permissions.<br />
TROUBLESHOOTING WEB REPORTS<br />
For troubleshooting information see the <strong>Tapit</strong>WebReports.pdf on <strong>Trisys</strong> Software<br />
CD in <strong>Tapit</strong> Web Reports folder or find it on the Web at<br />
http://www.trisys.<strong>com</strong>/documents/WebRepsDoc/<strong>Tapit</strong>WebReports.pdf<br />
Error Message: “Script Time Out” error occurs when a report is generating longer<br />
than the maximum allowed processing time.<br />
Sometimes the specified time frame contains too much data and the report takes too long<br />
146 • WEB REPORTS <strong>Tapit</strong>
to run.<br />
You can remedy this by going back to the filter screen and trying to run the same report<br />
again for a shorter time period.<br />
<strong>Tapit</strong> WEB REPORTS • 147
Index<br />
B<br />
Before installing your software 2<br />
C<br />
Call Editor 58<br />
Clients 29<br />
Add a new client 29<br />
Edit or delete a client 30<br />
Print Clients List 30<br />
Custom Reports 79<br />
D<br />
Data Maintenance 73<br />
Call Records Maintenance 76<br />
Export 74<br />
Export to Billing Software 77<br />
Import 75<br />
Import <strong>Tapit</strong> DOS Data 77<br />
Import V&H Data 78<br />
Database Repair Utility 90<br />
Departments 24<br />
Add a new department 25<br />
Edit or delete a department 25<br />
Print departments list 26<br />
Dialing patterns 69<br />
Add a dialing pattern 70<br />
Delete a dialing pattern 70<br />
Edit a dialing pattern 70<br />
DOS Data 77<br />
F<br />
Filter - reports 32<br />
Fraud Alert 83<br />
Delete Log File 85<br />
Dialed numbers 88<br />
Extensions 87<br />
Parameters 83<br />
G<br />
Test Alarms 85<br />
Trunks 86<br />
Getting Started 2<br />
H<br />
Hierarchy Tree 27<br />
I<br />
Installing <strong>Tapit</strong> Multi-User 8<br />
Installing <strong>Tapit</strong> Single User 4<br />
Introduction 1<br />
M<br />
Main Menu 21<br />
Monitor 92<br />
Action 93<br />
PBX 94<br />
Settings 93<br />
Moving TAPIT <strong>EX</strong> to another <strong>com</strong>puter<br />
12<br />
O<br />
O<strong>ver</strong>view 22<br />
P<br />
Pricing<br />
Add new pricing record 63<br />
Delete pricing record 63<br />
Find a specific record 63<br />
Pricing Call Records 60<br />
R<br />
Recosting 66<br />
Using Custom option 67<br />
Using <strong>Tapit</strong> Carrier option 68<br />
Using V&H Carrier option 68<br />
Reindexing 65<br />
Reinstalling TAPIT <strong>EX</strong> 12<br />
Report Designer 79<br />
148 • Index <strong>Tapit</strong>
Custom Reports<br />
Creating reports from templates 82<br />
Detail report 79<br />
Editing custom reports 82<br />
Summary report 81<br />
Report Scheduler 71<br />
Add a new report 71<br />
Delete a report record 72<br />
Edit a report record 72<br />
Reports 31<br />
Filter options 32<br />
Web Reports 112<br />
S<br />
Setting up TAPIT Single User 5<br />
SMDR Alarm 103<br />
Installation 104<br />
Requirements 103<br />
User Instructions 105<br />
SMDR Monitor 92<br />
Software License Agreement 96<br />
Statistics 45<br />
Graphs 45<br />
For Date and Time 46<br />
For Date and Time - Detail 46<br />
For top 10 values 45<br />
System Maintenance 47<br />
System Parameters 7, 48<br />
Activity 53<br />
Call Costing 51<br />
Communications 49<br />
Destination 55<br />
Trunks 54<br />
System Requirements 1<br />
Upgrading TAPIT for DOS to TAPIT<br />
<strong>EX</strong> 18<br />
Upgrading TAPIT for Windows 14<br />
Users 22<br />
Add a new user 23<br />
Edit or delete a user 24<br />
Print Hierarchy Tree 27<br />
Printing users list 24<br />
V<br />
V&H Data - Import 78<br />
W<br />
Web Reports<br />
User Instructions<br />
Creating/Printing Reports 123, 125<br />
Drill Down Reports 129<br />
Graph Reports 129<br />
Trunk Analysis Reports 130<br />
Web Reports 112<br />
Installation 113<br />
Permissions 137<br />
Requirements 112<br />
Troubleshooting 146<br />
Upgrading TAPIT Web Reports 122<br />
User Instructions 123<br />
T<br />
Technical Support 99<br />
Troubleshooting 99<br />
U<br />
Upgrading TAPIT 2000 to TAPIT <strong>EX</strong> 12<br />
Upgrading TAPIT <strong>EX</strong> – different serial<br />
number 11<br />
Upgrading TAPIT <strong>EX</strong> to TAPIT <strong>EX</strong> 12<br />
<strong>Tapit</strong> Index • 149