Eurotubi Pressfitting System - Technical Guide ... - Damstahl
Eurotubi Pressfitting System - Technical Guide ... - Damstahl
Eurotubi Pressfitting System - Technical Guide ... - Damstahl

Create successful ePaper yourself
Turn your PDF publications into a flip-book with our unique Google optimized e-Paper software.
The withdrawal of pipes must be done individually and not through dragging to avoid any scratching.<br />
You must avoid launching the joints and heavy overlays, which may cause damage to threads and<br />
deformations, decreasing their seal capacity.<br />
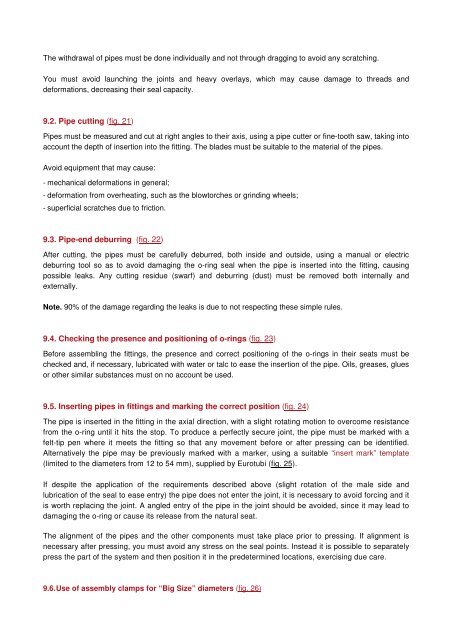
9.2. Pipe cutting (fig. 21)<br />
Pipes must be measured and cut at right angles to their axis, using a pipe cutter or fine-tooth saw, taking into<br />
account the depth of insertion into the fitting. The blades must be suitable to the material of the pipes.<br />
Avoid equipment that may cause:<br />
- mechanical deformations in general;<br />
- deformation from overheating, such as the blowtorches or grinding wheels;<br />
- superficial scratches due to friction.<br />
9.3. Pipe-end deburring (fig. 22)<br />
After cutting, the pipes must be carefully deburred, both inside and outside, using a manual or electric<br />
deburring tool so as to avoid damaging the o-ring seal when the pipe is inserted into the fitting, causing<br />
possible leaks. Any cutting residue (swarf) and deburring (dust) must be removed both internally and<br />
externally.<br />
Note. 90% of the damage regarding the leaks is due to not respecting these simple rules.<br />
9.4. Checking the presence and positioning of o-rings (fig. 23)<br />
Before assembling the fittings, the presence and correct positioning of the o-rings in their seats must be<br />
checked and, if necessary, lubricated with water or talc to ease the insertion of the pipe. Oils, greases, glues<br />
or other similar substances must on no account be used.<br />
9.5. Inserting pipes in fittings and marking the correct position (fig. 24)<br />
The pipe is inserted in the fitting in the axial direction, with a slight rotating motion to overcome resistance<br />
from the o-ring until it hits the stop. To produce a perfectly secure joint, the pipe must be marked with a<br />
felt-tip pen where it meets the fitting so that any movement before or after pressing can be identified.<br />
Alternatively the pipe may be previously marked with a marker, using a suitable “insert mark” template<br />
(limited to the diameters from 12 to 54 mm), supplied by <strong>Eurotubi</strong> (fig. 25).<br />
If despite the application of the requirements described above (slight rotation of the male side and<br />
lubrication of the seal to ease entry) the pipe does not enter the joint, it is necessary to avoid forcing and it<br />
is worth replacing the joint. A angled entry of the pipe in the joint should be avoided, since it may lead to<br />
damaging the o-ring or cause its release from the natural seat.<br />
The alignment of the pipes and the other components must take place prior to pressing. If alignment is<br />
necessary after pressing, you must avoid any stress on the seal points. Instead it is possible to separately<br />
press the part of the system and then position it in the predetermined locations, exercising due care.<br />
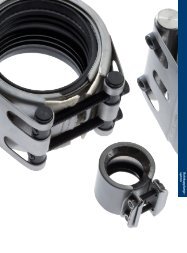
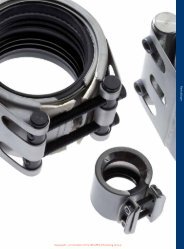
9.6. Use of assembly clamps for “Big Size” diameters (fig. 26)