S3.15 Strength System Base Owner's Manual - Precor
S3.15 Strength System Base Owner's Manual - Precor
S3.15 Strength System Base Owner's Manual - Precor

You also want an ePaper? Increase the reach of your titles
YUMPU automatically turns print PDFs into web optimized ePapers that Google loves.
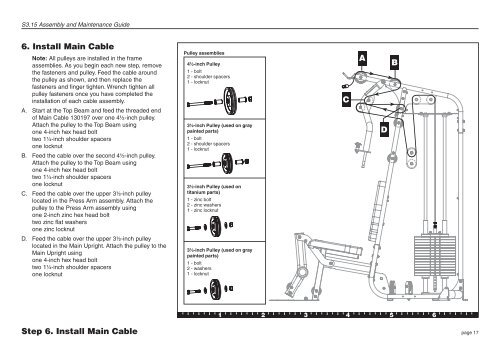
<strong>S3.15</strong> Assembly and Maintenance Guide6. Install Main CableNote: All pulleys are installed in the frameassemblies. As you begin each new step, removethe fasteners and pulley. Feed the cable aroundthe pulley as shown, and then replace thefasteners and finger tighten. Wrench tighten allpulley fasteners once you have completed theinstallation of each cable assembly.A. Start at the Top Beam and feed the threaded endof Main Cable 130197 over one 4½-inch pulley.Attach the pulley to the Top Beam usingone 4-inch hex head bolttwo 1¹⁄₄-inch shoulder spacersone locknutB. Feed the cable over the second 4½-inch pulley.Attach the pulley to the Top Beam usingone 4-inch hex head bolttwo 1¹⁄₄-inch shoulder spacersone locknutC. Feed the cable over the upper 3½-inch pulleylocated in the Press Arm assembly. Attach thepulley to the Press Arm assembly usingone 2-inch zinc hex head bolttwo zinc flat washersone zinc locknutD. Feed the cable over the upper 3½-inch pulleylocated in the Main Upright. Attach the pulley to theMain Upright usingone 4-inch hex head bolttwo 1¹⁄₄-inch shoulder spacersone locknutPulley assemblies4½-inch Pulley1 - bolt2 - shoulder spacers1 - locknutCAB3½-inch Pulley (used on graypainted parts)1 - bolt2 - shoulder spacers1 - locknut3½-inch Pulley (used ontitanium parts)1 - zinc bolt2 - zinc washers1 - zinc locknutD3½-inch Pulley (used on graypainted parts)1 - bolt2 - washers1 - locknut1 2 3 4 5 6Step 6. Install Main Cablepage 17